
Geothermal heating is a pretty cool technology. It saves a lot of money in heating and is much more efficient than fuel oil or propane. There are many web sites explaining the technology so I will not spend too much time with that. Basically a geothermal heat pump is a large refrigerator that moves heat from one spot (the ground) and puts it into your house. In cooling mode, it takes heat out of the house and puts in into the ground. Its very simple and the technology is not new. Heat pumps just move heat around and do not create heat like a gas furnace does so they are pretty efficient (around 400% or so). A typical gas furnace is 95% and a fuel oil furnace is around 85% or so. Heat pumps look exactly like a normal furnace except they have some plumbing connected to it. I basically pulled my old fuel oil furnace out and the heat pump just slid right in the same spot. I used the same duct work minus a small adapter I made. My heat pump is a open loop system. Open loops will pump water out of a well and then you dump the water back into another well or run it to the ditch like I did. My county did not like the idea of me pumping water back into a deep well and really preferred that I run it to the ditch. It did not matter to me either way as the water just ends up in the great lakes in the end anyways.
I get asked if its legal to install your own HVAC system. This depends on where you live so calling your county inspector will quickly answer that. I live in Michigan and as long as the install passes inspection, they do not care who installs it. -Great! The only downside is it could void the warranty on your heat pump if its not installed professionally. Not all brands are like this so just read up on them.
I did a geothermal self install in my own home over a span of a 2 months in 2011. I worked on it during the weekends in late summer while I worked my day job during the week. I will warn you this was a huge project and I spent a month reading up on HVAC rules and electrical code before I decided to dive into this project. Basic skills needed that I will not spend too much time to explain are plumbing and home electrical. I’ll explain in detail everything else I did to install and pass state inspection. Calculating the savings was also a big deal. I knew what I spent each winter with my existing fuel oil furnace and I ran the numbers on a bunch of theoretical calculations on what the geothermal bills would be. I wanted to know if the geothermal would be worth it and it scared me to death not knowing if this thing would really work.
I had a few big problems to deal with before I bought any equipment so I’ll break the write up into two parts.
Problem #1: I only had 100Amp service in my 1969 house. My inspector could not believe what I was running with my existing setup (full electric house with large pole barn lol…) and he said I had to upgrade my electrical service for the added geothermal. I called Detroit Edison and told them what I was doing. They sent out a planning engineer to take a look at my house. She left me a detailed list of what I needed and how much it would cost to upgrade since my existing electrical service was inadequate for geothermal. The killer on the electrical service with geothermal is the emergency backup heat. Michigan requires a 2nd form of backup heat for a geothermal install which for me was a huge 9000 Watt (50 amp) electric heater built into the heat pump. My old 100 Amp service was not going to cut it so I upgraded to 400 Amp service (dual 200 Amp meters) which is the maximum residential electrical hookup in my area. One 200 amp meter for the house and pole barn and the other 200 amp meter for the geothermal special half rate. Its way overkill but I don’t want to do this again.
First I had to buy two permits for this project. Yeah they got me on two! One electrical permit for $100 and a mechanical permit for $125. Each one of these comes with its own inspection and final approval. I am not one to normally get permits but I felt I probably should follow the rules this time since I am spending $1000’s of dollars on this project. My inspectors actually were very helpful and gave me sound advice when I asked for it. They knew I was not a professional so they really looked around at my install. In the end they both told me it was a good clean install. -Cool!
Detroit Edison ended up installing a new utility pole with transformer and I had to install a new dual meter box on the house. I paid $500 for them to run my power underground. It was well worth it to get rid of the overhead power lines. Installation was easy as the box just bolts to the house and I had to run conduit down the side of the house and inside. Drilling the hole though the house was interesting as I had to use a large hole saw.
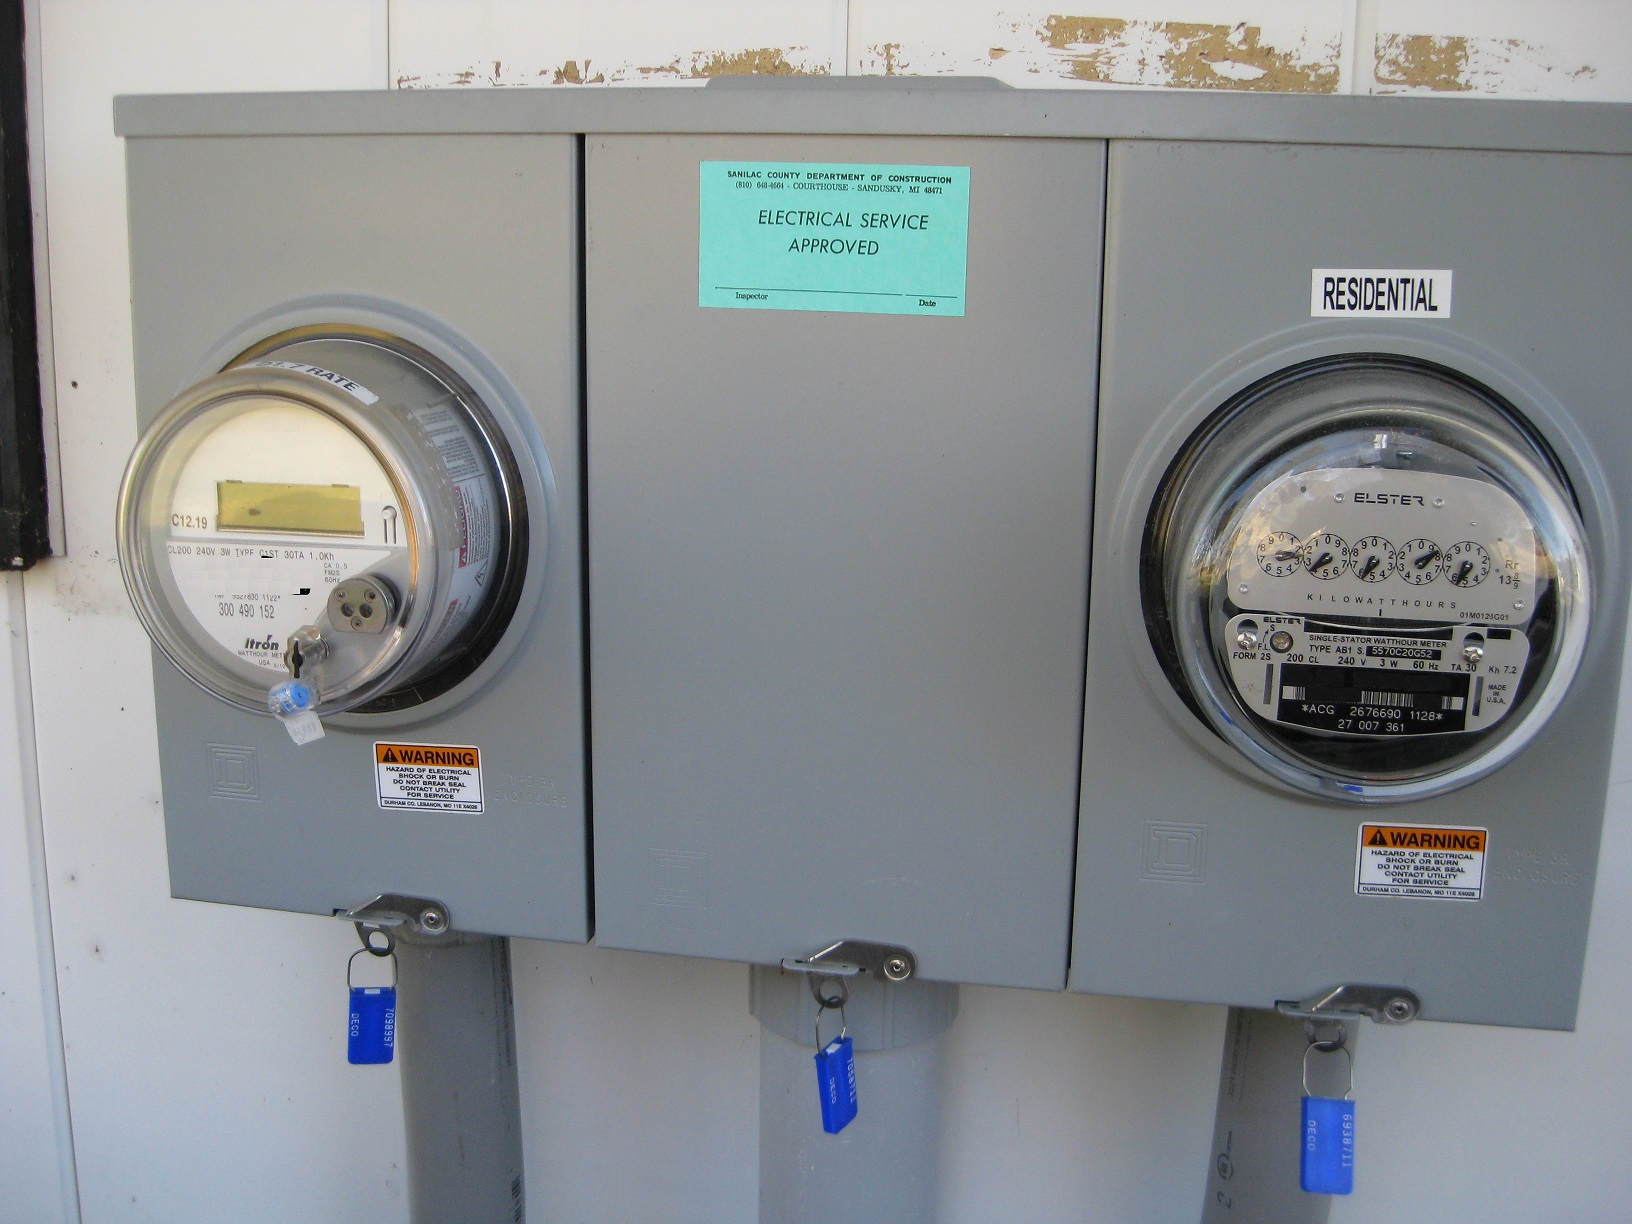
Above shows the new power meters. Once inspection is passed, Edison will come out and install the glass meters. The one on the right is for the house, and the left one is for hot water and the heat pump. The meter box alone was $300.
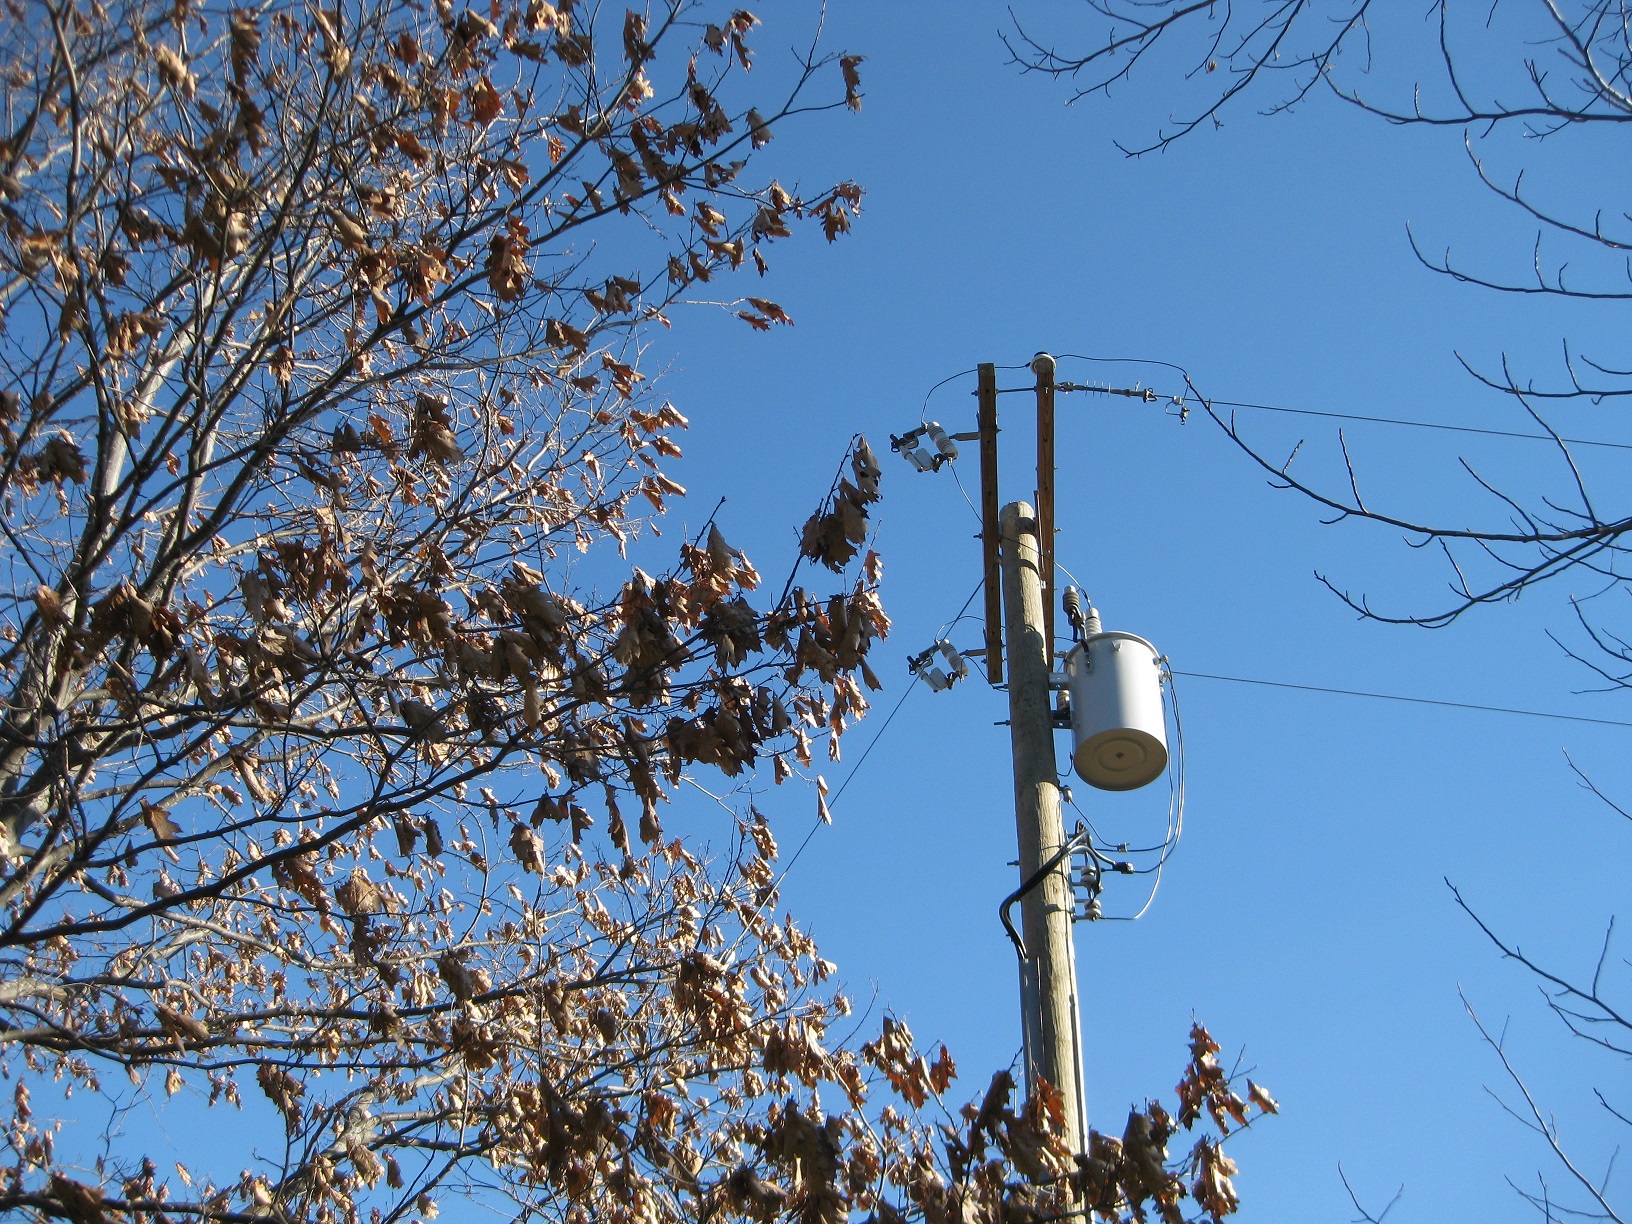
The new pole and transformer are shown above with the underground cable running down the pole. Pretty normal looking.
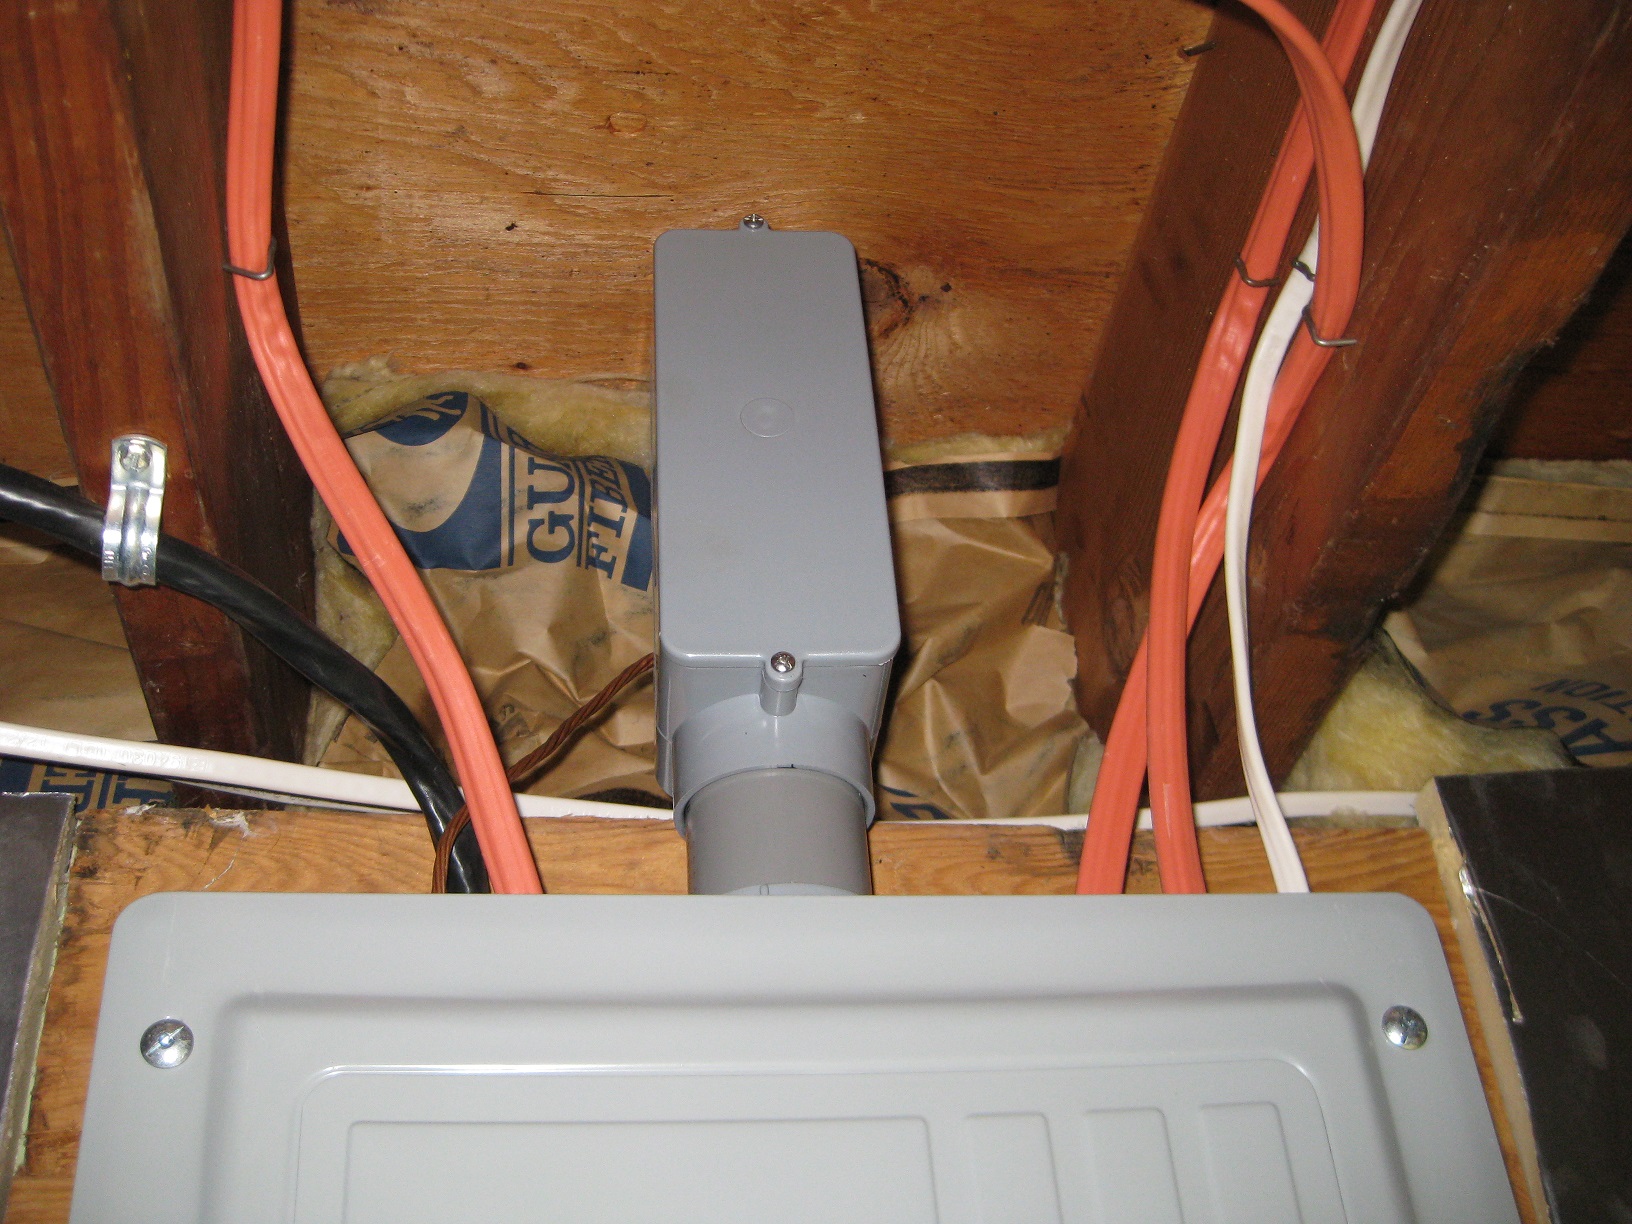
Inside I mounted a brand new breaker box and ran the outside conduit to the new box (see above).
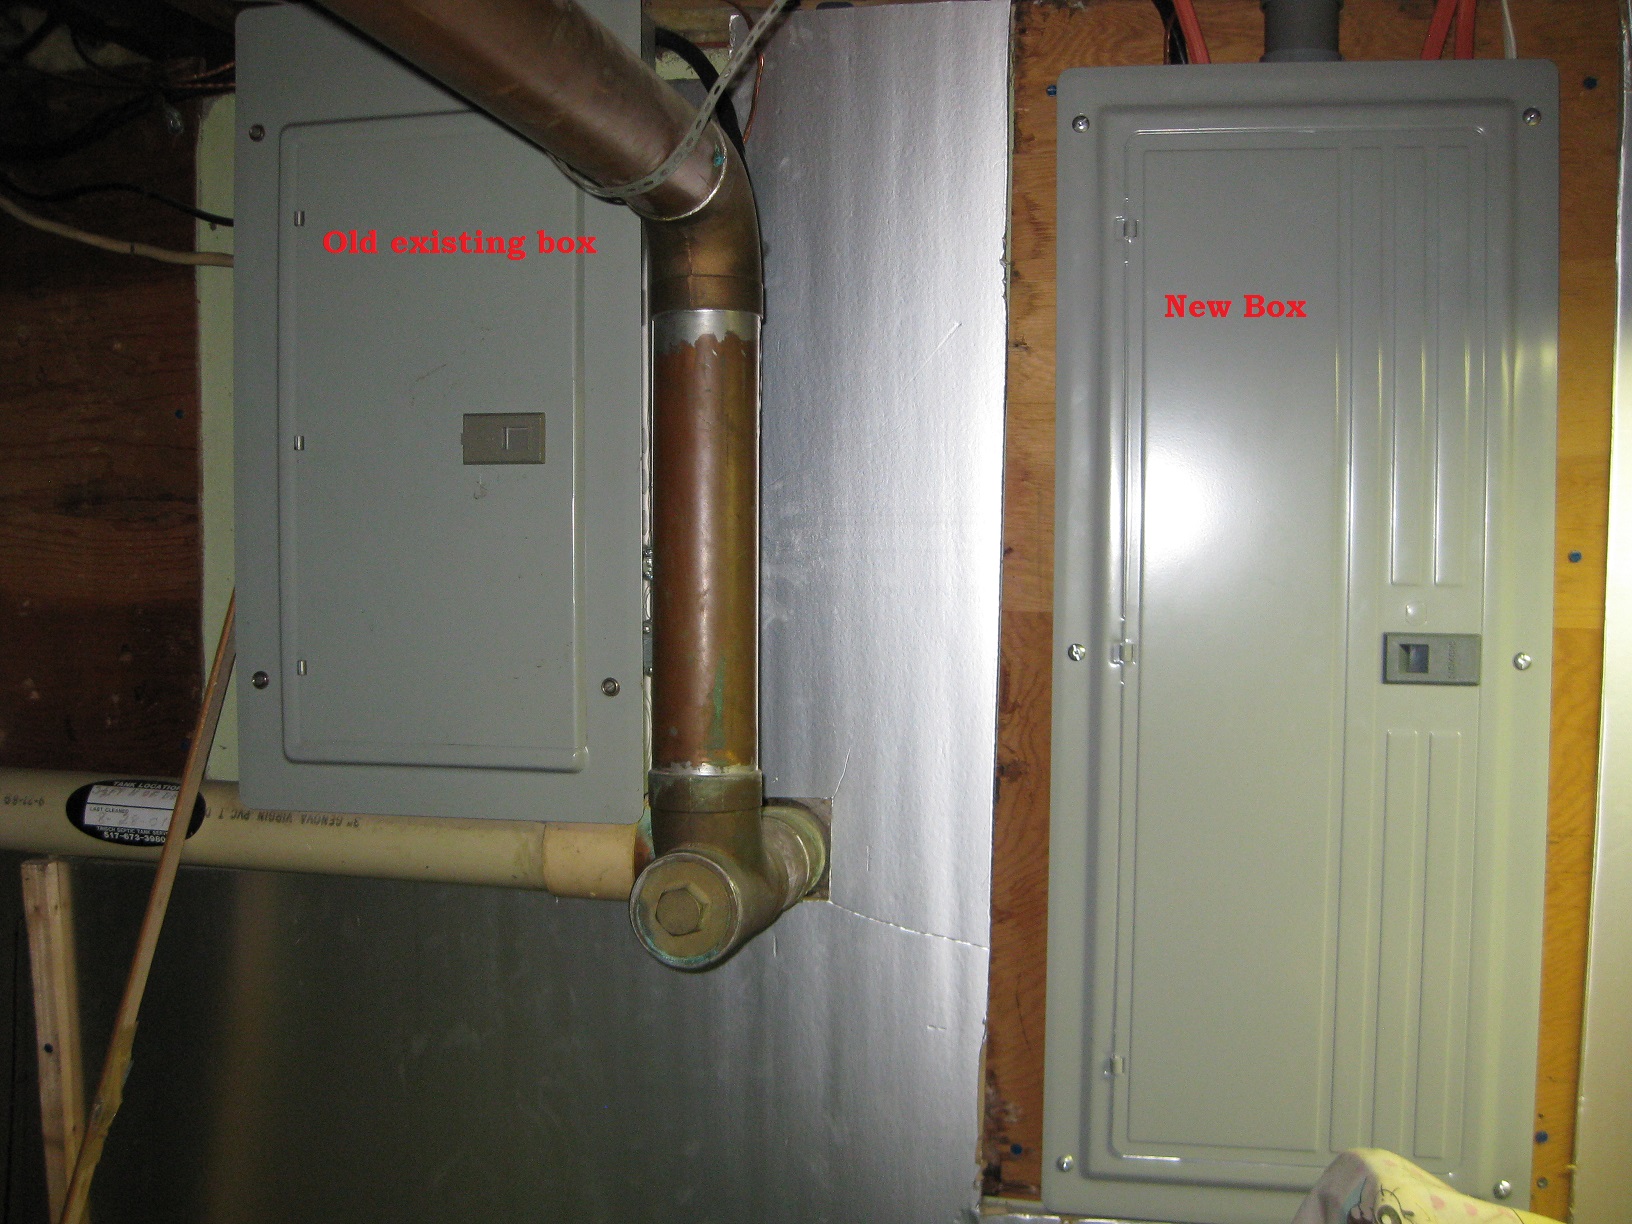
I installed the new breaker box right next to my existing house box. It’s much larger but its pretty empty inside. The large box was the same cost as a small one so I just got the bigger one.
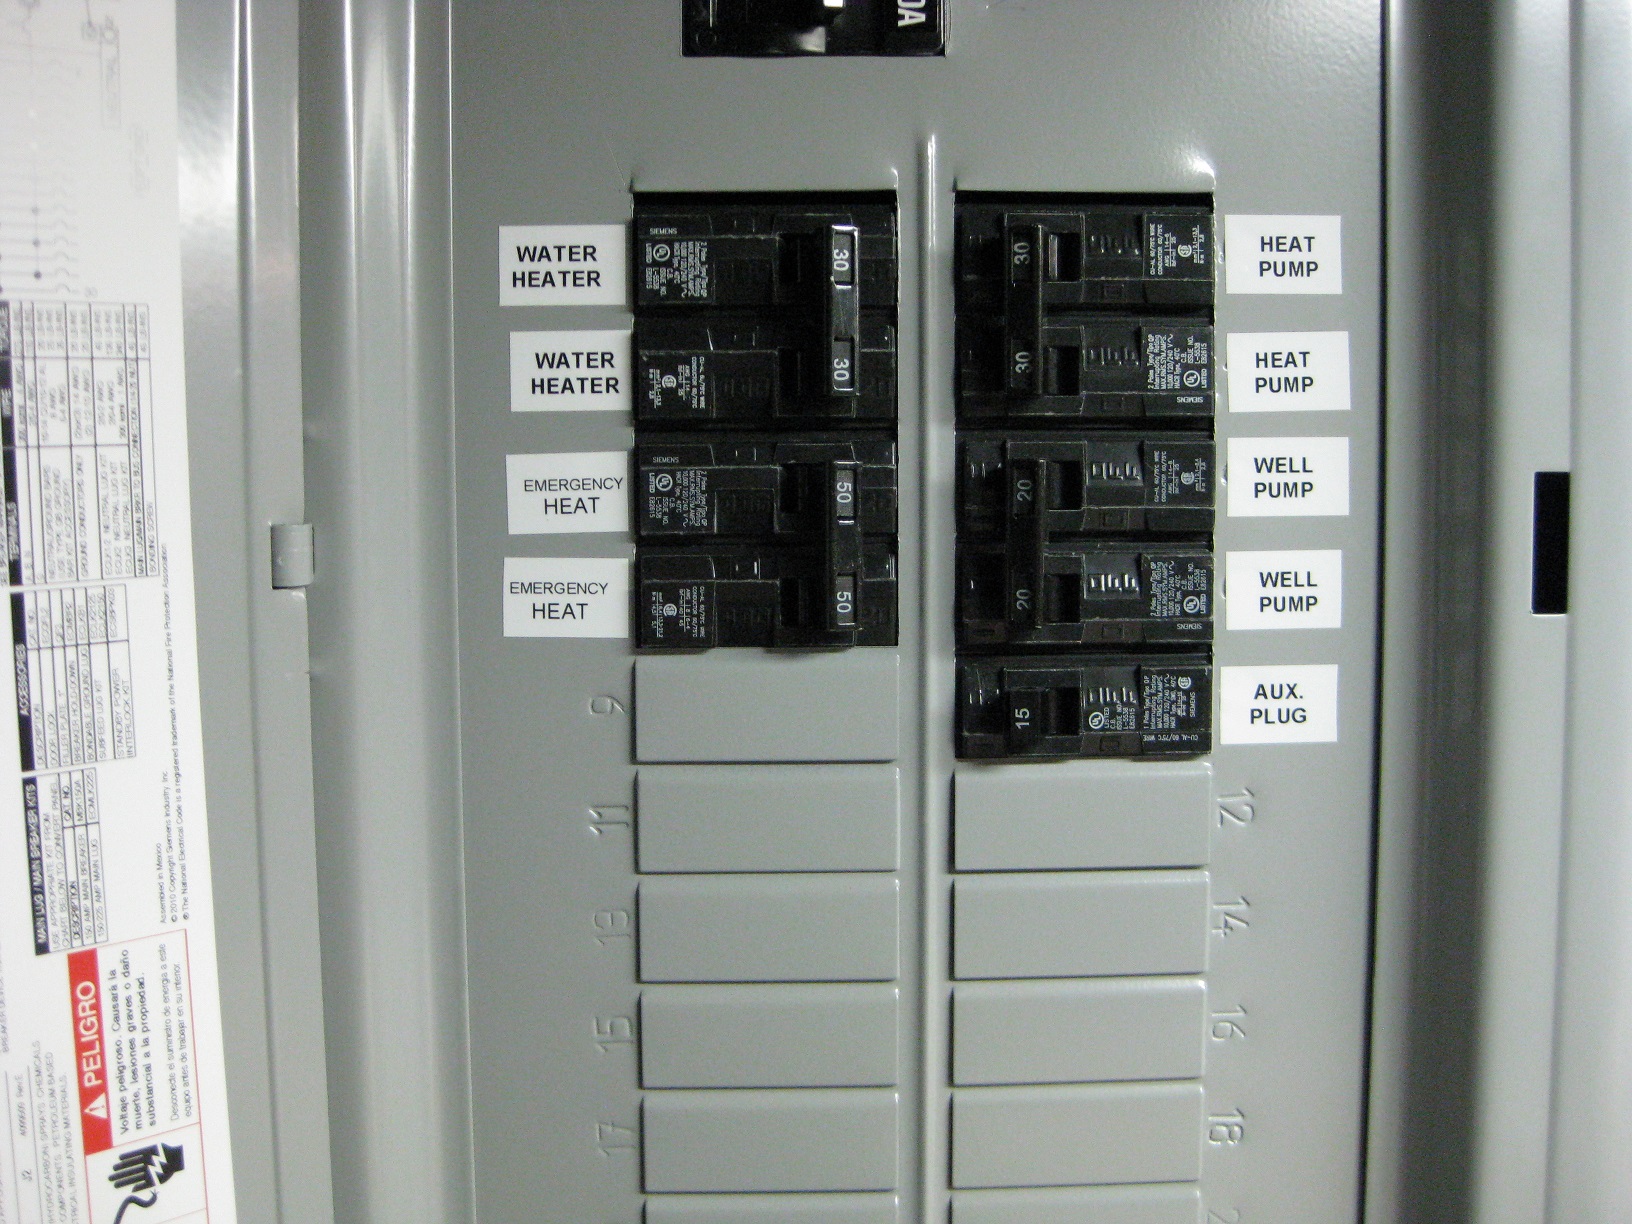
Detroit Edison lets me run the Water Heater, Heat Pump, Well Pump, Aux plug (runs the humidifier), and the Emergency Heat all the the cheap 1/2 rate. Pretty nice! The well pump is only allowed if you use the well for the water source then its considered part of the heat pump system. A closed loop system will not be allowed to put the well pump on the cheap rate.
Problem #2: I had no idea what size of a heat pump to buy. To small = cold house in winter, and too big = high cycle time and poor cooling in summer. I had to make sure I was buying the proper sized heat pump. I did a bunch of calculations on the BTU loss for the house called “Manual J” and I looked at the past 2 years of heating bills. Its not too hard to estimate what you need to heat and cool your house.
I downloaded a program from University of California called “HEED”
http://www.energy-design-tools.aud.ucla.edu/
Its a pretty clunky piece of software but it actually works pretty well and best of all is free. The first thing I did was downloaded the weather info for Saginaw, Michigan which is easily done inside the program. It will use the weather history for the area to help calculate heat loss on your house.

Once the weather info is installed, you need to spend some good time measuring your house. HEED will ask you to sketch up your home with windows, doors, roof, wall insulation, ceiling insulation, etc. This is SUPER important to enter the data correctly. I went into my attic to measure insulation, measured all my windows, measured wall thickness, looked for drafts, ect. I spent a whole Saturday gathering all the data for my house.

This is my house drawn in HEED. Its important to even add the trees, garage, overhangs and all. Looks pretty nice!
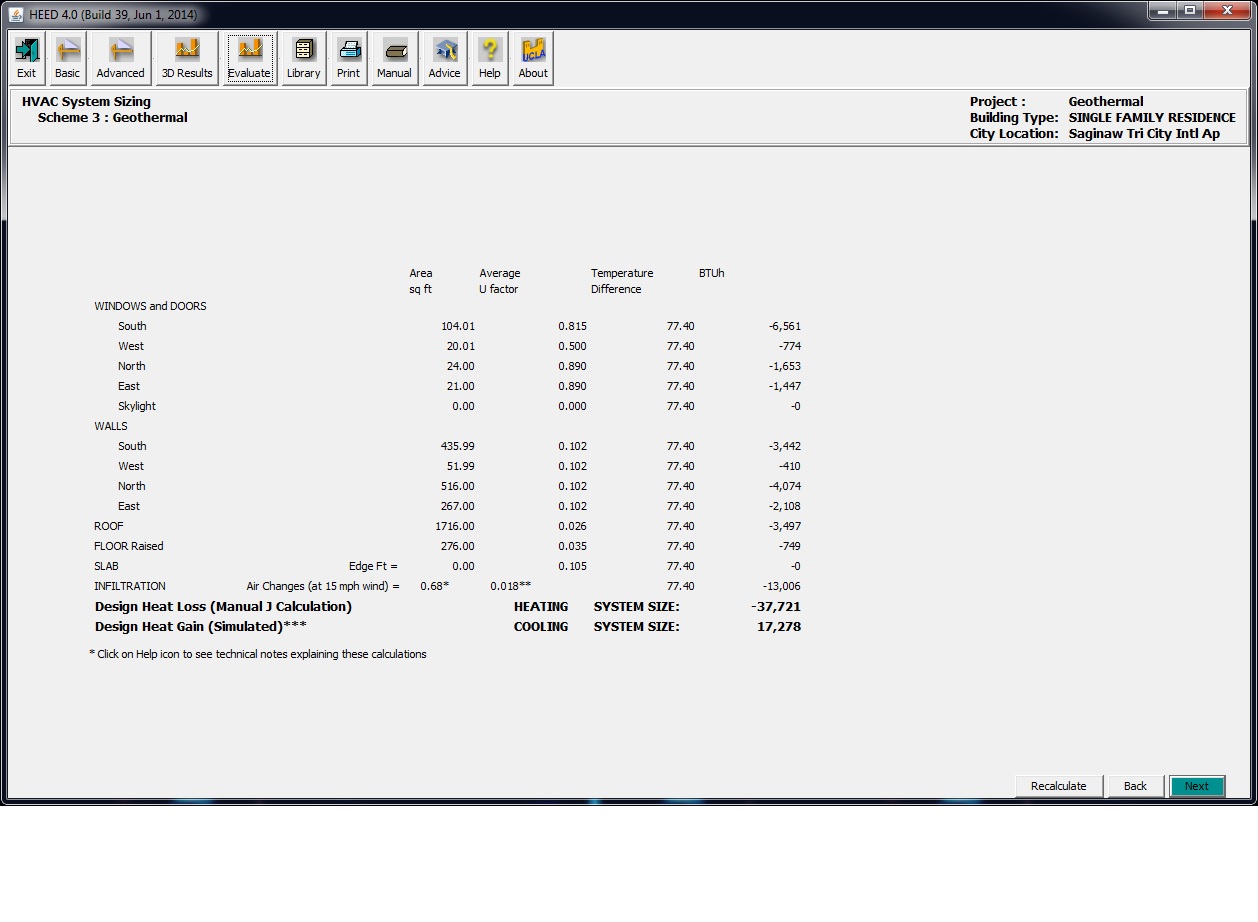
Press the results button and look at the HVAC System Sizing. It will calculate the COLDEST day which is -37,721 BTU/hr loss for my house. That is for a 77.4 degree difference (70 inside and -7.4 outside) . Cooling ended up being 17,278 BTU/Hr gained. I was not sure about the results so I also did some sanity checks based on my past usage of fuel oil. I know how much oil I burn a year and how many BTU’s each gallon of Fuel oil will make with a 85% efficient furnace. It worked out pretty close and I got -20,000 BTU/hr average based on my past bills. So far the number makes sense as -37,721 is a abnormally cold day which is only a few days a year. The rest of the days are much warmer at 20 degrees. I want a heat pump that can cover me when its -7 degrees outside.
I ended up buying a Bard GV38 which is a 38,500 BTU/hr 2 stage heat pump. Stage one is 25,800 BTU/hr heating and stage two is 37,000 BTU/hr heating. The emergency heat (Stage 3) is an additional 30,000 BTU/hr if I need it. Cooling is 41,000 and 29,400 BTU/hr which is way more than I need.
Installing the heat pump was not much different that a normal furnace. The added steps include some plumbing which is pretty easy. My heat pump was almost the same size as my fuel oil furnace which made things very easy for me.
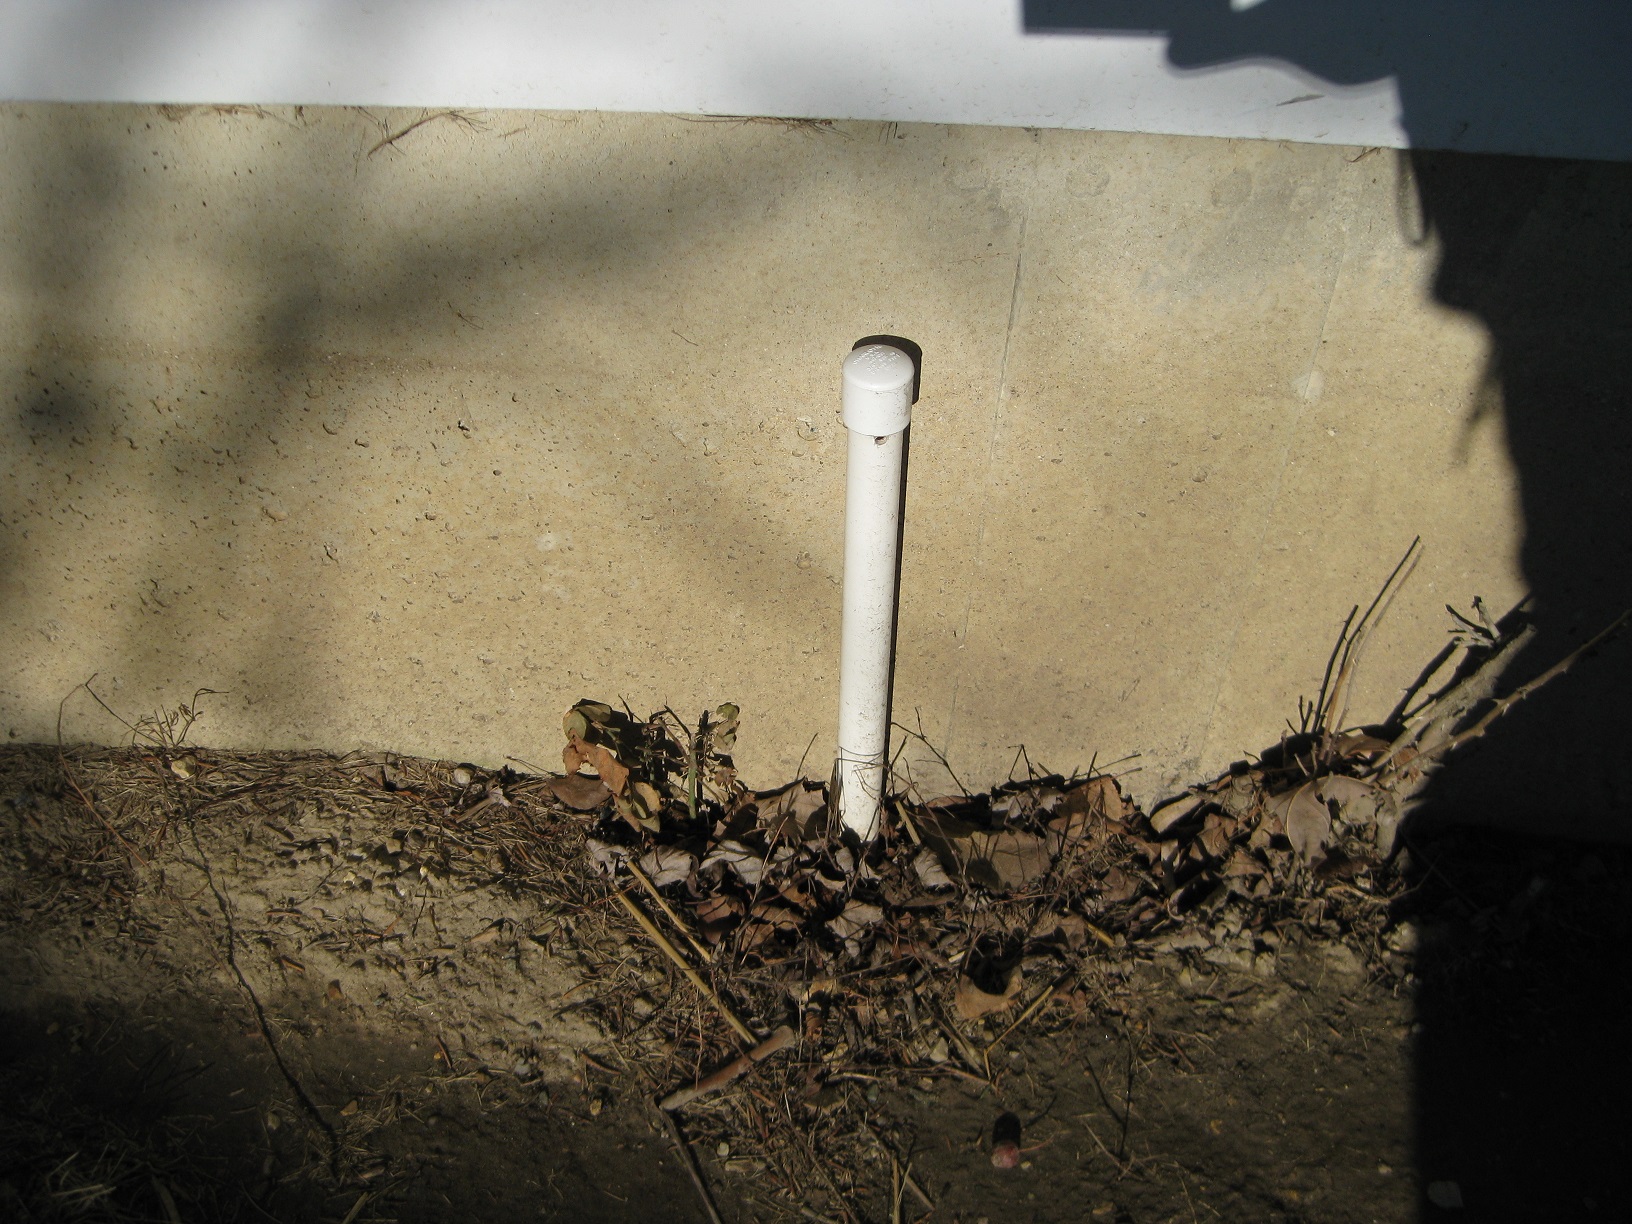
The first thing I did was rent a trencher for a day and I buried a tile from my house to the ditch. This is where the waste water will dump to.
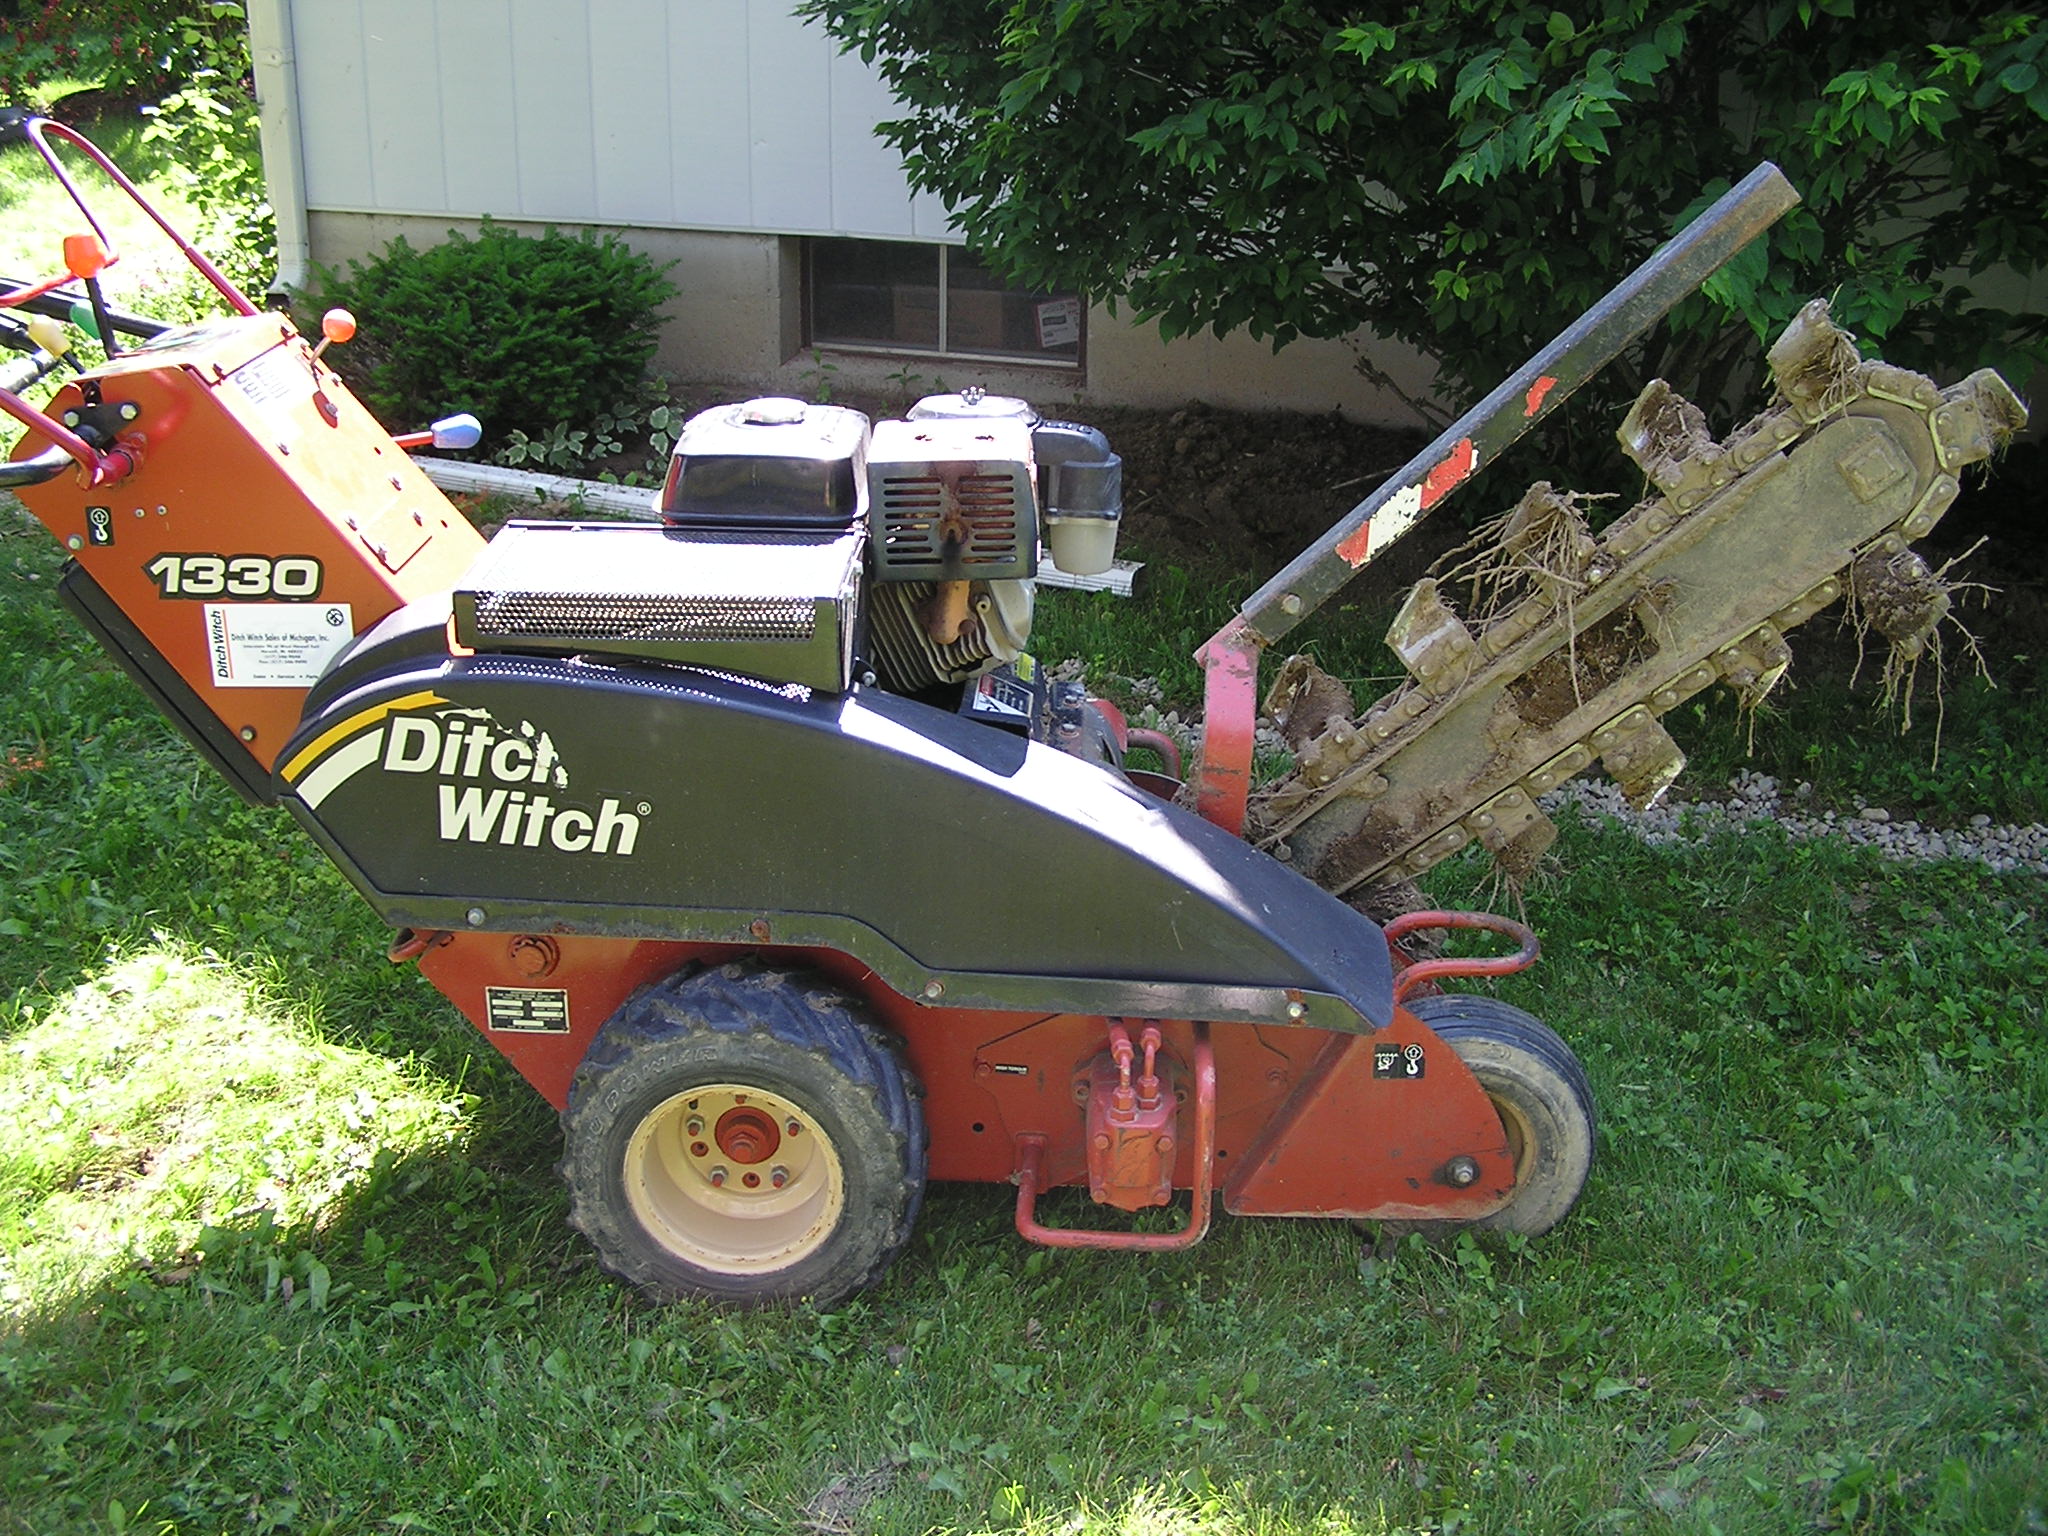
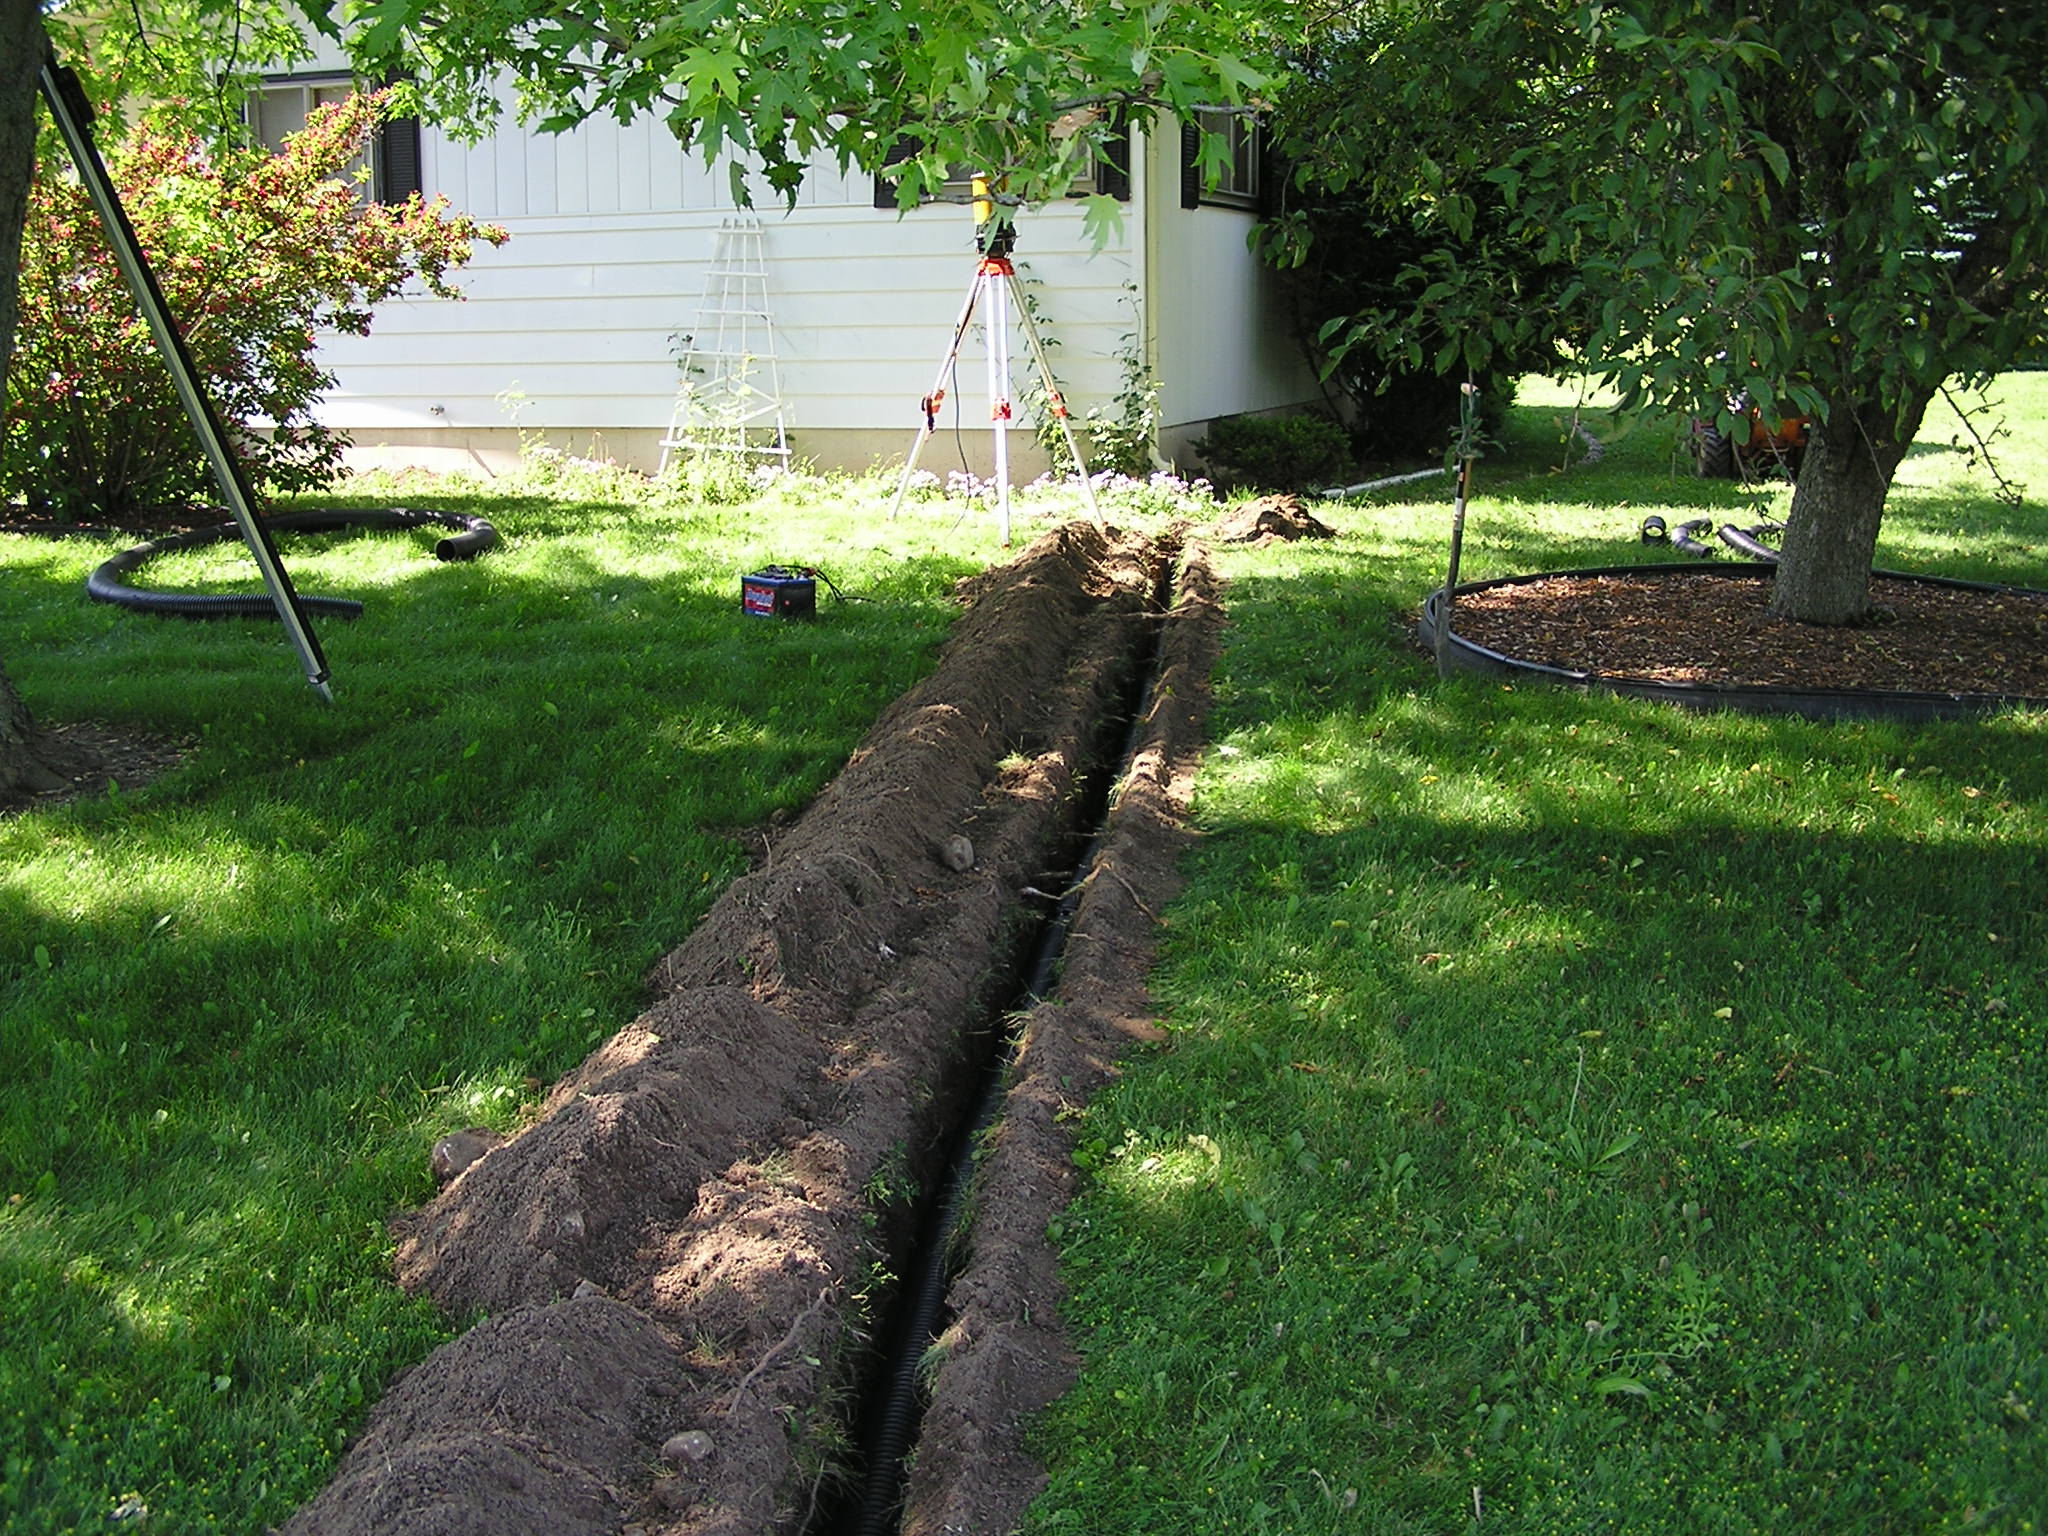
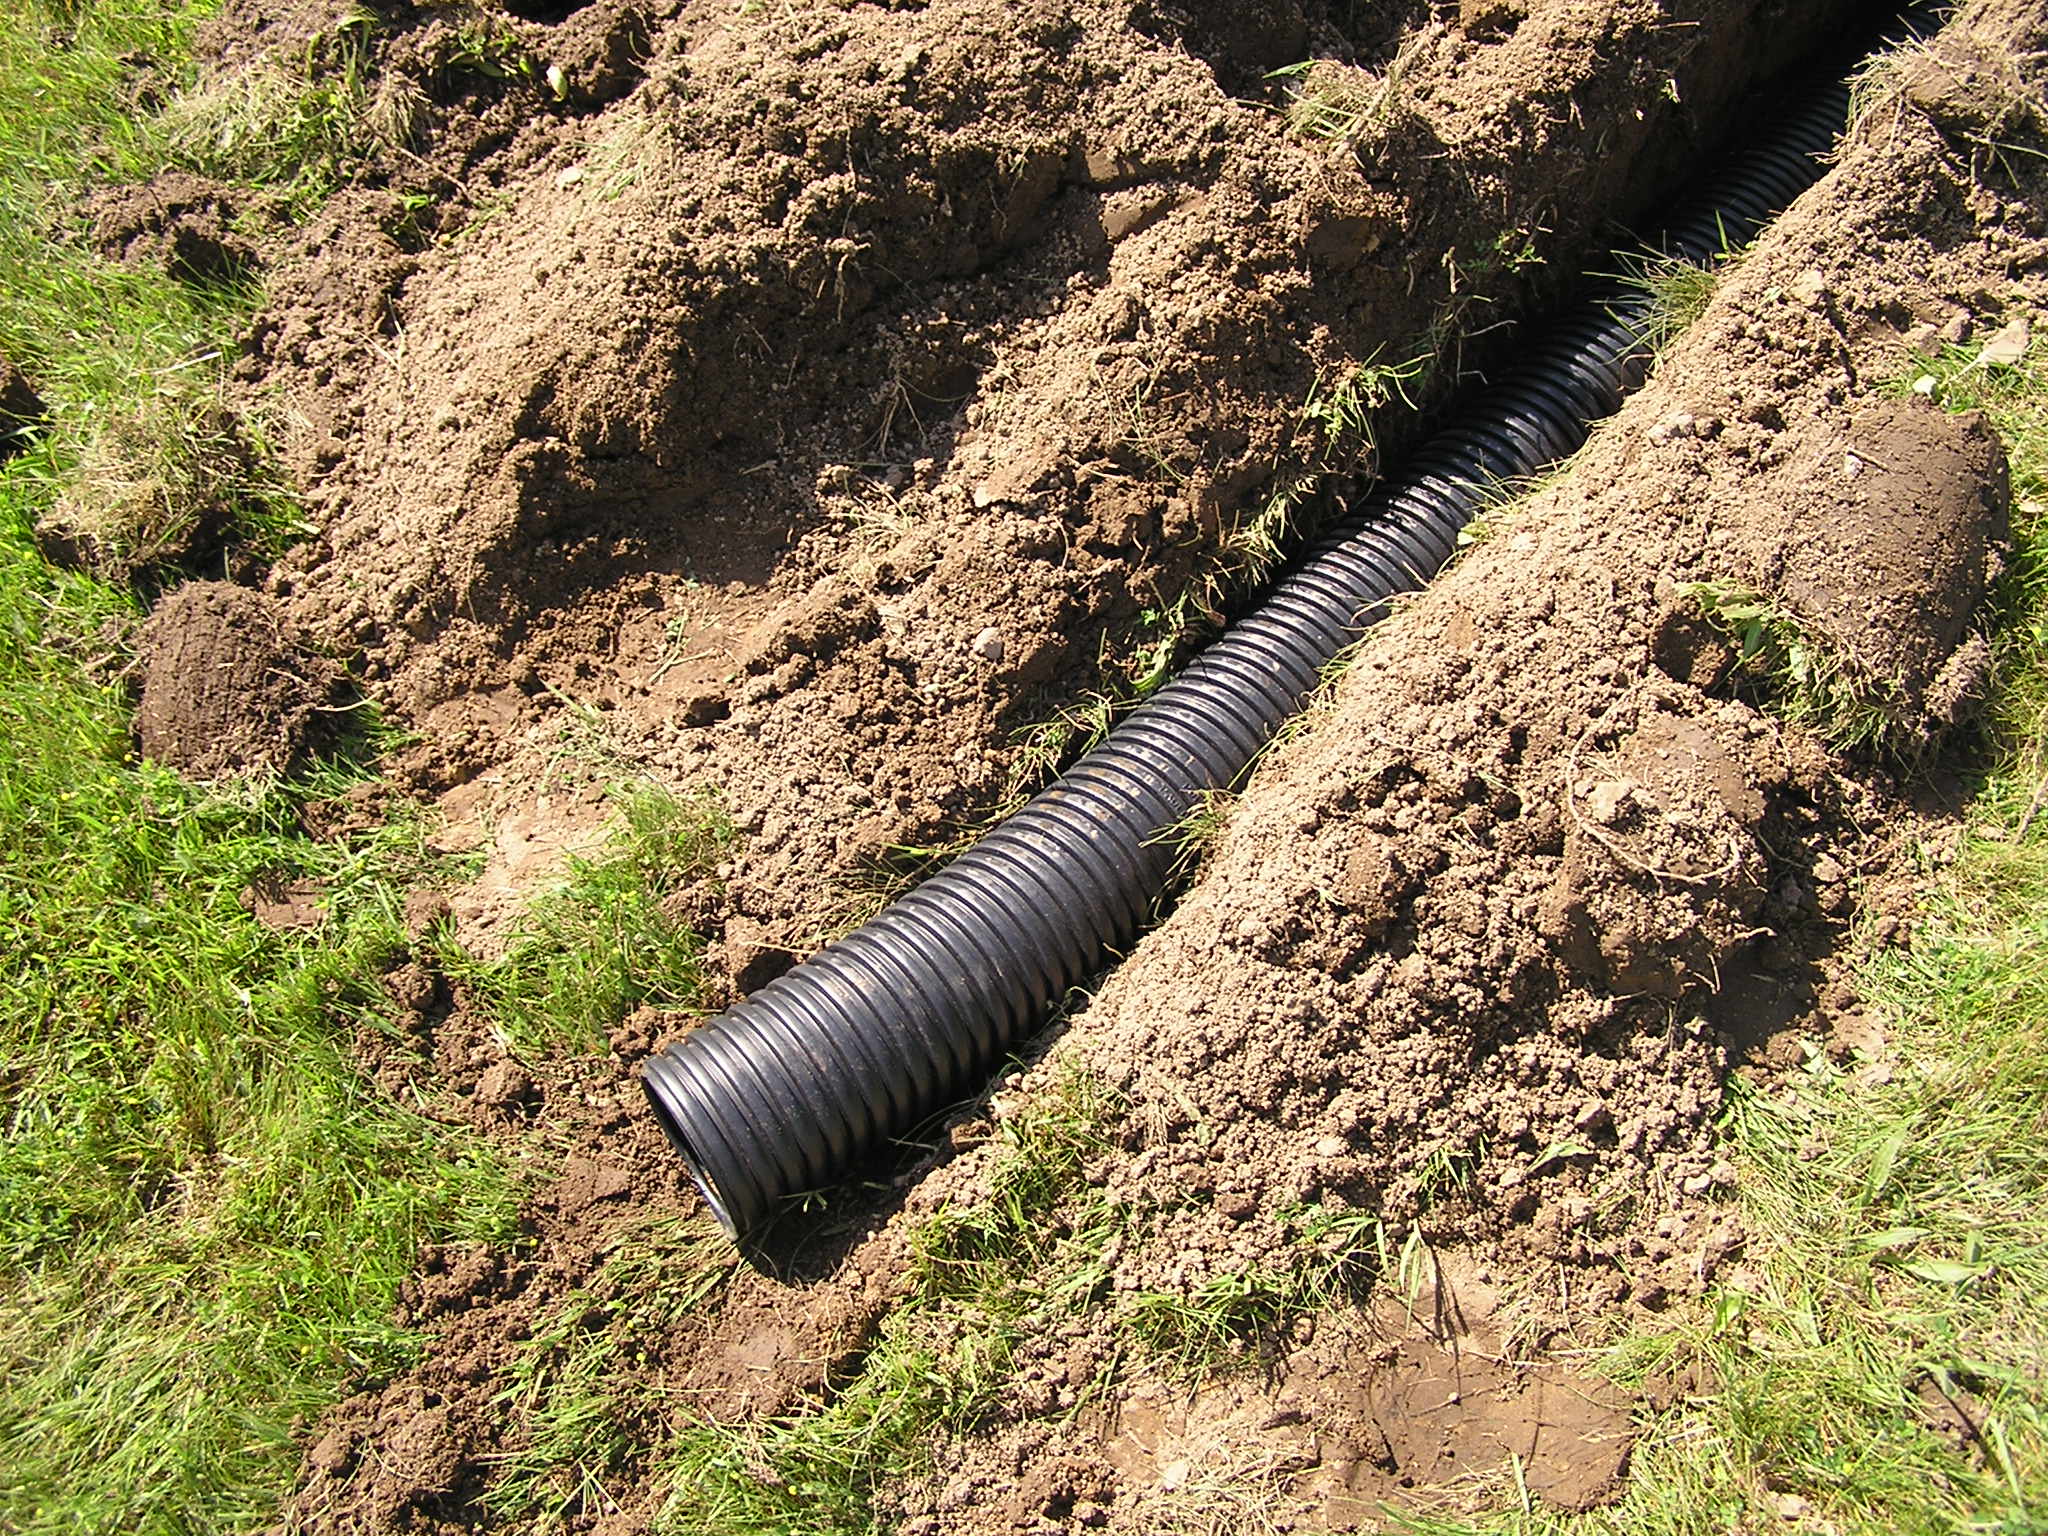
The tile has to have a constant downward fall so the water flows out and does not sit in the pipe. Water sitting in the pipe will freeze in the winter and cause all sorts of problems. I used a laser level to make sure I had plenty of fall. The trencher was fun to use and made quick work of my project. It cut through roots and pulled up rocks easily.
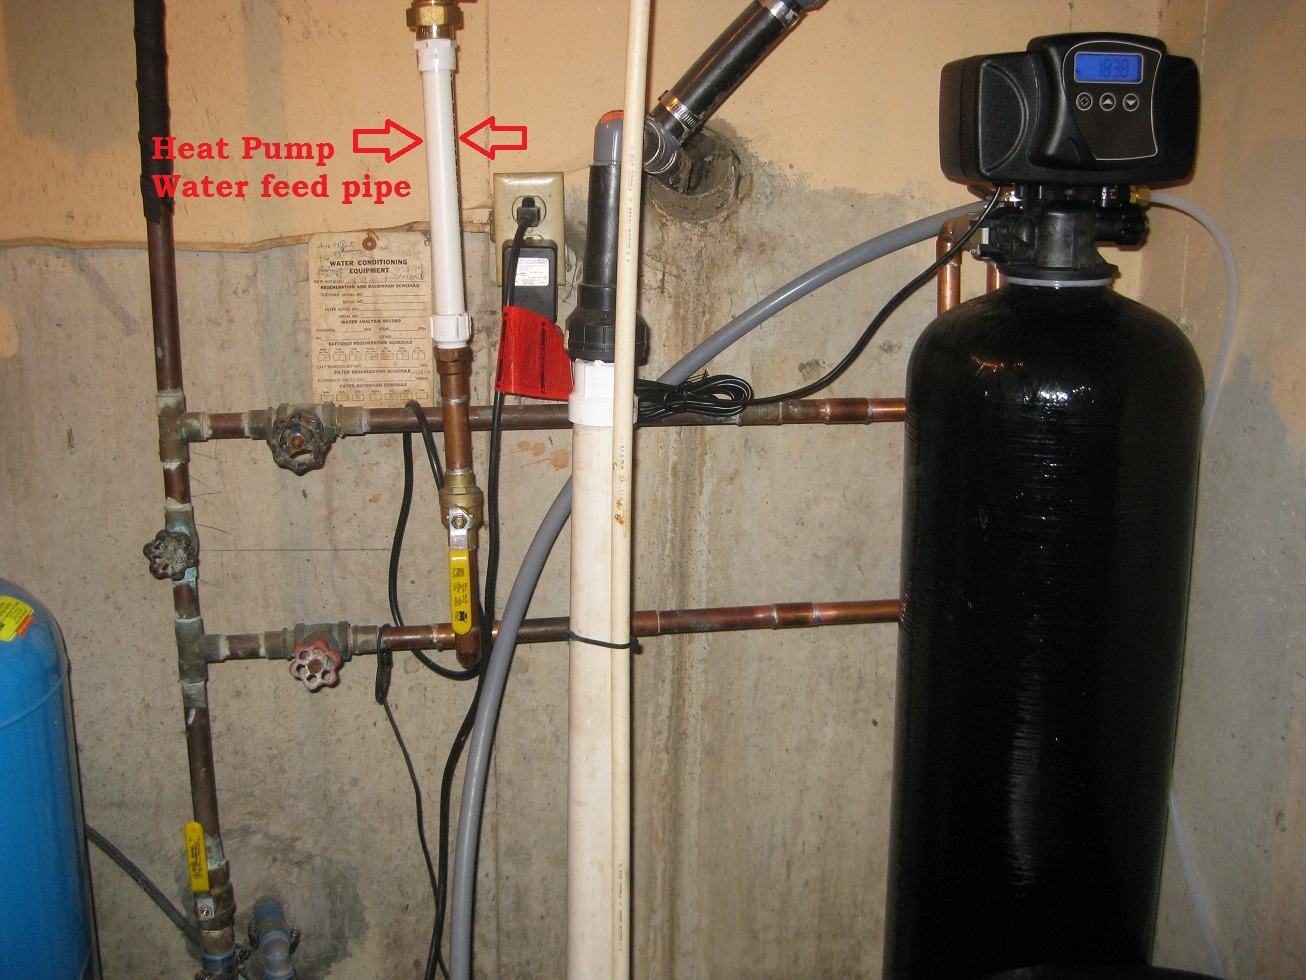
The heat pump needs water. I tapped into my water supply right at the well entrance point. Its connected before the water softener because there is no need to run soft water through the heat pump.
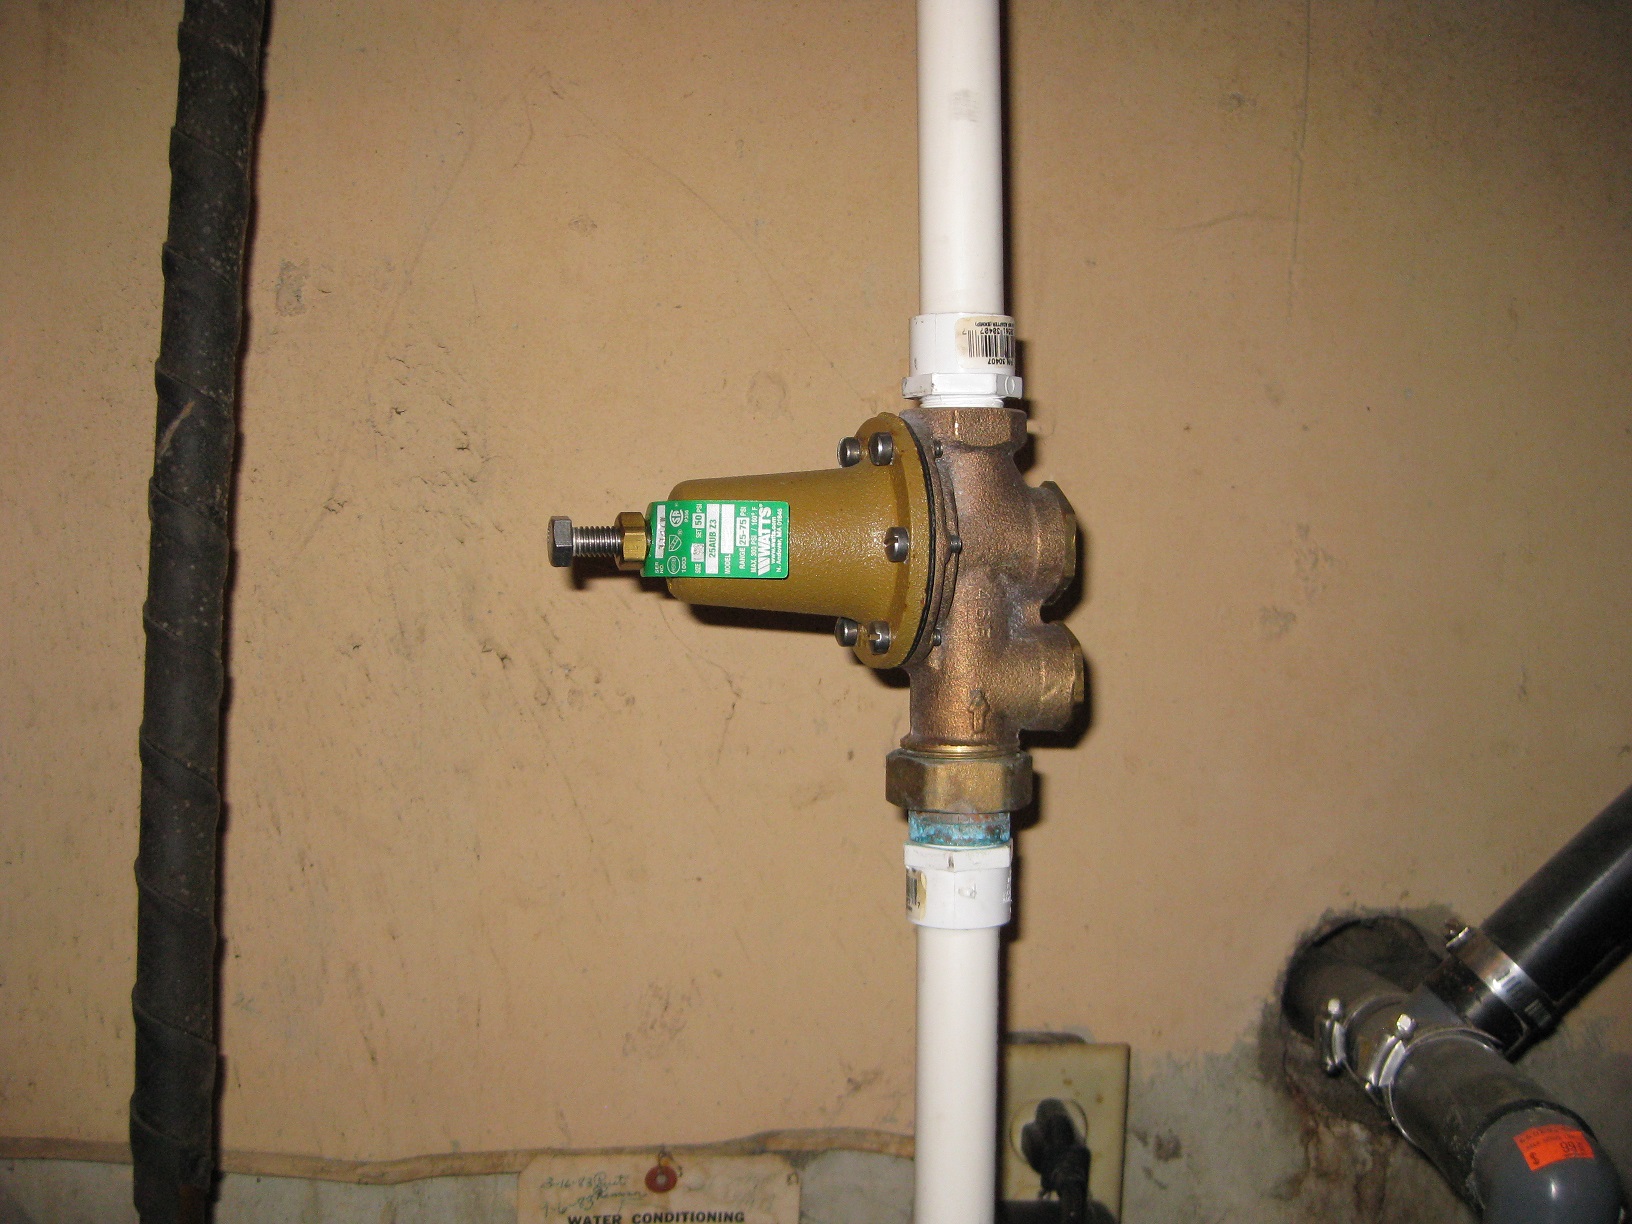
Pressure regulator show above.
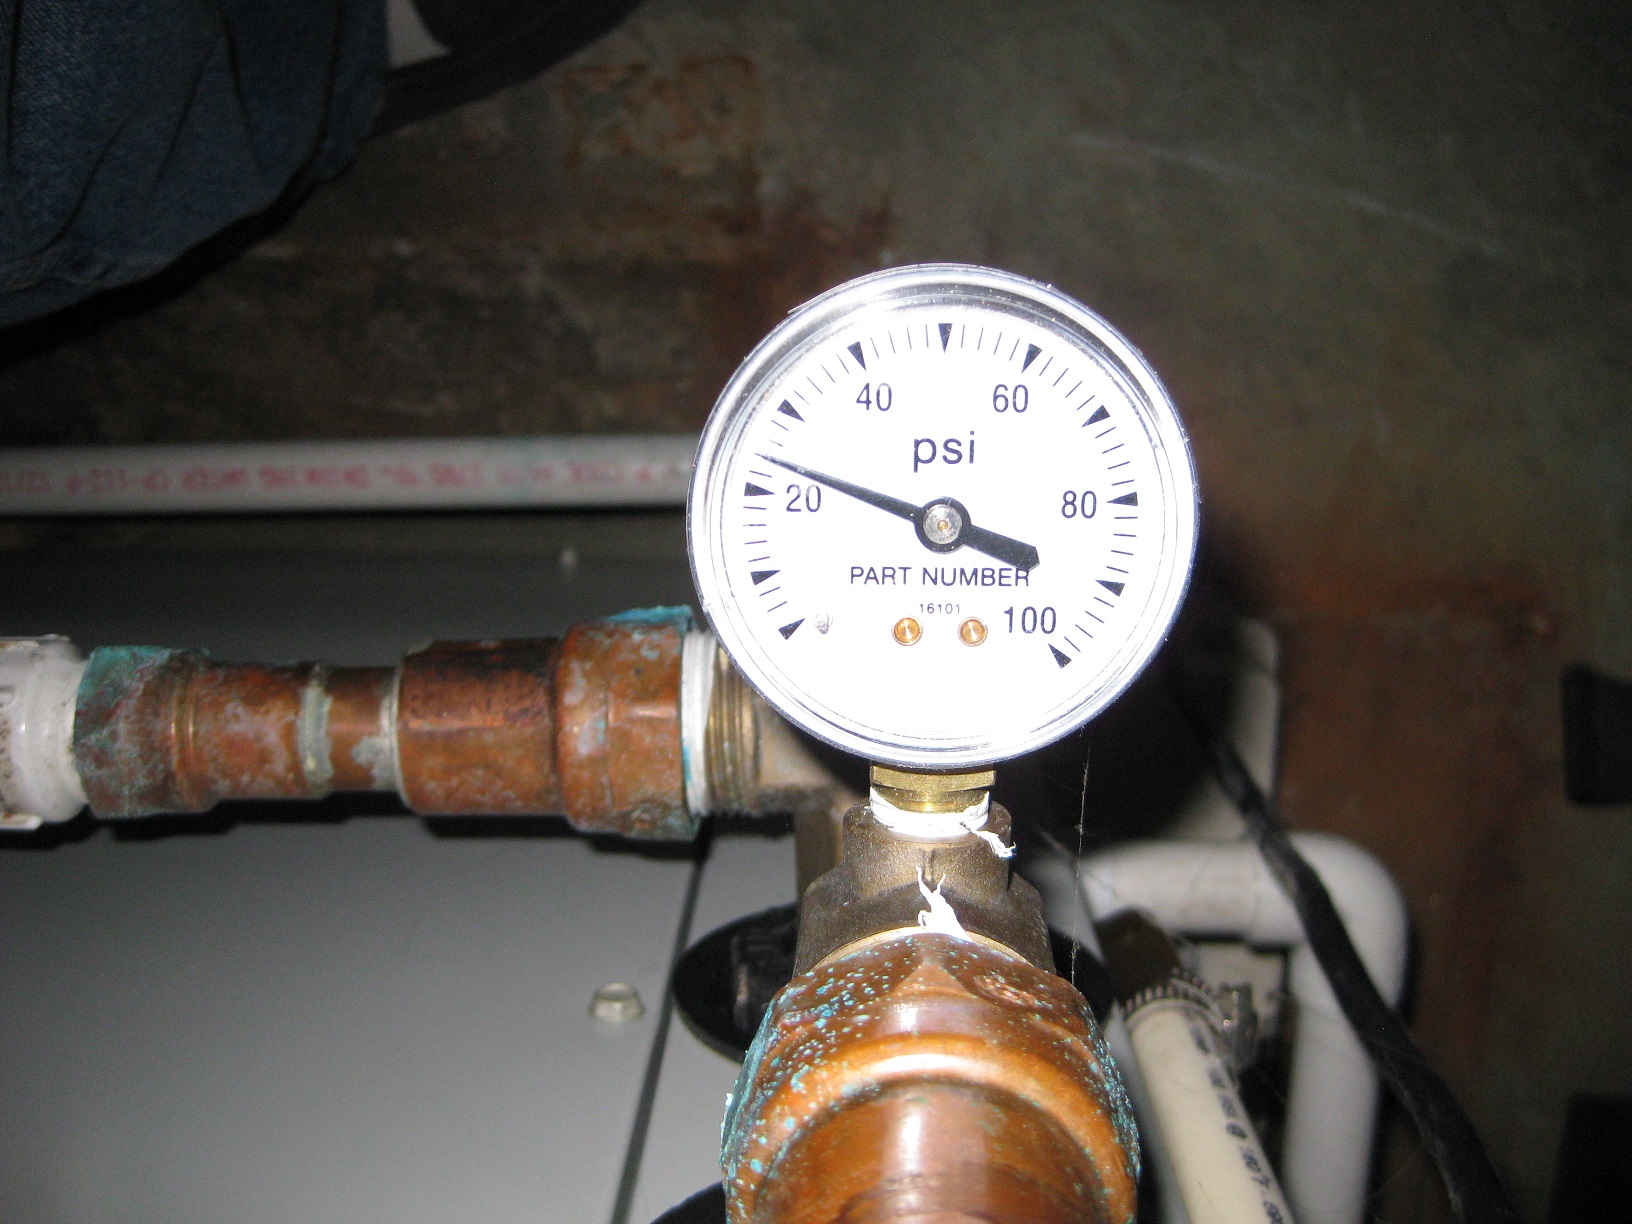
Another item I added to the water supply pipe is a pressure regulator to drop the pressure from the house hold 60psi down to around 22 psi. The lowered pressure completely eliminated the annoying water hiss which was really loud and I could hear it all through the house when the heat pump was running. The heat pump can run on pressure all the way down to 15 PSI.
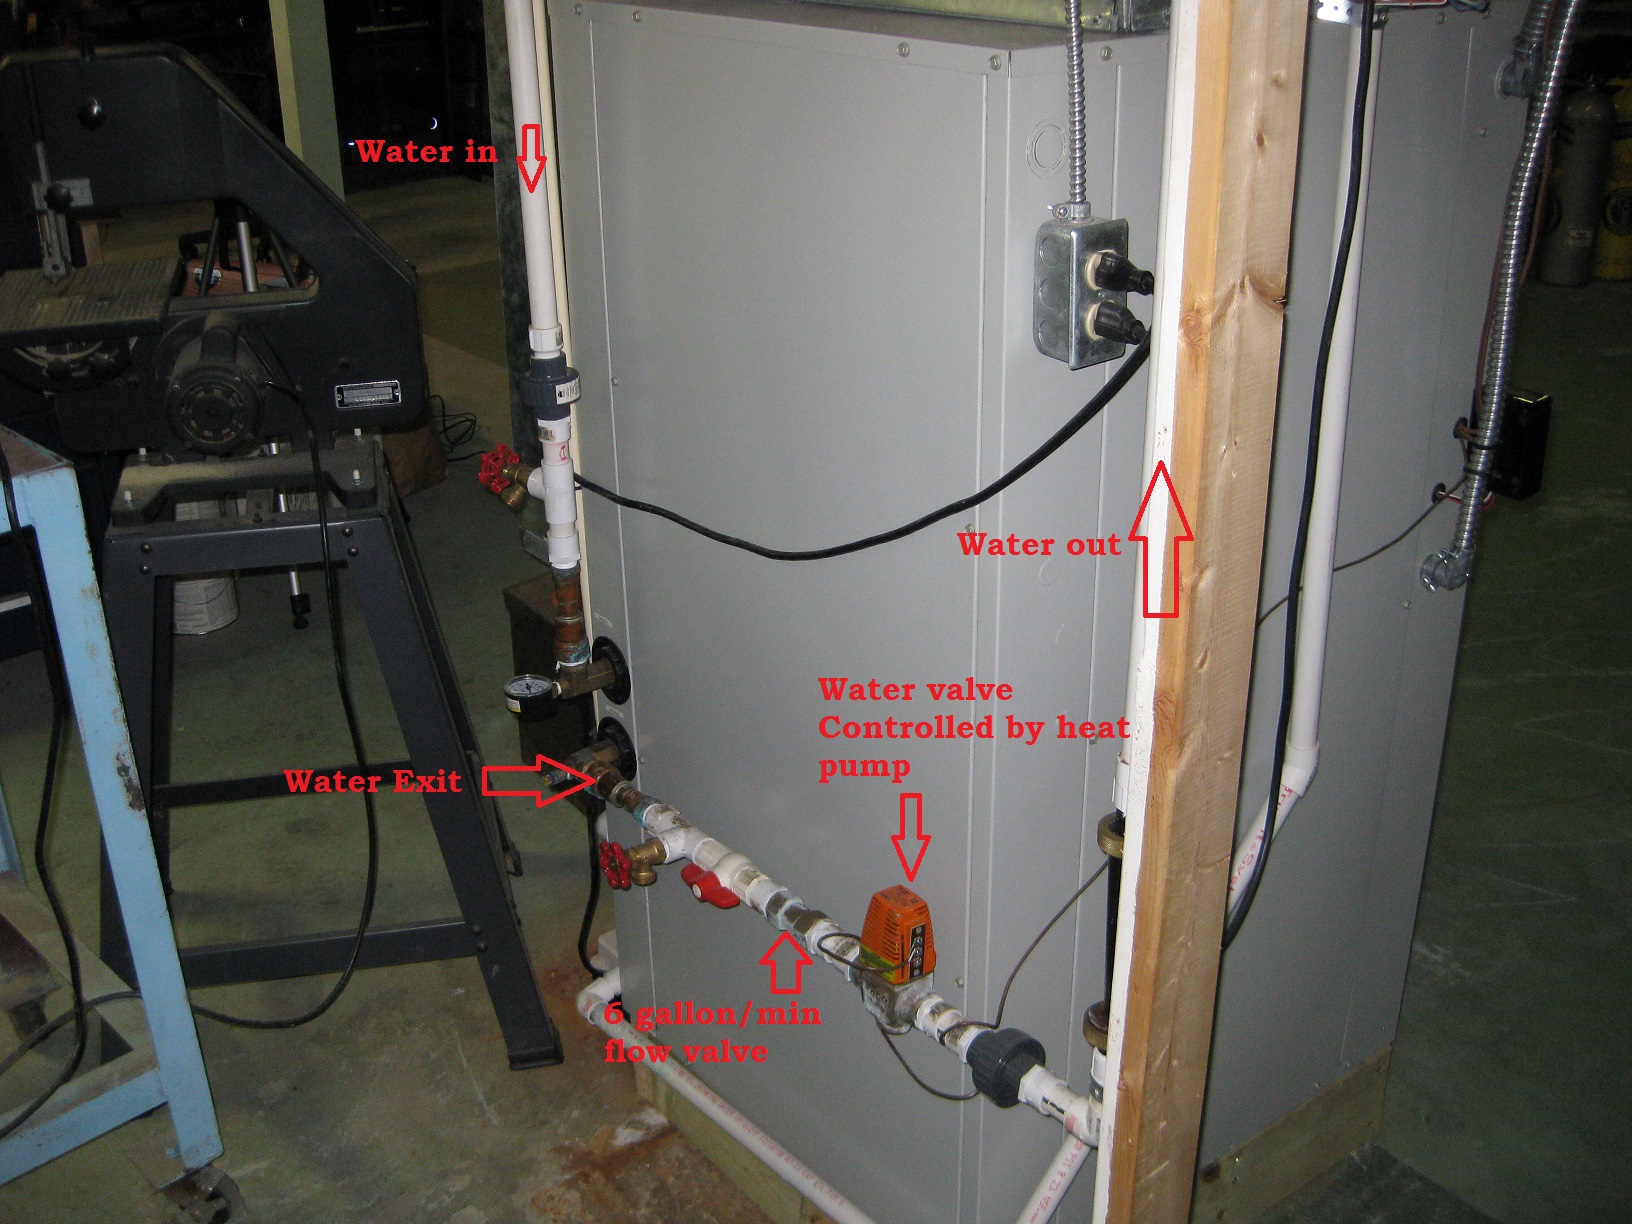
The installation manual clearly shows a diagram on how to install the plumbing. Water comes in from your water supply and connects right to the heat pump. Water exits the heat pump and will get throttled down by a 6 gallon per minute flow valve. That way your water will not run full blast when your heat pump turns on. Smaller heat pumps only need 4 gallon a minute flow valves. The electric valve (orange thing) is opened and closed by the heat pump. When the heat pump calls for heating or cooling, the valve opens allowing water to flow through the system. That’s it pretty simple.
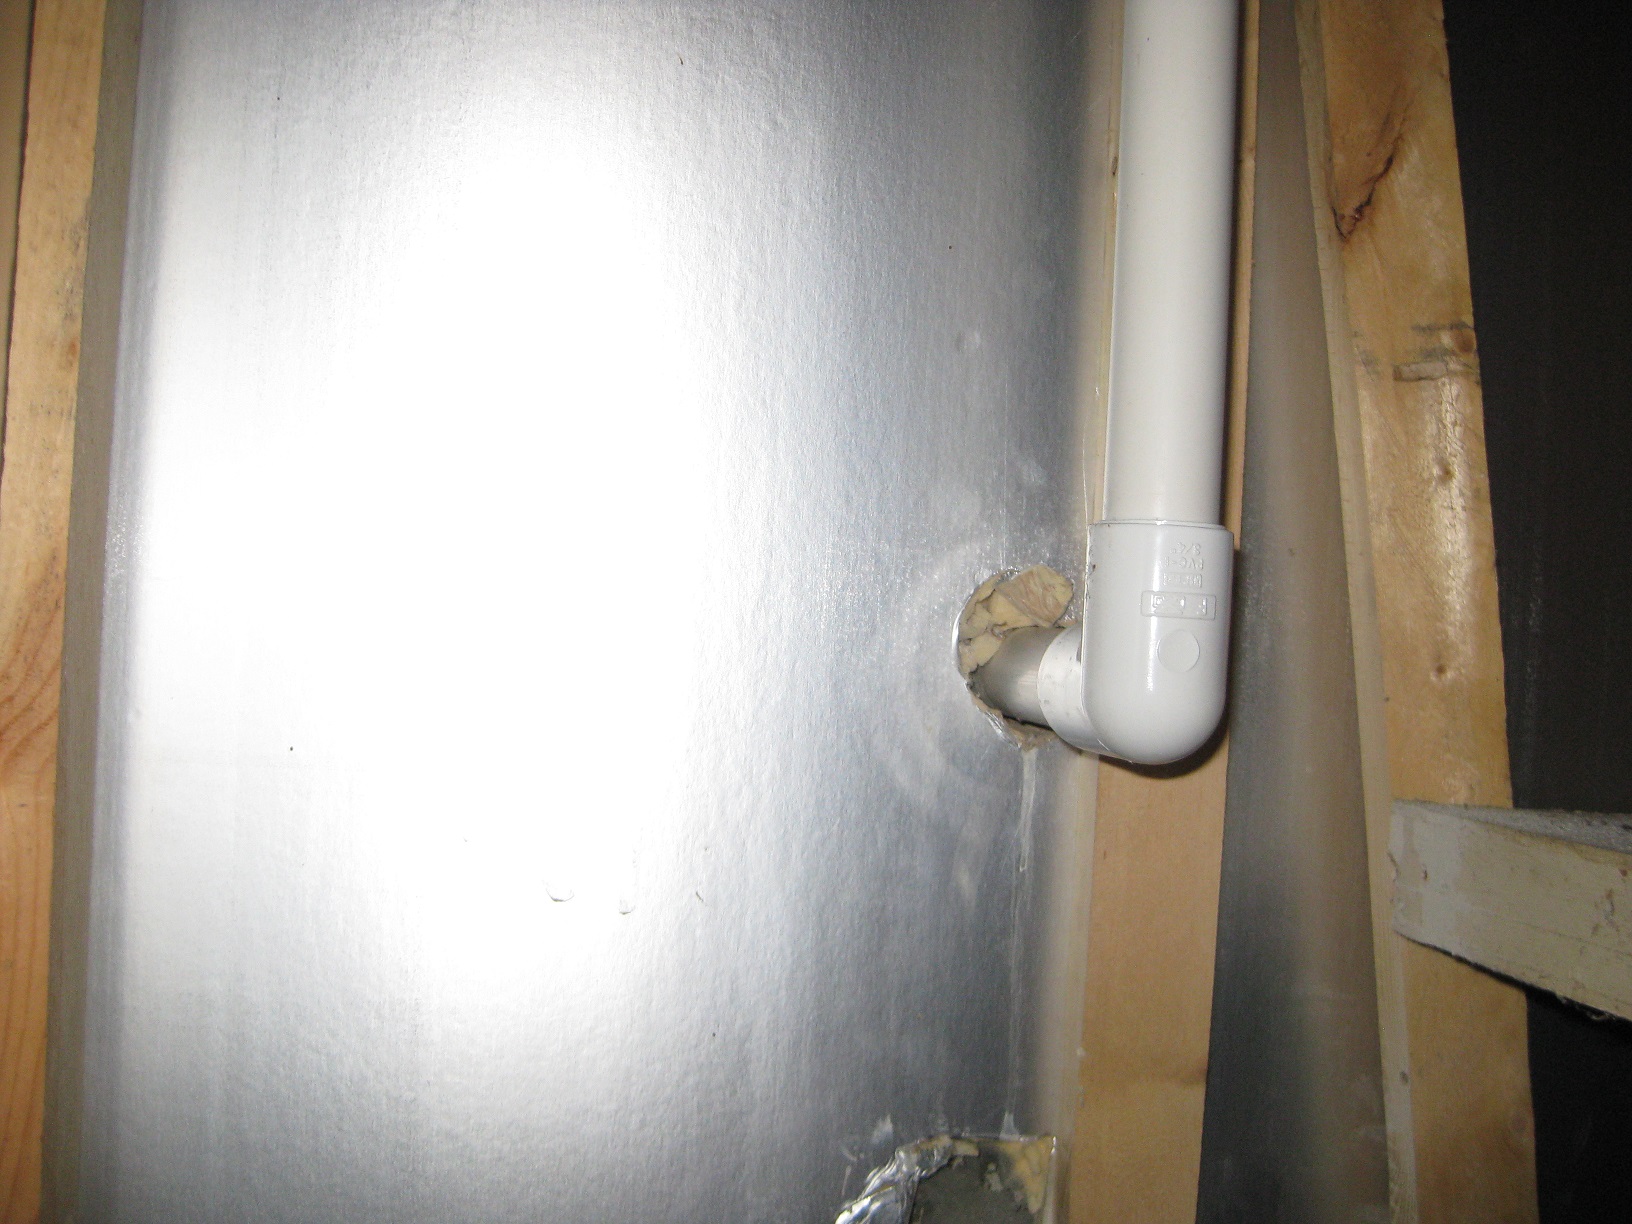
The exit water is plumbed outside to my buried tile. I drilled a hole in me basement wall and ran it to the underground tile. I did not want any water sitting in the pipe for fear of freezing outside so I installed a tee’d off pipe with a vent. This is called a vacuum break and will let the water flow out of the pipe quickly as long as the pipe has downward slope (remember the tile had to have the downward slope as well). It simply lets air into the pipe (to break the vacuum) and the water will flow out on its own very quickly. The idea is simple: No sitting water = no frozen water. Water does not come out of the vent hole because the pressure is so low that it just flows out the normal exit in the tile instead. It works great – 4 years now and zero frozen pipes.
The electrical connection was more of a challenge but not too bad. I am pretty familiar with house wiring already so this was not much different than wiring up a hot water heater or any other 220 Volt appliance.
There are two different electrical connections to the heat pump. The first one is 220 Volt at 30 AMP to power the actual heat pump. The heat pump actually only draws 6 amps on stage 1 and 10 amps on stage 2. I guess they want 30 amps for surge. The 2nd connection is 220 Volt @ 50 AMP for the emergency heat. This is nothing more than a huge electric space heater and will provide full heat to the house if the heat pump actually fails. Its nice to have but I have never had to use it. Michigan says I have to have it.
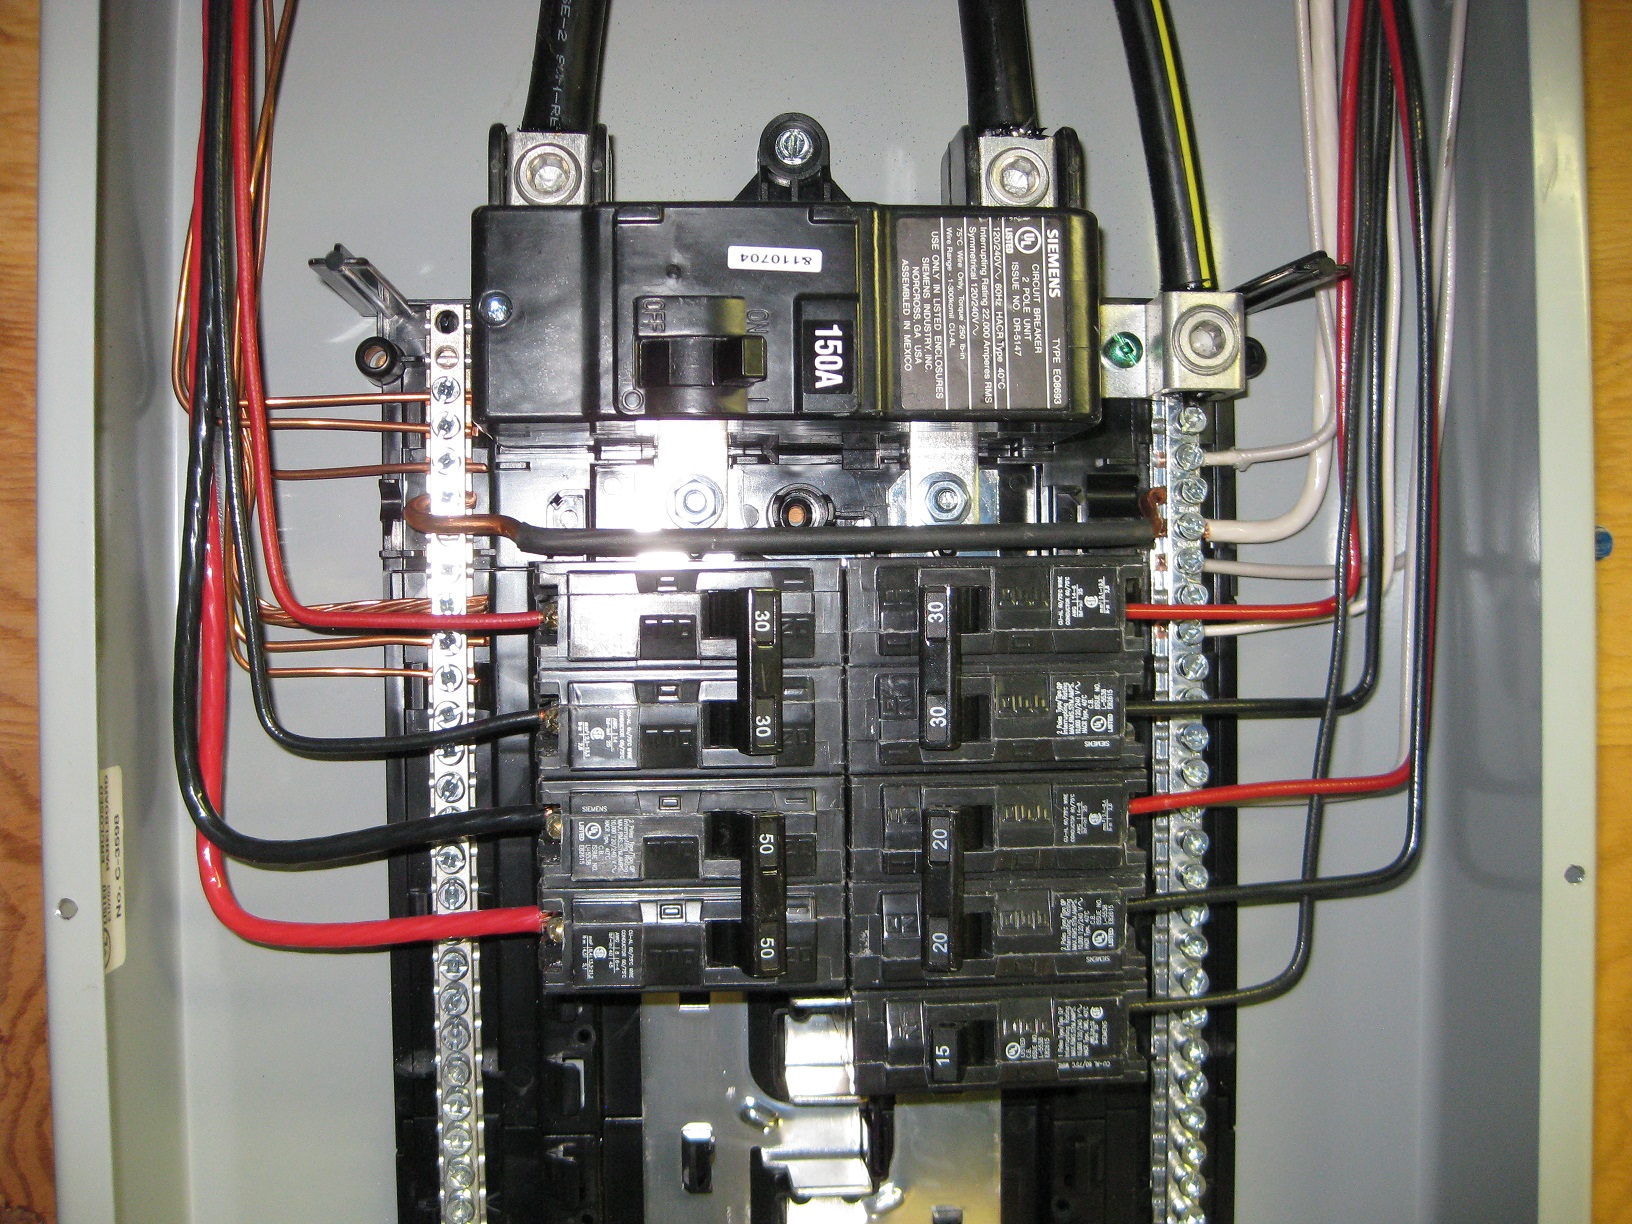
I used 8 gauge solid copper wire for the 50 AMP connection and 10 gauge copper for the 30 amp connection. I have a small 15 amp outlet on the heat pump to power the humidifier which used 14 gauge wire. I believe the well pump is on a 20 amp breaker and the water heater is also on a 30 amp breaker.
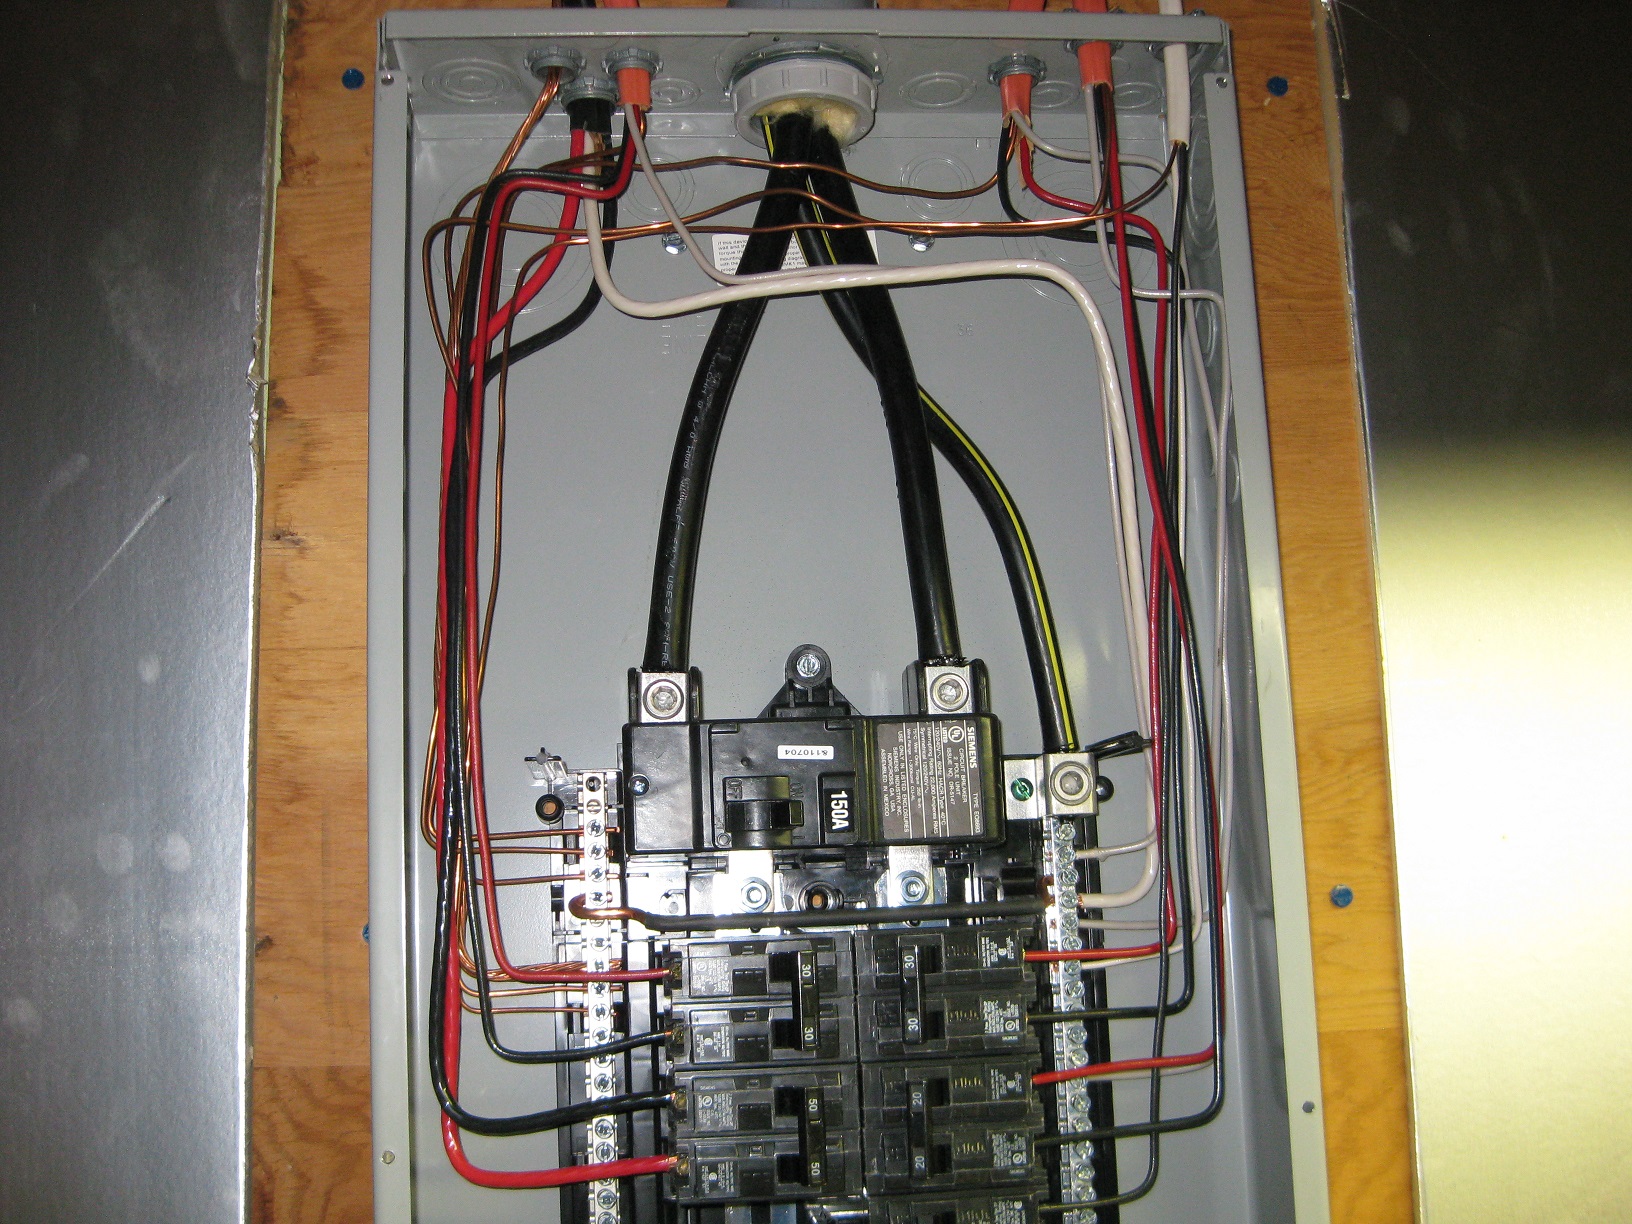
I moved my well pump and my water heater to the new box as well. You can see the huge 4/0 aluminum feed wire to the 150 AMP main breaker. I also replace the feed wire to my old box. It also is fed with 4/0 aluminum wire. Both boxes now can support 200 amp service each if I ever want to replace the main breakers.
I believe they fed my house with 750 kcmil solid copper from the pole. Crazy stuff as I remember the Detroit Edison guys complaining about it when they connected it up. Needless to say I never have any lights dimming when things turn on.
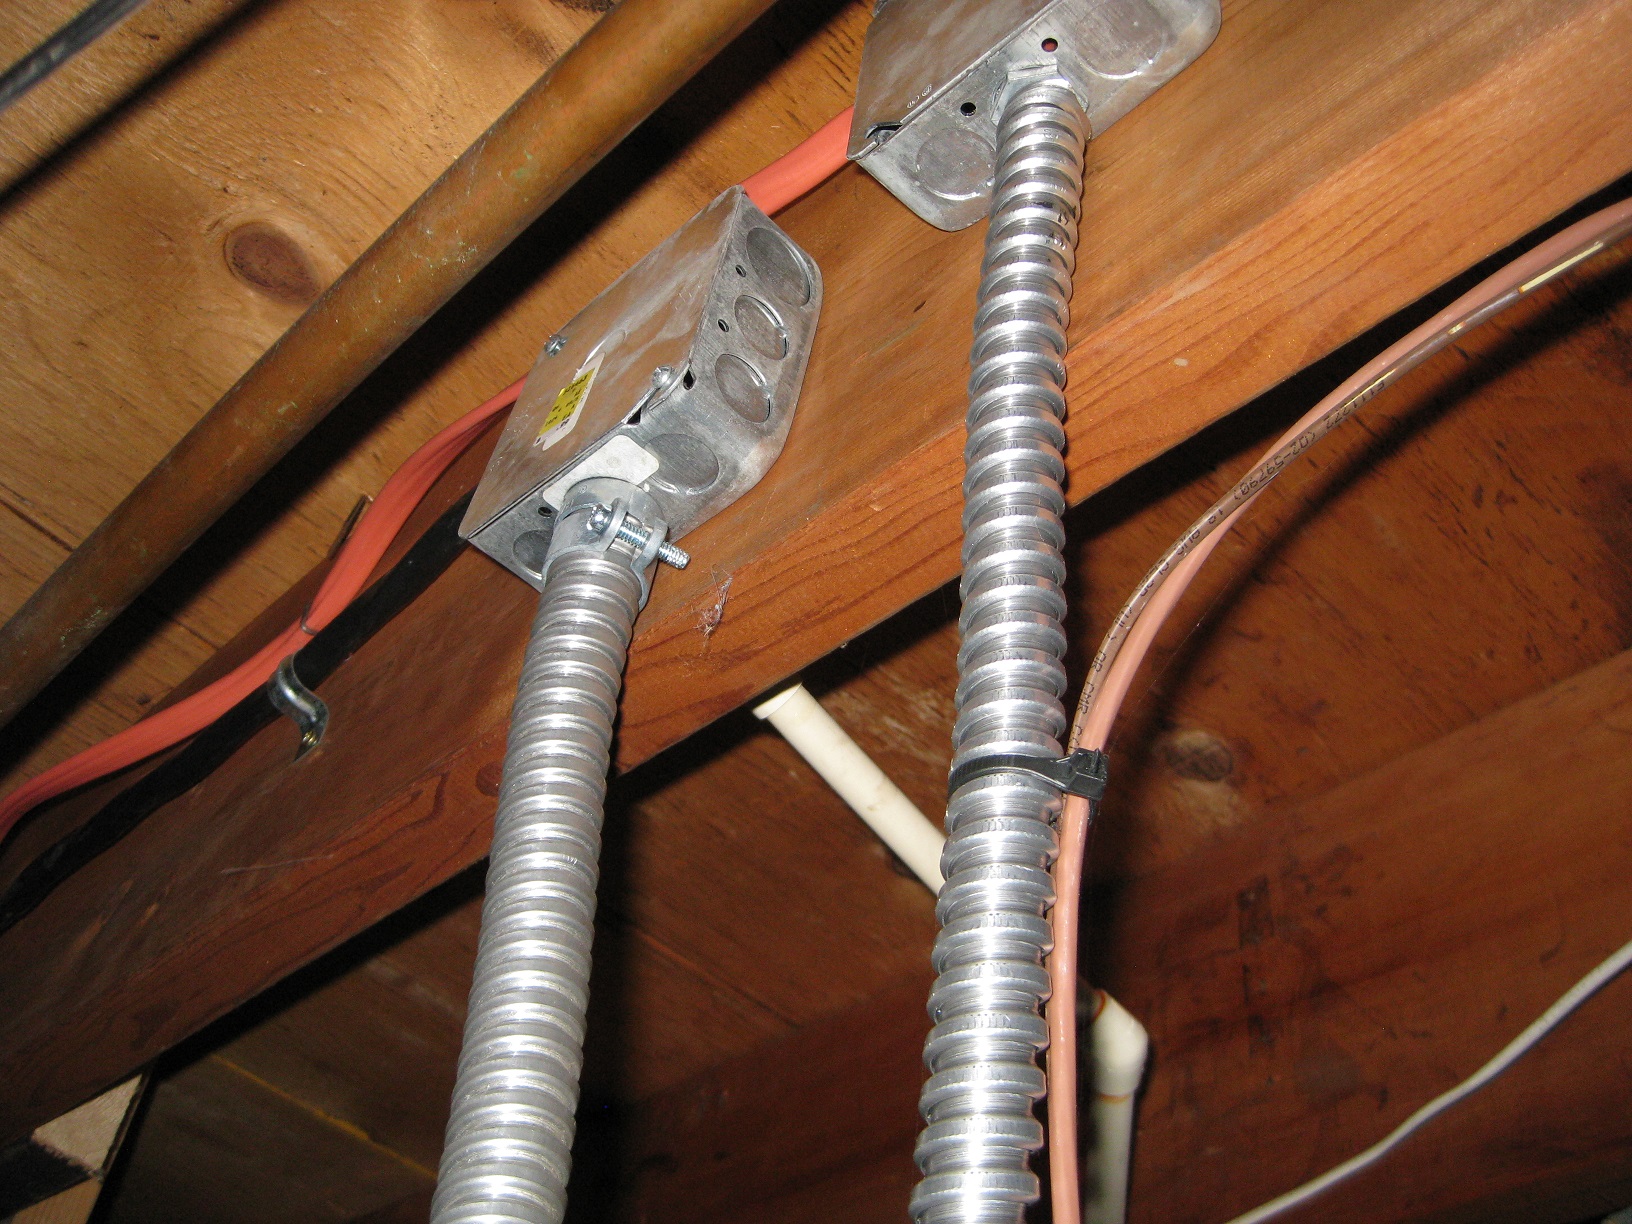
I ran all the wire in the basement ceiling and then dropped it down to the heat pump (see above and below). Any drops have to be encased in steel or plastic conduit from a junction box.
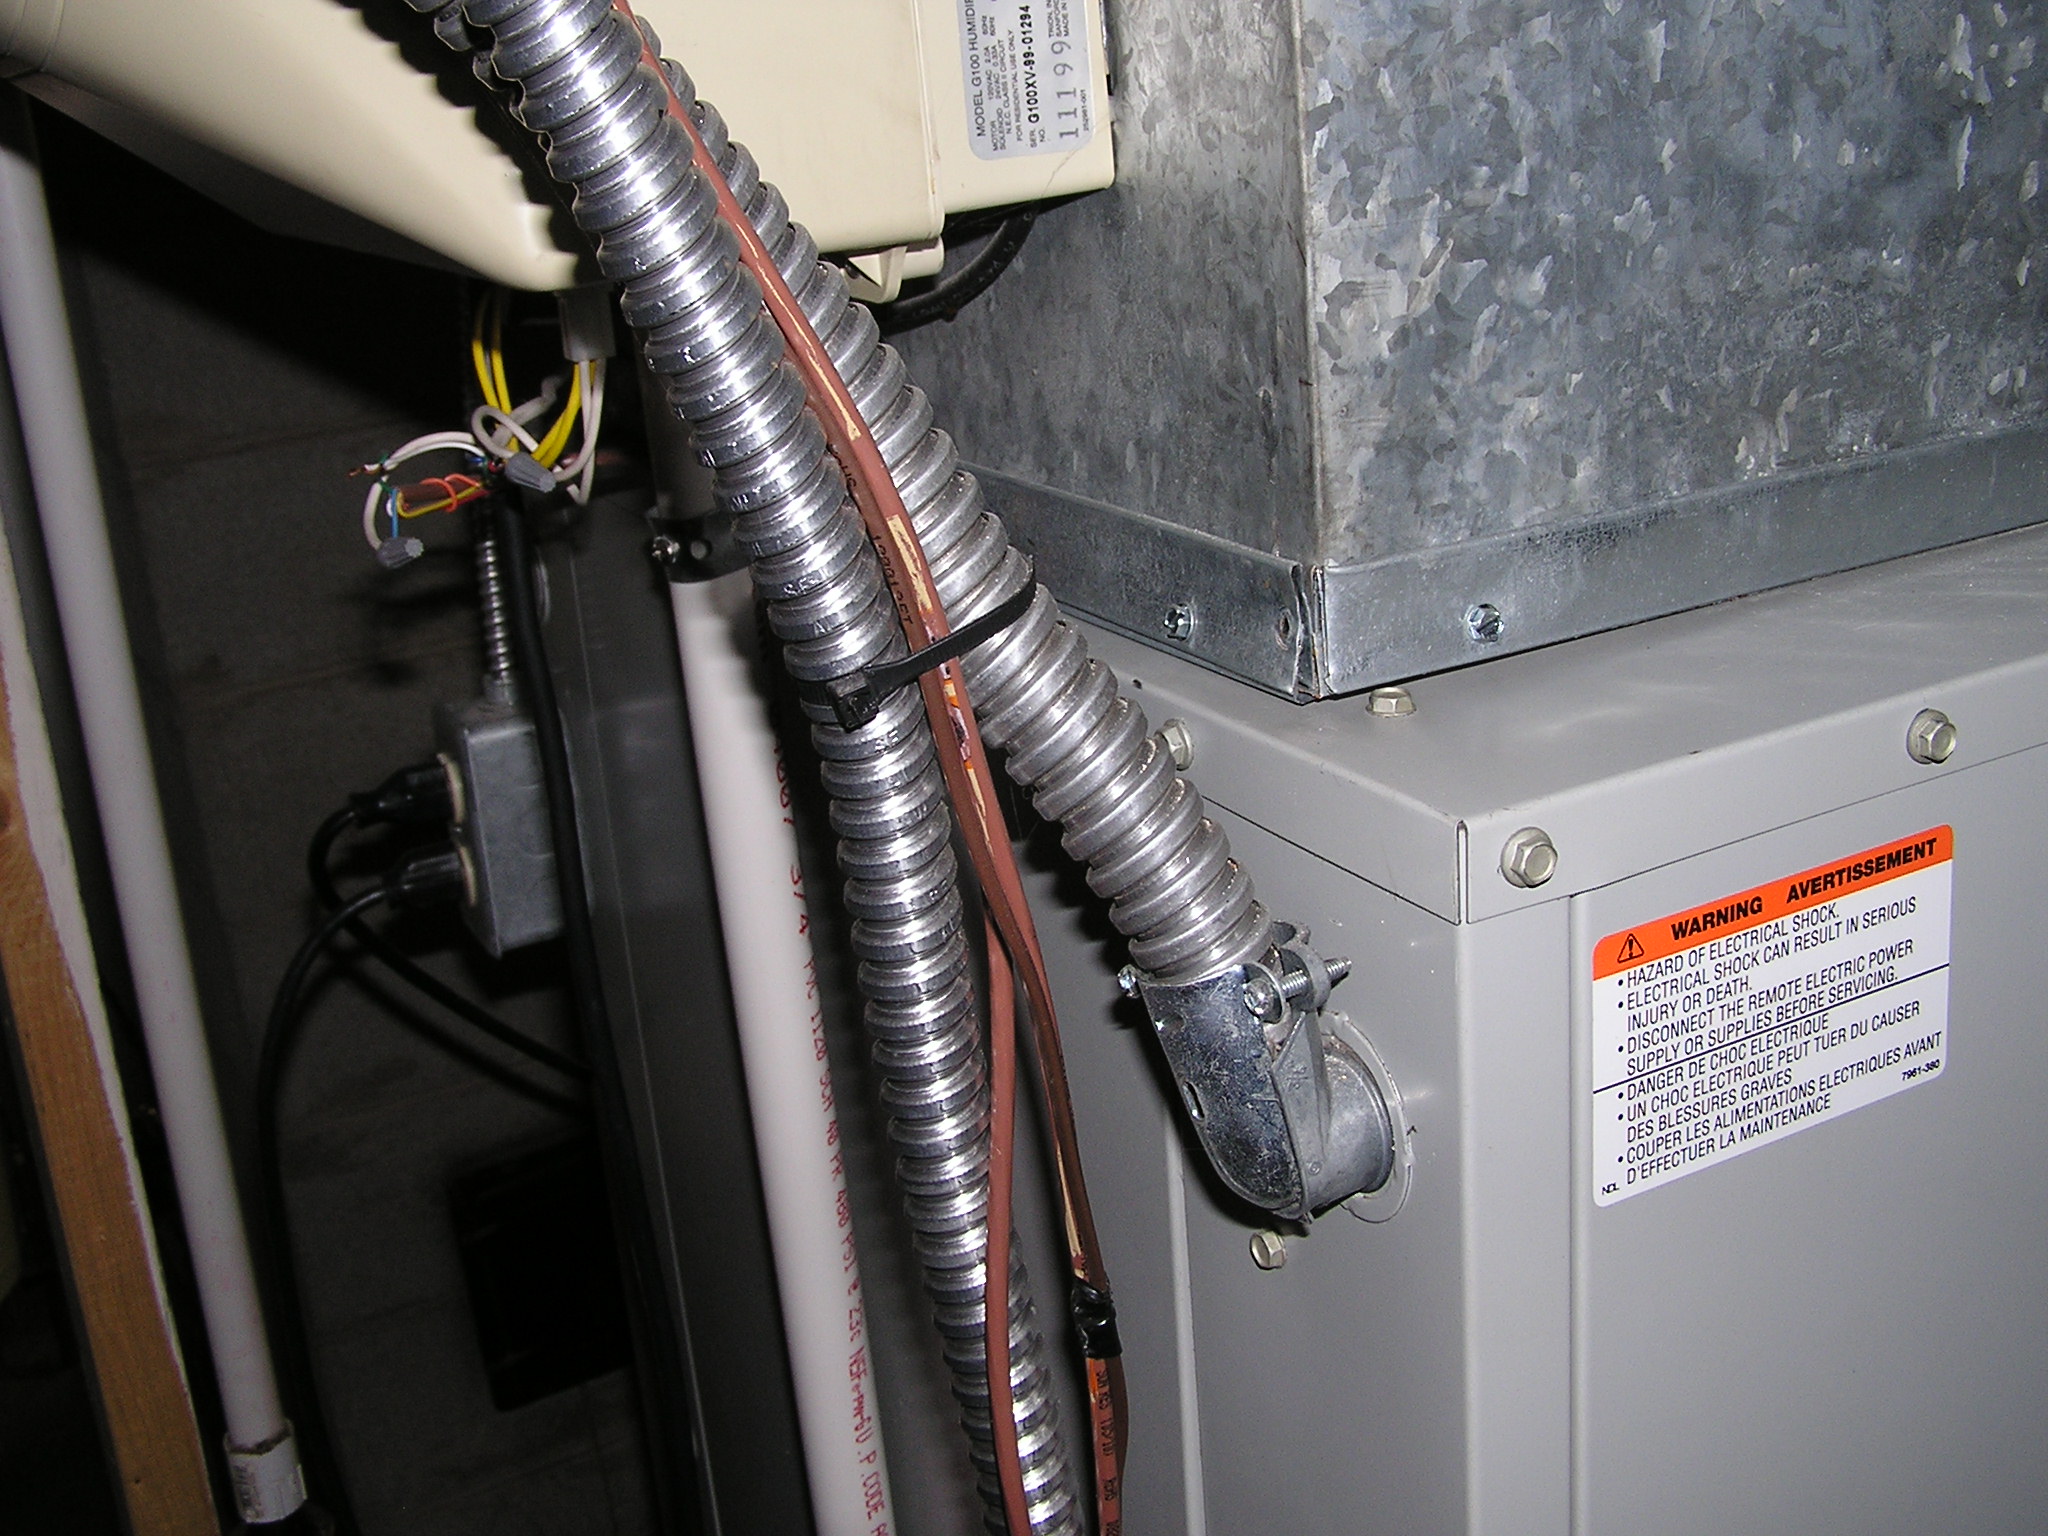
Thermostat wire is shown in the above picture zip tied to the power conduit. I needed 9 conductor wire so I ran one 7 conductor and one 3 conductor wire (one unused wire just in case).
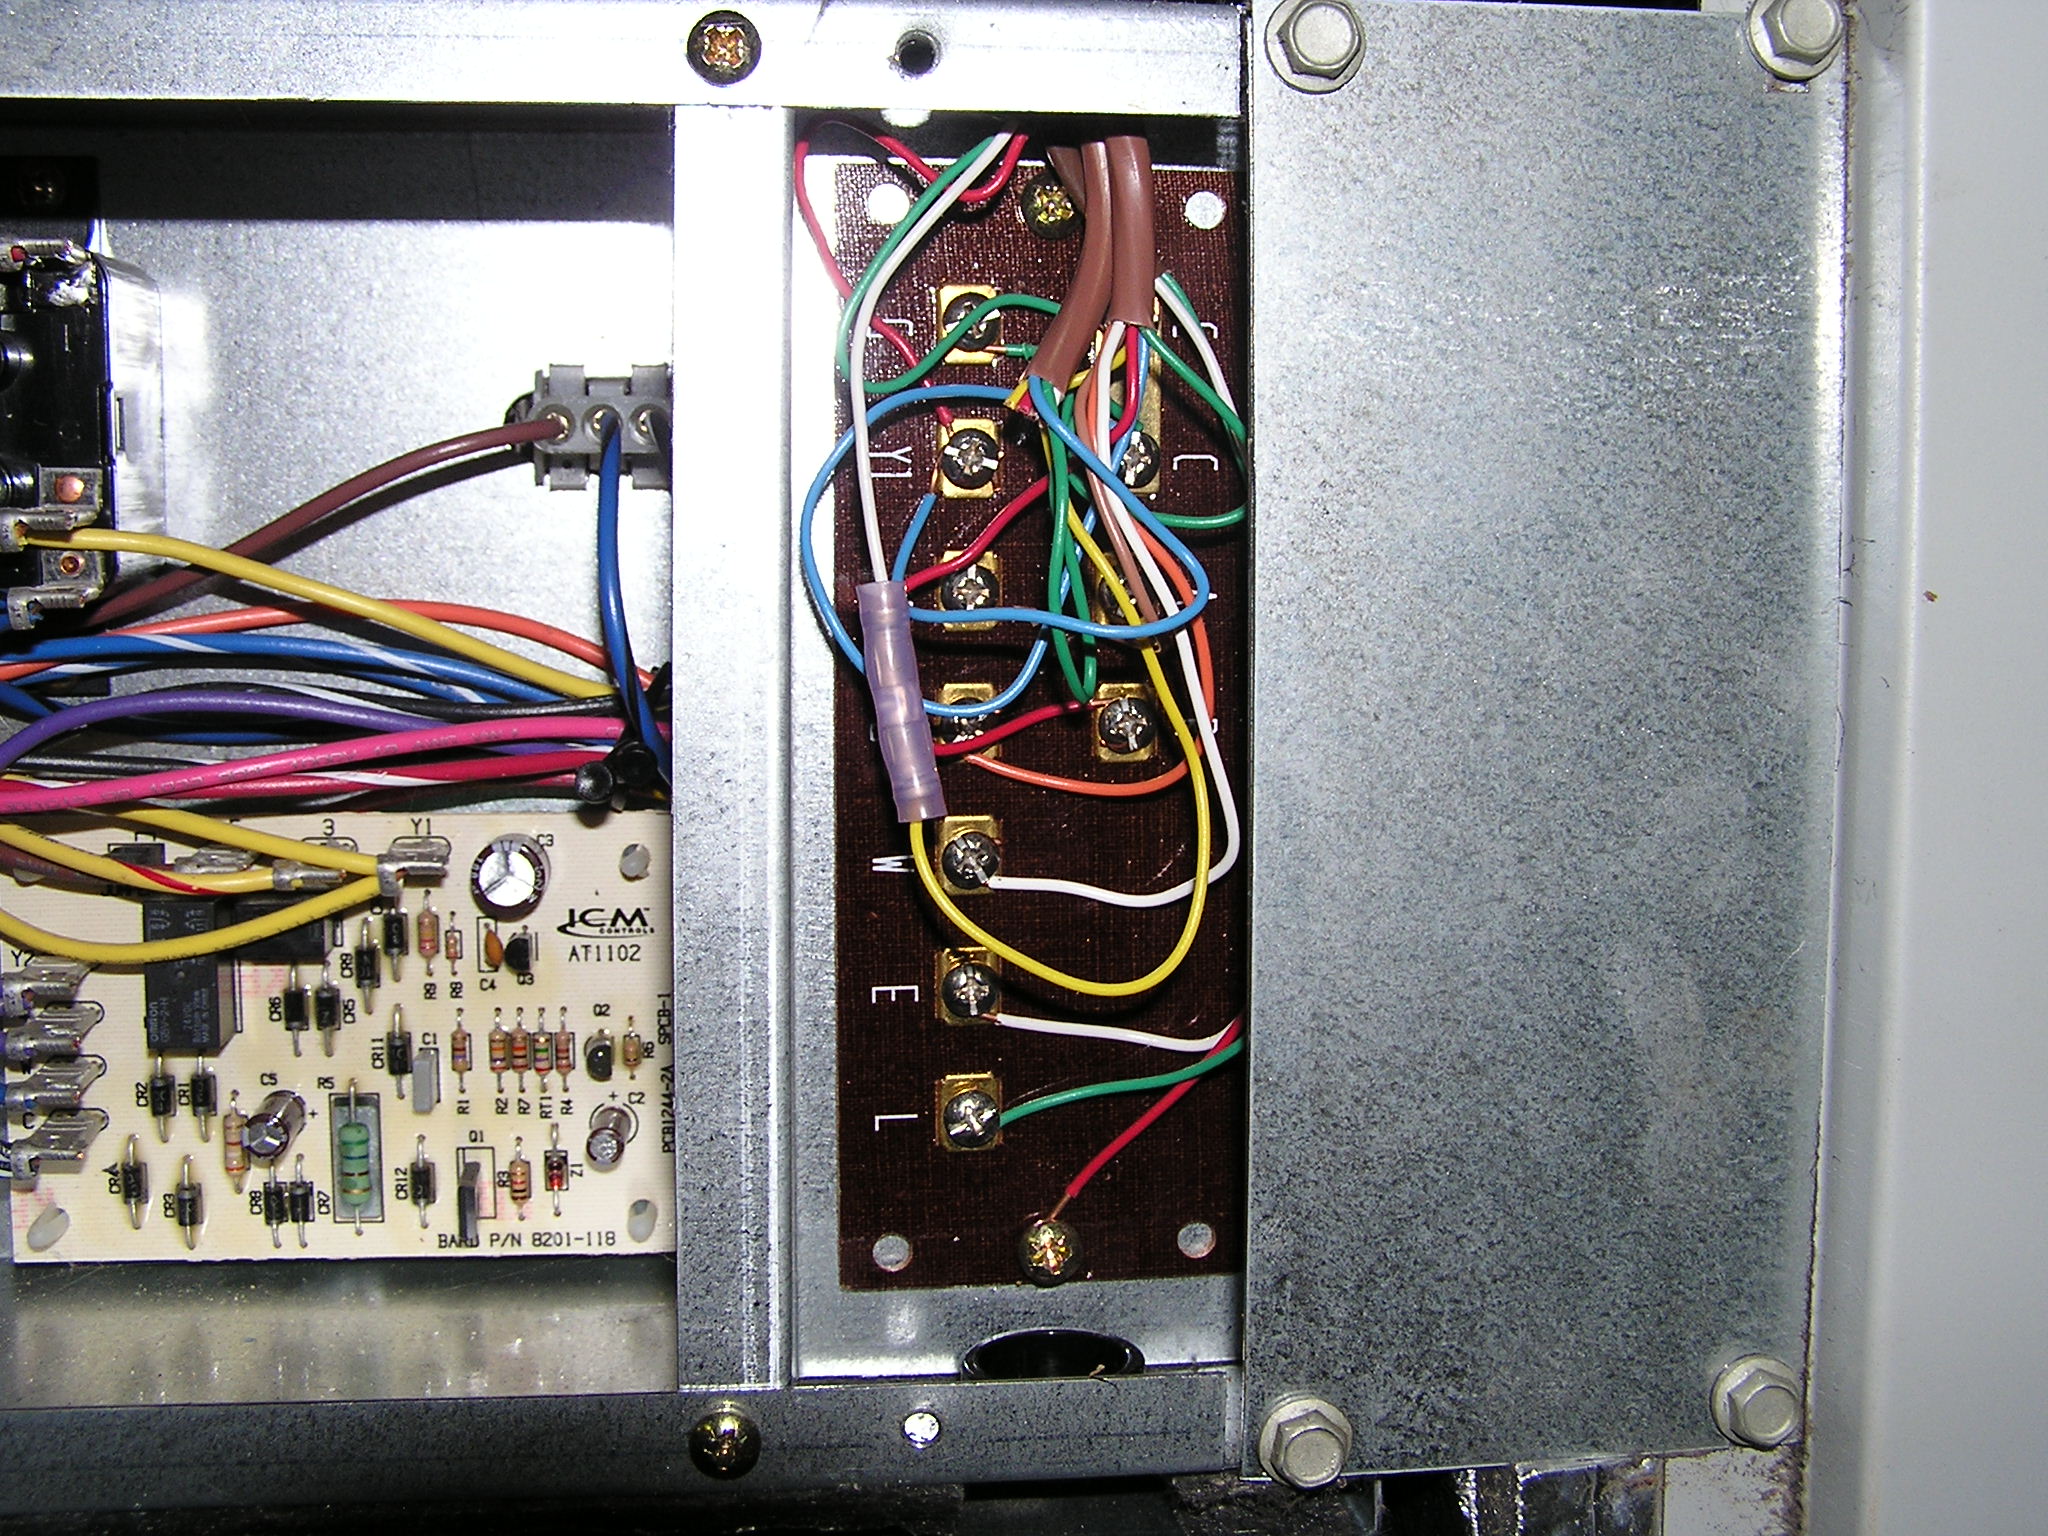
The manual describes how to hook up the thermostat wire to the main control board inside the heat pump (shown above). No programming needed just hook it up and go.
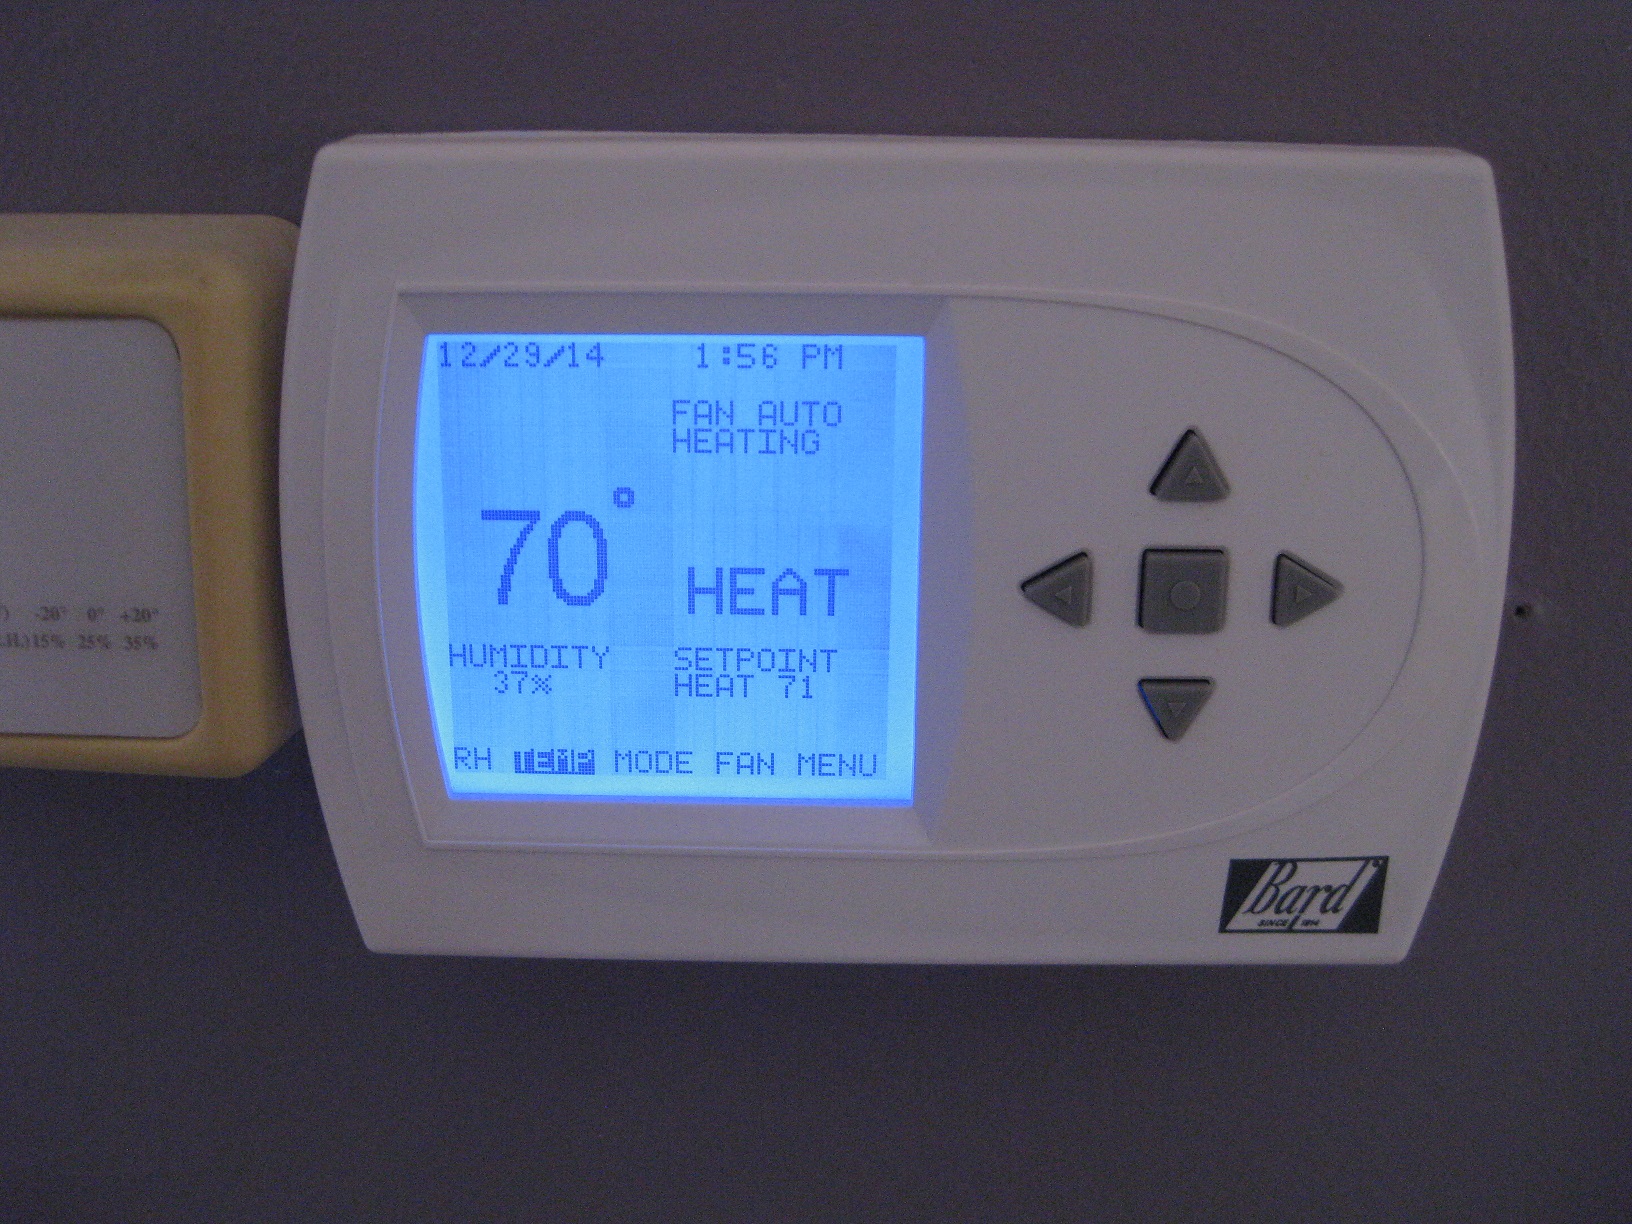
The thermostat is powered by the heat pump so no batteries needed. Nice feature for me. This thermostat supports 3 stage heat pump. Any thermostat will work as long as it supports multi stage heat pumps.
Listed below are the specs for my house and my GV38 Heat pump. Based on 4 yrs of service.
Stage One Heat = 25,800 BTU/hr (6.7 amps) ( Good down to 15°F outside while 71°F inside.)
Stage Two Heat = 37,000 BTU/hr (10.1 amps) (Good for below 15°F outside while 71°F inside. Tested to -7°F so far with no wind)
Stage Three Heat = 37,000 BTU/hr (10.1 amps) + 30,000 BTU/hr E-Heat (35 Amps) for a total of 67,000 BTU/hr. Never used. I have only tested it in test mode and it heats like crazy.
Stage One Cooling = -29,400 BTU/hr (6.7 Amps) (so far will cool the house to 74°F while 99°F outside with no problems. I use this mode 100% of the time so far)
Stage Two Cooling= -41,000 BTU/hr (10.1 Amps) Never needed it yet. I imagine I could turn my house into a walk in freezer if I wanted to.
This thermostat supports temperature differentials. Differentials are a nice feature to adjust your comfort and power usage. Mine are set like this to minimize power consumption:
Stage 1 differential =1°
Stage 2 differential=2°
Stage 3 differential=1°
Differentials work like this: My thermostat is set to 71°. When the thermostat drops to 70° it will call for heat with stage one. When the thermostat falls to 69° it will call for Stage 2 heat. Thermostat falls to 68° it will still stay at stage 2 because the differential is set to 2°. When the thermostat falls to 67° Stage 3 is called for which will get the temp up quickly with the help of aux heat strips. I never want to use Aux heat because its expensive so on really cold days when its -7° to 2° outside it will stay in stage 2 all day and maintain 68°-69°. That seems to be the balance point for stage 2 but it only gets cold like that a few weeks a year. There is a setting called “Smart Staging” which will activate a timer for stage 3 aux heat. It works like this: setting the “Smart Staging” to 60 minutes will force the heat pump into stage 3 after 60 minutes if stage 1 or stage 2 cannot heat the house up to the thermostat set point. This is nice if you really want your house to stay at 71° when its really cold outside. It will cost you more money however so I keep this feature off. As long as its 5° or above (wind dependent) stage 2 will heat my house back up to 71° no problem and shut off. Below 5° and its starts to float around in the 68°-70° area. The coldest it can get in my house with these settings is 67° which is acceptable to me (maybe not for my wife…) but this only happens rarely on the once a year -10°ish days in Jan or Feb.
Update 2-15-15: It got down to -14°F and windy last night. Stage 3 was active and heating like crazy when I got up. House was 70° and climbing so it’s working good. This is the first time I have seen stage 3 without testing mode.
Remember – Heat pumps are made to run. Having them run for half the day is normal (mine runs all day sometimes). They are at peak efficiency when running for hours. Mine will run at stage 1 forever when its 15°F outside and maintain 70°-71° which is good. You do not want Aux heat coming on ever unless it’s some extremely cold day. Let the heat pump do the heating. Aux heating is 100% efficient. Heat pump is 400% efficient. So this means the Aux heat costs 4 times more than the heat pump costs to run.
My ground water is 52°F and will exit at 38°F or so in stage 1 heat mode. I will have to measure it because I do not remember exactly. Cooling stage 1 will discharge 70° water or so.
I keep my house at 71°F in the winter which is a battle with my wife because I prefer 69°F. I just keep it at 71° and peace is kept with her and my 2 daughters. In the summer I keep it at 74°F which is pretty cold. I tried 71°F once and it was like a freezer. Everyone was too cold and used blankets. I thought it was awesome but I lost that battle too.
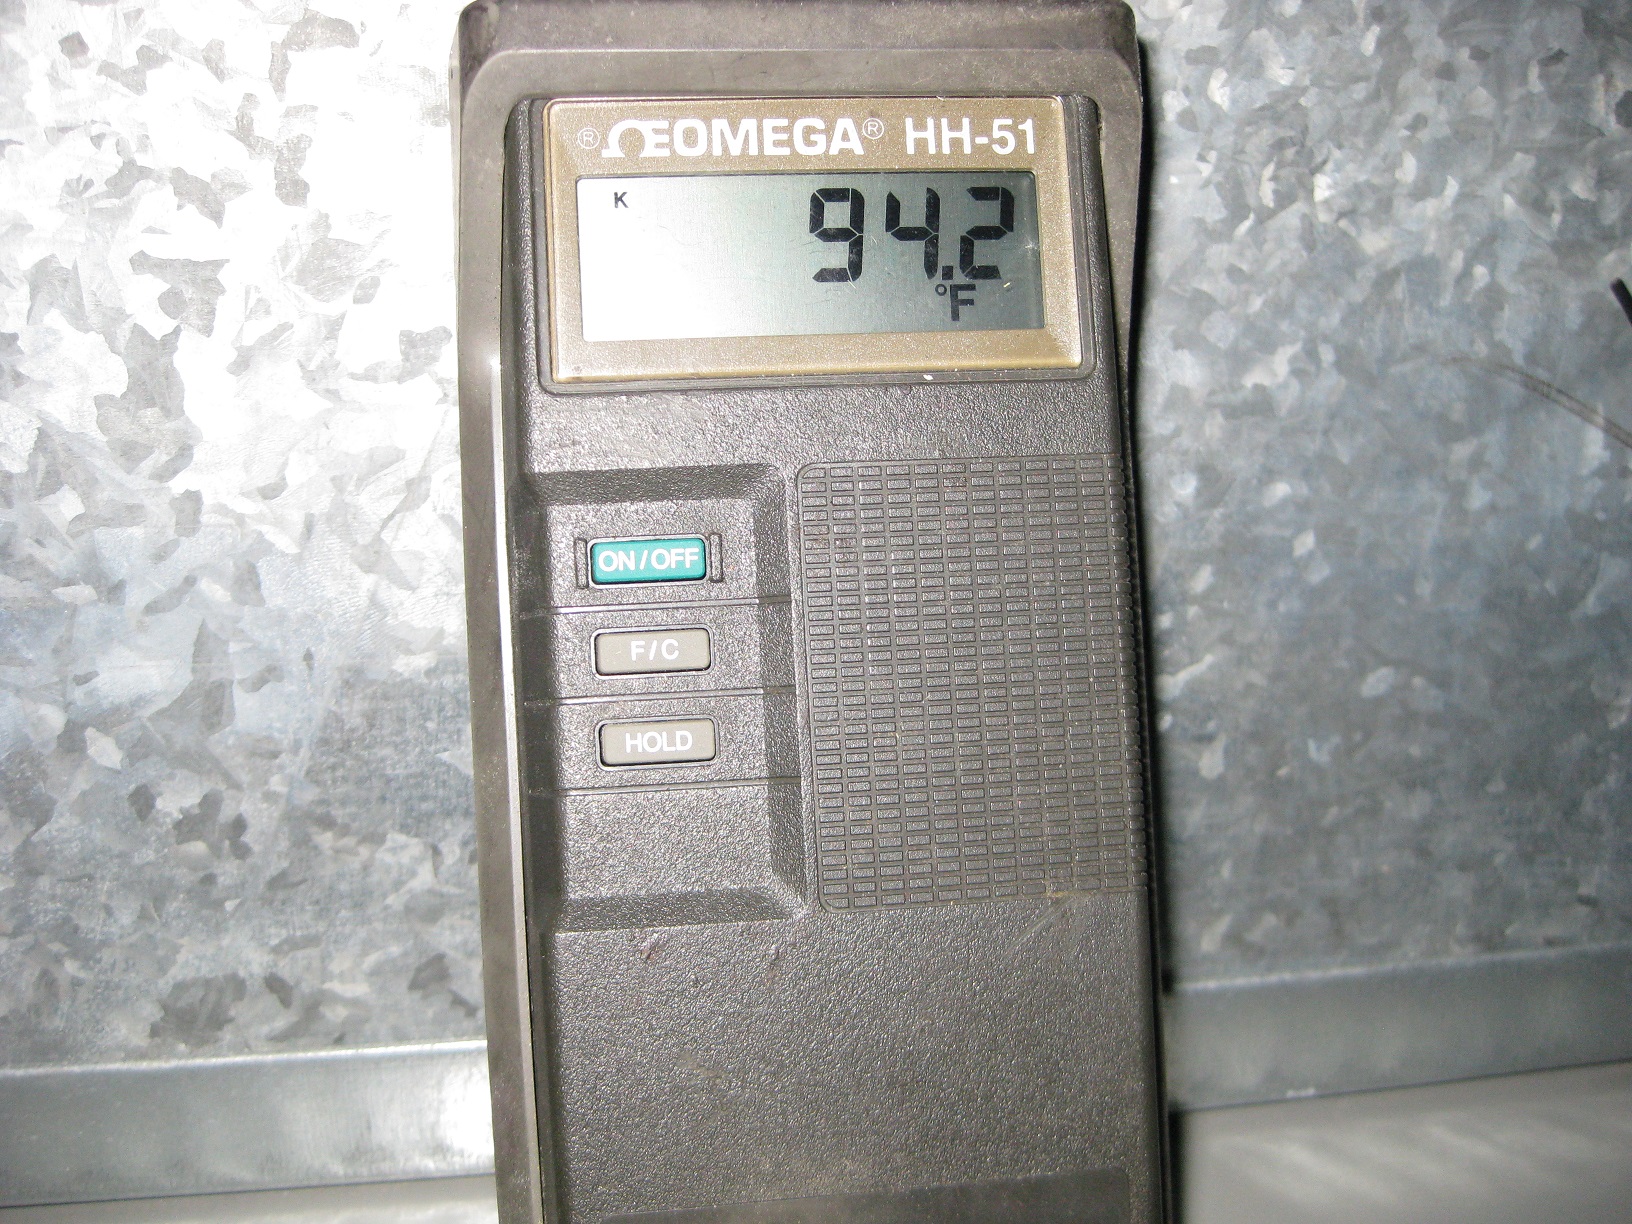
My heat pump outputs about 94°F air in the plenum with 68° air input. It’s in the high 80’s when it gets to the registers. My old fuel oil furnace for comparison was at 145°F at the registers. This means that the heat pump will run for hours during a cycle where the furnace only was on for 15 minute cycles. Sometimes the heat pumps runs all day continuously on cold days. This was really unnerving for me at first but I have grown used to it now. Heat pumps are at their highest efficiency when running for long periods. If it cycles fast like a gas furnace then you have an over sized heat pump for sure and you will spend more money on electricity.
My duct work was pretty adequate. I had to make a custom adapter to make it fit but I had my local hardware store fabricate that for me for $30. I did some duct work calculations based on my heat pump specs and I had to add one more return air duct and feed air duct. I ended up adding it to the basement. This was a huge improvement to the air quality in the basement. I no longer need a dehumidifier in the summer and the basement temp in the winter is now 68° instead of 61°. I spend more time down there which is great. There are tons of duct work calculators online and even a few YouTube videos. It’s not hard at all. I made a small manometer to measure static pressure in my duct work using a clear plastic hose and some water which worked perfect. Link for that HERE
I have had my heat pump for 4 years now (4 winters). I was really nervous the 1st year because I did not know what kind of electric bill I would be getting and if the unit would heat my house well in the winter. My old furnace was a fuel oil fired 100,000 BTU/hr furnace that consumed 750 gallons of fuel every winter. It worked well but cost me $1,700 a year to use it back in 2011. Today would be $2,250+.
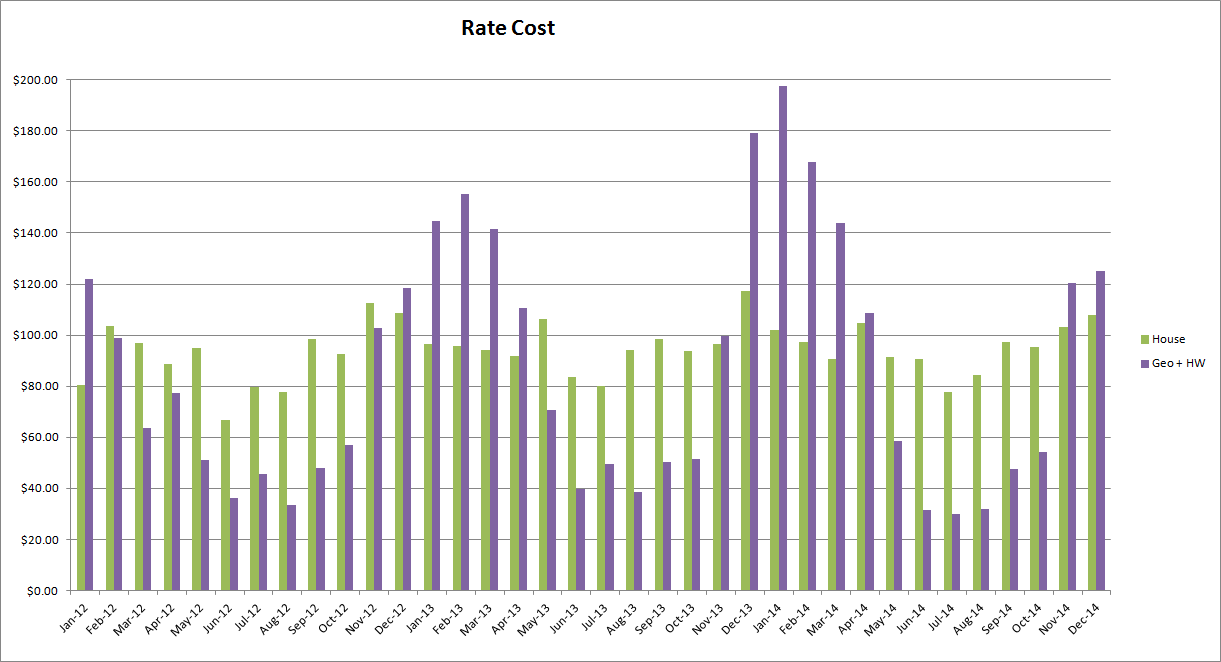
Above shows 3 years of my cost for the heat pump. My house averages $95 per month. The heat pump is combined with the water heater (also has the well pump too). I have at least 5 yrs of water heater data which costs me $30 a month average all year (summer & winter). Figuring out the heating and cooling portion is easy once you subtract the $30 a month hot water fee. Notice the summer cooling is around $10 a month or less even in August. Cooling is pretty cheap for me.
Heating is different. My most expensive heating bill was $198 – $30 for hot water = $168 for heat. 2014 was the coldest year I have experienced in the past 20 yrs so that was a good test for the heat pump. 2012 was a pretty warm winter.
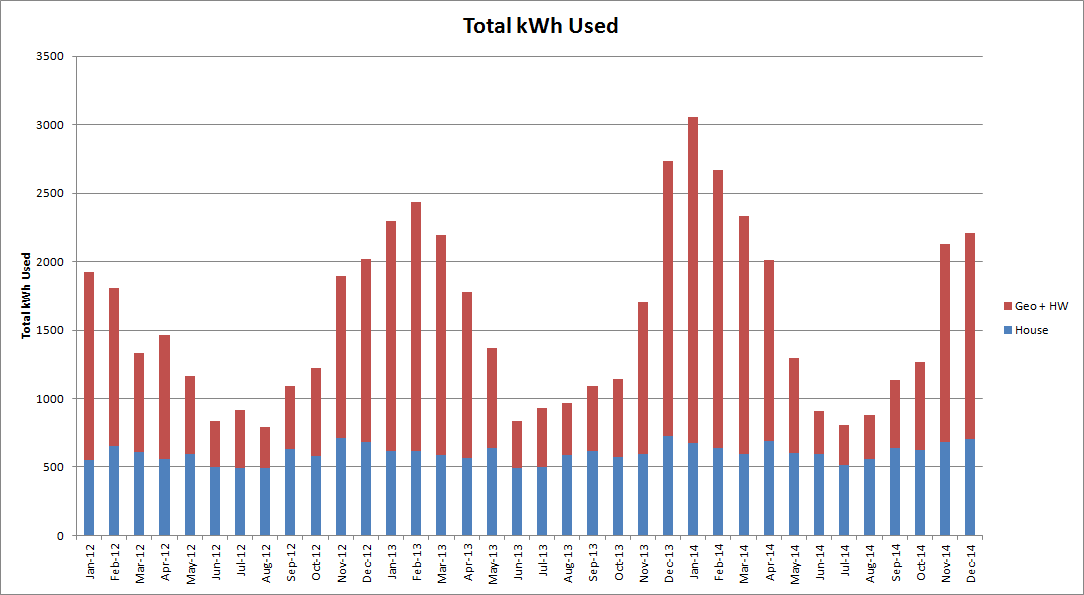
Here is the same chart that shows Kilowatt hour usage. The house is blue and the red is the heat pump (& well pump) and the water heater. I believe the average house is 600 kWh which is really stable. You can see again 2014 was really cold.
So far, I have been very impressed with the heat pump. Heating months for me are Oct – May. My average heating cost for those months is $700 total each year with the heat pump. That’s huge savings compared to the $1,700 I use to pay for the same months of heat.
Cost of the installation:
I have it broken down for everything that I bought (including the electrical upgrade to 400 Amp service). Sales tax is included in everything except for the heat pump equipment. I also got a 30% Federal Tax credit which was nice.
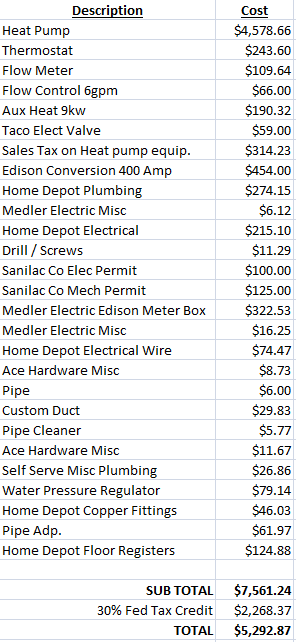
My cost was $5,292 in the end. I save $1,000 a year on fuel oil so this is a 5 year payback. Not bad. A ground loop install would have cost me another $4,000 for the coil loop and excavating dirt. I have access to a backhoe so that was not a real big issue other that a few $100 in fuel.
I highly recommend a heat pump. It really does work well.
FYI I did have two local professionals quote a similar installation. Both quotes were in the $17,000+ range. They only took about 10 min to quote which is strange since I spent a whole weekend calculating the heat load of my house. Not one of those guys did that for their heat pump sizing or even asked me what I currently spend on heating. Perhaps they do it so often they kind of know already? -not sure on that as I am no professional.
great weiting. thank you so so much.
so you installed heat pumps instead of a waterfurnace? What is your square footage?
And did you i stall a generator too?
Think you could have used 200 amps total had the town allowed it?
I am confused about the ground loop circulation pump. Is it running all the time? If not, how does it get the signal to turn on / off?
The ground loop pumps only run when the heat pump is on. The ground loop circulation pump is inside the heat pump itself so it just turns it on if there is a call for heat or cooling.
The cost savings and environmental benefits of geothermal energy are so appealing, and it’s great to know that with the right tools and knowledge, homeowners can take on such a project. Thanks for sharing these insights!