

Here is my MAME cabinet conversion made from a Neo-Geo MVS cabinet. MAME (Multiple Arcade Machine Emulator) is an excellent arcade emulator that will emulate the hardware of many arcade games perfectly. It will play almost all arcade games on a relatively low end PC. If you grew up in the 80’s like I did, you will remember the local arcades and all those quarters you lost in games like
Galaga. Well here is a chance to have all those games on one machine in your own home.
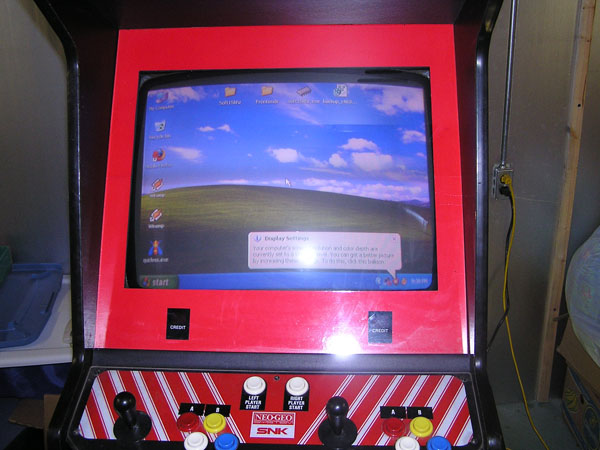
My cabinet is an old NEO-GEO MVS cabinet made by SNK that I paid $100 US for last month from a local arcade that was closing its doors. It was complete with a working 25″ monitor. It was important for me to buy a cabinet that had a working monitor because I wanted the “real” experience that is hard to obtain using a PC monitor. The control panel (where the buttons and joystick are) was not too important when selecting a cabinet because I was willing to add buttons and update it to the modern configuration. Check out Craigslist, Ebay, and your local arcades to find a cheap unwanted cabinet.
Make sure to check out the Build Your Own Arcade Controls Web site for excellent tips and help from the experts.
Videos of the cabinet are at the bottom.
CABINET

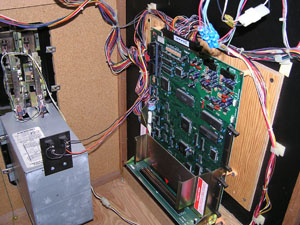
Here is the inside of the cabinet. You can see the monitor on the top, the original NEO GEO arcade board mounted on the side, and the power supply in on the bottom. I removed the power supply and the NEO GEO board since they will not be needed for the MAME conversion.

Here is the original control panel. It’s not too bad but it does need two additional buttons for each player. The extra buttons are needed to play any of the modern fighter games (Like Street Fighter or Killer Instinct).

I used a 1.125 inch diameter hole saw to cut the additional holes in the console. This NEO-GEO console is made steel plate and not MDF. I had to make sure the hole saw was a “bi-metal” type that is made for steel cutting. Cost: ~$9US

Drilling the hole can be tricky. If you are not perfectly parallel to the console surface, the hole saw will “bite” the Plexiglas too much and crack it like it did to me. I had to go slow and level and the rest of the holes turned out fine. One tip I was emailed about said to run the drill in reverse while cutting into plexiglass. Reverse will cut just fine and not grab and crack the plexiglass. Once through the plexyglass, switch the drill into forward mode to cut the steel plate. I have not tried this but I think its a great idea.

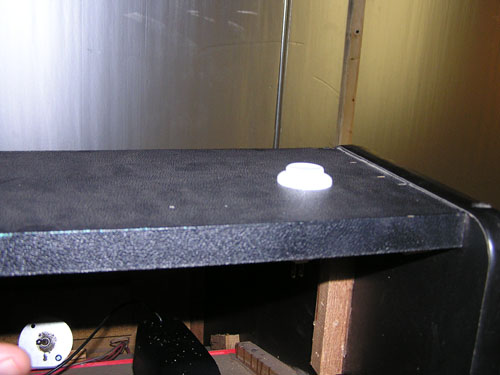
I ordered extra buttons from HAPP CONTROLS which arrived promptly. My finished buttons ended up with a slight slant configuration due to the original button layout. It looks good to me. Hooking up the buttons to the system is covered in the hardware section.

MONITOR

My monitor is a Wells Garner 25K7195 25″ CGA Monitor. These are neither a TV nor a PC Monitor. They require a 5 volt 15Khz signal and you can not just connect a PC to this monitor without some “help”. A PC will output 1 volt 30Khz and will destroy one of these arcade monitors in a very short time.
There are some options to get around this.
- You can buy a special arcade video card called ArcadeVGA from Andy Warne. This works perfect and is the plug-in and forget solution. Cost ~$90US
- You can use a modern video card and download Soft15Khz which will configure your drivers to output the special 15Khz signals. Not compatible with all video cards. Requires installation and possible tinkering. Works perfect when setup correctly. Cost: Free (again this is an excellent piece of software)
I went with my existing ATI X800XT video card and downloaded Soft15Khz for free. This ended up working perfect and was very easy to setup. Here is a excellent forum post on how to set up Soft15Khz to work with your video card. Soft15khz Wiki for additional info.
List of Compatable Video Cards with Soft15khz: Video Card List
HARDWARE
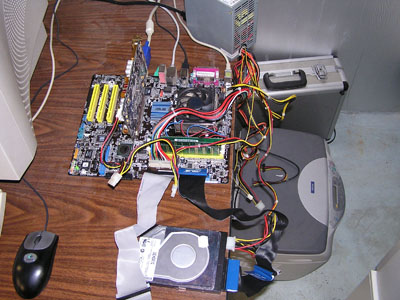

I had an ASUS motherboard laying around with a AMD 64bit 3000+ CPU and 1 gig of RAM. This is overkill for this project but that’s what I had available. A 20Gig Hard Drive and a ATI X800XT video card were in my junk box of CPU parts so I used those as well. Any PC at 1Ghz with 512Mb ram will run everything nicely. Any 2D video card will work. There is no need to buy a high end DX10 video card for this project. MAME does not access any of the 3D architecture in a video card.
Sound: I just used the onboard sound card. You can not power the cabinet speakers from the output on the sound card. I ordered a cheap set of Logitech S-220 2.1 Multimedia Speaker System from Newegg for about $22US. It came with two small speakers and a small sub woofer. I removed the cabinet speakers and replaced them with these. I used stick on Velcro to secure them to the cabinet wood. The sub woofer just sits in the bottom of the cabinet. They sound great and the bass will thump nicely during a Mortal Kombat 3 fight. I placed the volume control (came with the speakers) just inside the coin door so I can easily adjust the volume while playing.

General Layout of Hardware
Most of the hardware normally in an arcade cabinet uses the cabinets power supply for power but I removed that earlier. The Monitor does not use the power supply and was powered from normal 110v AC. You can see in the picture above right below the subwoofer is a isolation transformer for the monitor. The white and green wires are seen below that and are plugged into the power strip. This was the original plug for the cabinet but I shortened it so it would fit better inside. The PC and speakers also need a normal 110 Volt source but its very inconvenient to have 3 separate power cords to run the new cabinet. The solution is a cheap Wal-Mart power strip. I wired a toggle switch inline with the power strips cord and plugged the PC, speakers, and the original arcade power cord into the power strip. Now there is one cord to plug in and one power switch just like the real thing. Click here for a detailed photo of the power setup.
The next problem is connecting the control panel and the arcade monitor to the PC. The cabinet is wired with a JAMMA connector. JAMMA connectors are very common and are the standard for wiring a cabinet.
The solution is the J-PAC made by Ultimarc

The J-PAC is an excellent piece of hardware that will seamlessly connect a PC to a JAMMA wired cabinet. If your cabinet is not wired with the standard JAMMA, Ultimarc also sells the I-PAC which is almost identical except you run all your own wires straight to the connectors on the I-PAC. Both ship with all the cables, programs, and instructions.
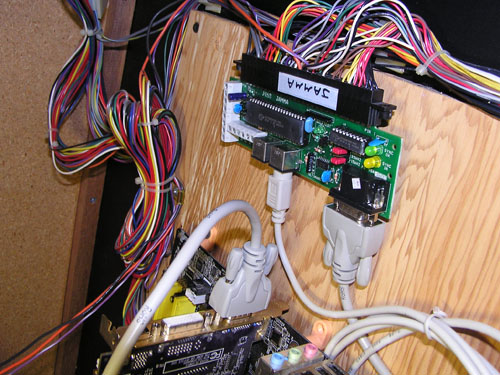
MAME uses the keyboard for all functions including joystick control and buttons. The J-PAC will emulate the PC keyboard and you can program it with this free program utility to use any keys you want. I found the default settings right out of the box to work perfect. The monitor will also connect right up to the J-PAC which will amplify the 1 volt PC video signal up to 5 volts for the arcade monitor. The J-PAC also will split any 30Khz signal from the PC into two 15Khz signals. This will allow you to see the boot up screen from the PC and will prevent any dangerous 30Khz signals from getting to the monitor.

I installed the PC right where the old NEO-GEO board was installed. The Hard drive is stuck to the cabinet wall with double sided tape. The cables are all connected accordingly and the J-PAC is connected per the instructions.
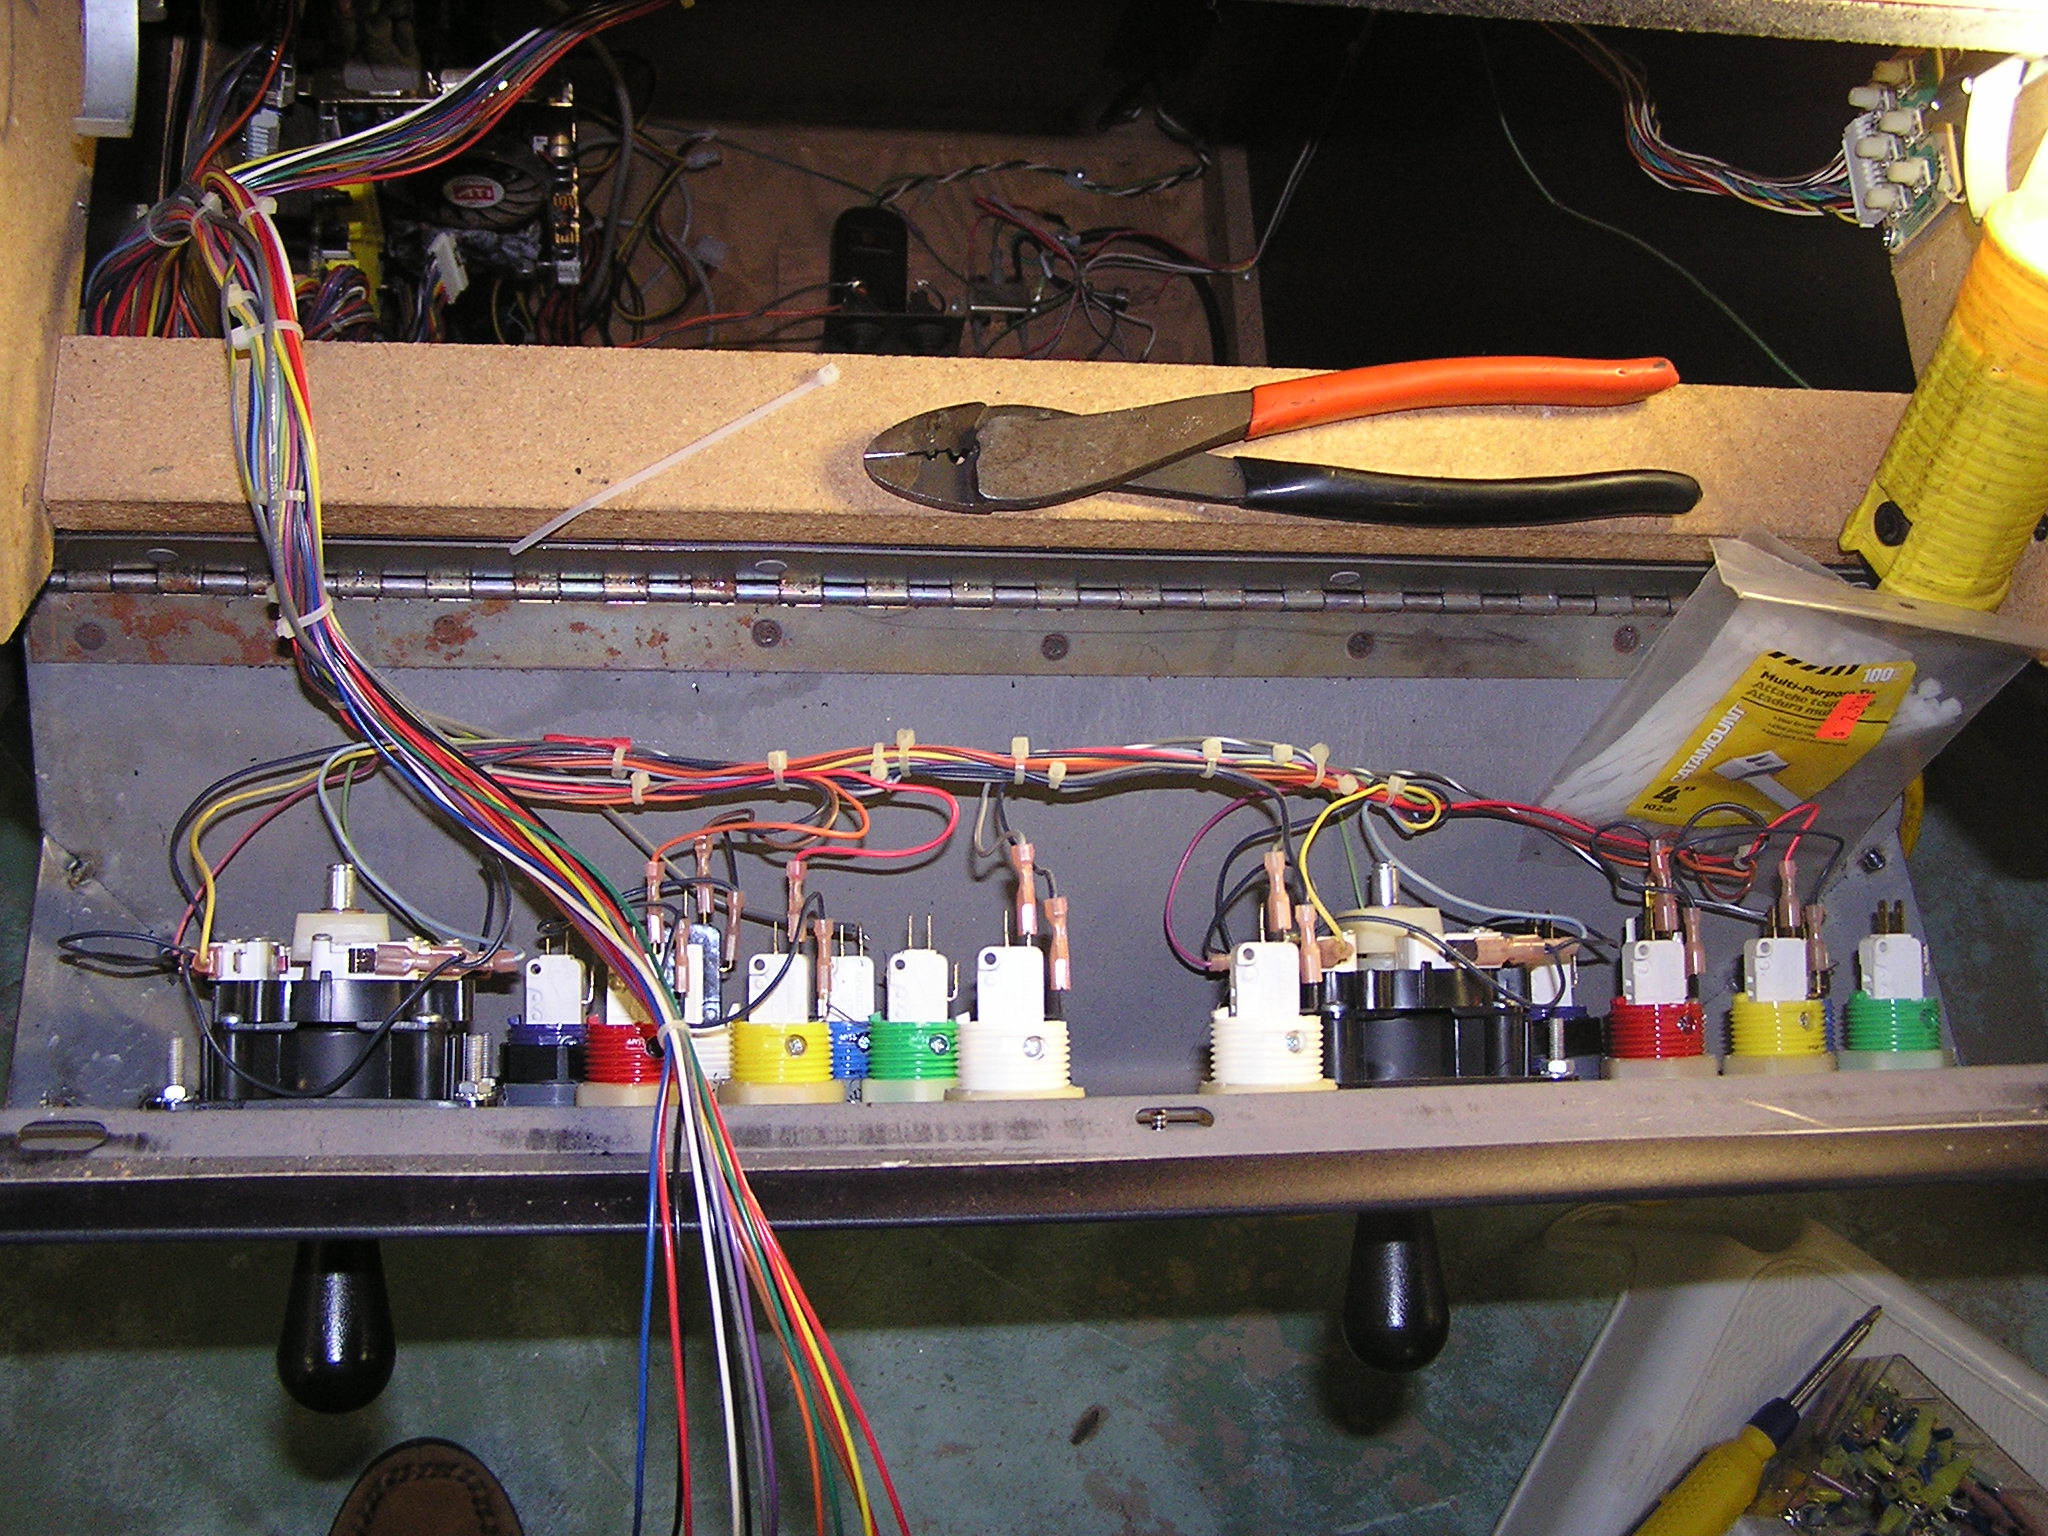
Most cabinets have a hinged control panel that allows easy access to the buttons wiring. I needed 5 extra wires for the buttons (I ran extra unused wires incase I want additional buttons later) . Each button needs a unique colored wire and a common black wire for ground. This diagram illustrates how to connect your extra buttons. The image is a I-PAC but the concept is identical with the J-PAC. For more information please visit the Arcade Controls Forum if you are still having trouble wiring your cabinet.

The last thing that needs to be done is to install a power button for the PC. Modern PC’s have a button on the front of their case to turn on. Simply supplying power is not enough to activate the PC. I used an extra HAPP pushbutton and installed it on the top of the cabinet as shown. I ran the wires down to the PC motherboard and connected it to the “POWER” button connection. The Motherboard instruction manual will note where this connection is.
I installed Windows XP on my cabinet PC. I installed all software on the PC before I mounted it into the cabinet because it was much easier this way. You may have to temporarily connect a mouse and keyboard to the cabinet until you get it setup the way you want it.
If you are familiar with Linux, there are many options to go this rout however Soft15Khz will not work with Linux and I did not want to buy the ArcadeVGA board at this time. I stuck with XP because its what I had available.
Software used:
Windows XP – for the Operating system.
MAME – Arcade Emulator (latest command line version)
MAMEwah – Front end for MAME. You need this to select the games and control the PC.
Soft15khz – Utility that forces your video card drivers to output 15Khz.
www.romnation.net – Get ROMS from here or search for Torrents.
MAME installs easily and you can go here if you need help installing it. MAMEwah was more of a pain to install and you can go here for installation instructions. Once you get it installed and working, you need to put a link to it into your Windows Startup folder. That way windows will boot right into MAMEwah without the need for a mouse or keyboard.

My Cabinet running the MAMEwah frontend. MAMEwah is completely controlled from the joystick and the buttons. There is no need for a mouse or keyboard. You can even shut down Windows or reboot the system from MAMEwah. It supports background MP3’s and has 1000’s of custom skins to make it suit your taste. I simply used the default skin (shown above).

Killer Instinct – Plays arcade perfect
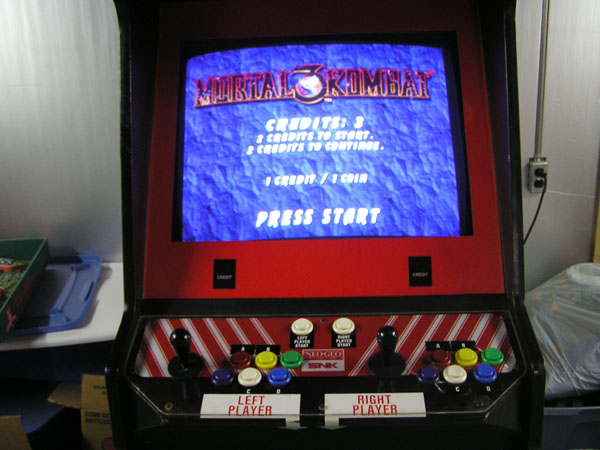
Mortal Kombat 3 also plays perfectly.
.
Galaga – One of my favorites
Video of the Cabinet in action. (Killer Instinct, Galaga, MK3, Shinobi)
Cabinet booting up. I also show Sonic The Hedgehog and Puzzle Fighter at the end.
hey, your post
Adore the modern appear. I enjoyed this great article. Thanks for the excellent work.
Thanks for the comments guys. I am liking the new blog software a lot. It’s so much easier to maintain than my old website.
I have a MVS cabinet and J-Pac that I just got Mame runnning on. I have a few questions: Does your “game select” button register with the J-Pac? Mine doesn’t. What buttons do you use for 1st player and 2nd player coin credit?
I might also suggest that you look in MicroXP for your OS. It is a modified version of XP that has all but the bare essentials removed, allowing XP to load up super fast.
sloth,
My game select does not work either. I just use the mameWAH menu. For the credits I just use the original coin mech switch. I just open the door and flick the same switch that the quarters hit on. 1st or 2nd player. I will check into MicroXP. Thanks for the tip!
I am about to try to convert my 4 slot Neo Geo to a Mame cabinet..
I am going to use this as the instructions…any tips???
What about ROMS? also is there a way to have both set up and be able to toggle between the 2 systems?
Not sure on dual setup. It gets complicated when you want two systems. I just downloaded all the ROMS off of a torrent site like Pirate bay.
Awesome, keep up the good work.
sometimes power strips can overheat specially if they are poorly designed;'”
I’ve got a Metal Slug X, Neo-Geo Cab that works – want to gut it and make a MAME Cab. Think I got everything understood accept not real sure how to dot he monitor. The one in my Cab works but theres so many wires coming off it, dont know whats what. maybe you can assist a brother in understanding this.
Send me a pic of your monitor and wires. I will try to help if I can.
I have the same exact setup and I am currently working on something very similar. Just curious what resolution(s) are you running your monitor at? And what are you using to configure it. Thanks!
Windows boots 640×480 and Mamewah also runs in that res. Once Mame loads a game, the game will run in its native resolution then switch back to 640×480 when you exit the game.
I use quickres to force windows into low resolutions. (http://www.dougknox.com/xp/utils/xp_quickres.htm). I also have to use the driver “soft15Khz” so the computer outputs the correct 15khz signal for the arcade monitor.
I just bought an original one and I can’t get it to come on or make noise before I left the store it came on but didn’t do anything but say game..and showed a a light picture. It didn’t make any sounds. But do you think something is loose wire or something I want it to remain original…. I in plug it at the store and it might have messed something up because I didn’t turn off first is there a reset button on it toake work and 4the sounds. It only has one game I believe and it is that slug one …I appreciate any thing you can tell me about it and how much its worth. Its. 1998.I think its cool though
your project is awesome!
for many years.. i wondered how arcade machine works with some modification like these..
howdy, just got an old arcade Neo Geo MAME machine, no hook ups to coin collector, can’t play without coins. not seeing any easy bypass out in the interwebs. thanks for any help.