
I currently have many tools in my shop. My favorite one is the CNC mill I built from an old 1954 Benchmaster mill. It’s heavy duty and very rigid. It works excellent and I run it with Mach3.

The mill is old and uses worn out ACME lead screws. This is not ideal for a CNC machine so I had to upgrade the lead screws to ball screws. I bought a length of 5/8 ball screw rod and two Thomson ball screws from Mcmaster Carr.

I had to make an aluminum adapter to attach the ball nut to the table. So far it works fine and aluminum seems to hold up well. The nuts did not fit well in this mill. I had to modify the mill table by machining off about 0.250 inch from the underside to allow for clearance for the nut.

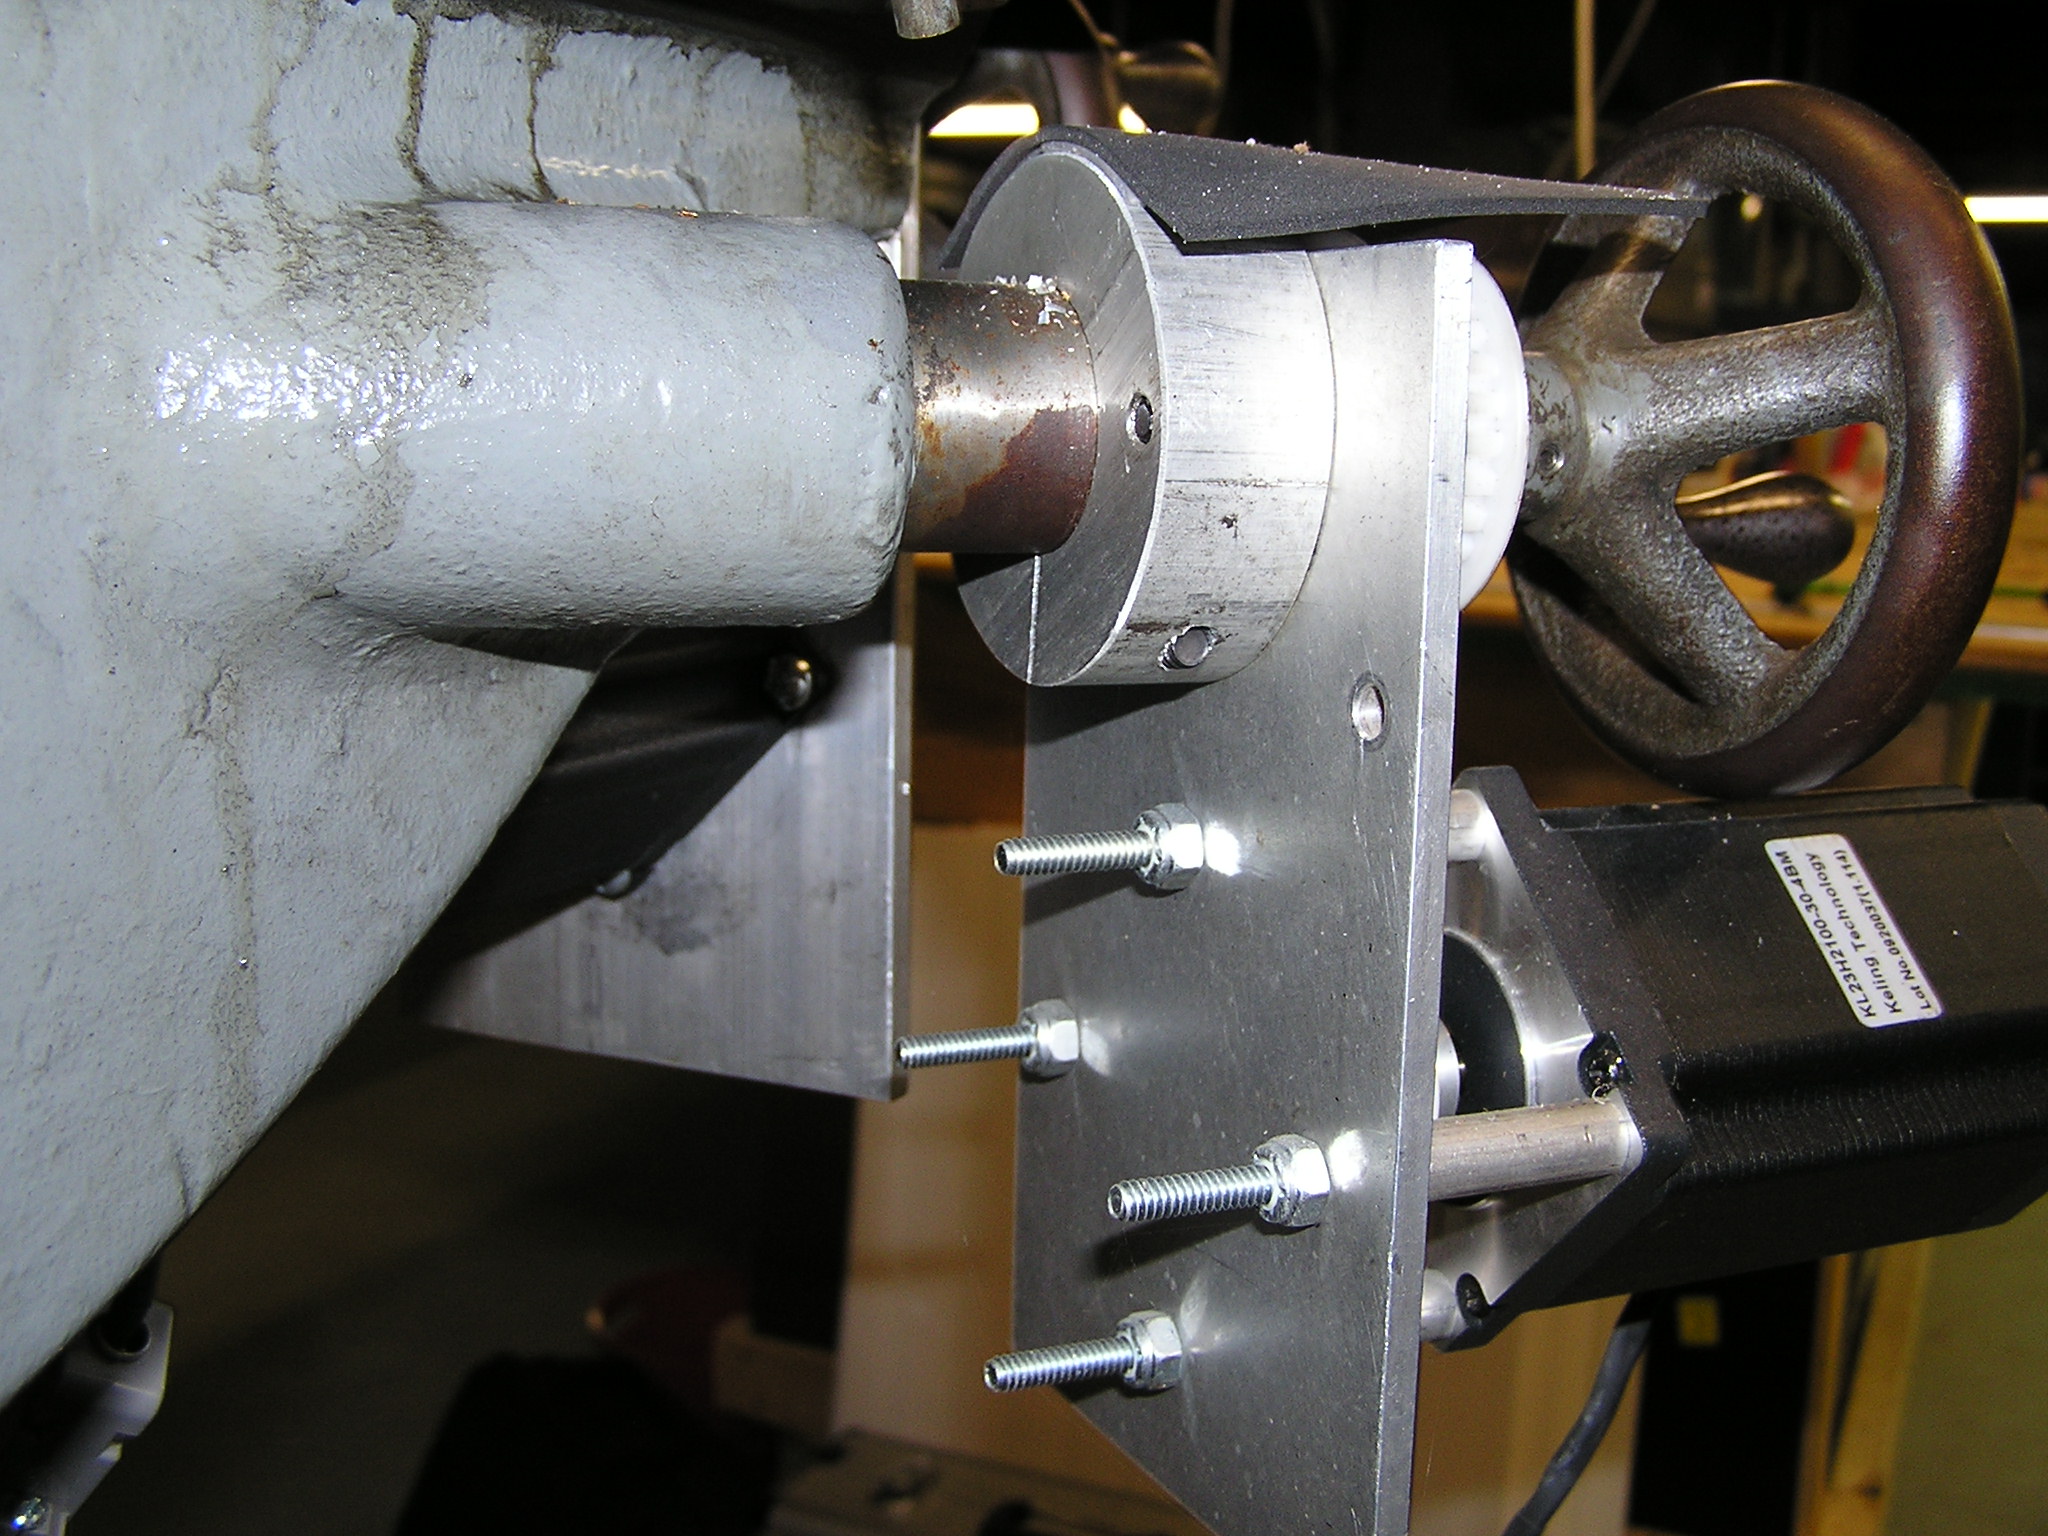
Connecting the ball screws to my existing handles and using my existing table bushing was important so I machined an adapter that is identical to the fitting on the end of my ACME lead screw. I used two set screws and clamped down on the ball screw. This was my cheap alternative to buying the very expensive ball nut mounts. So far I have had no problems with this setup and it has minimal backlash. Some day if I ever wear out the bushings I will just CNC a bearing block.


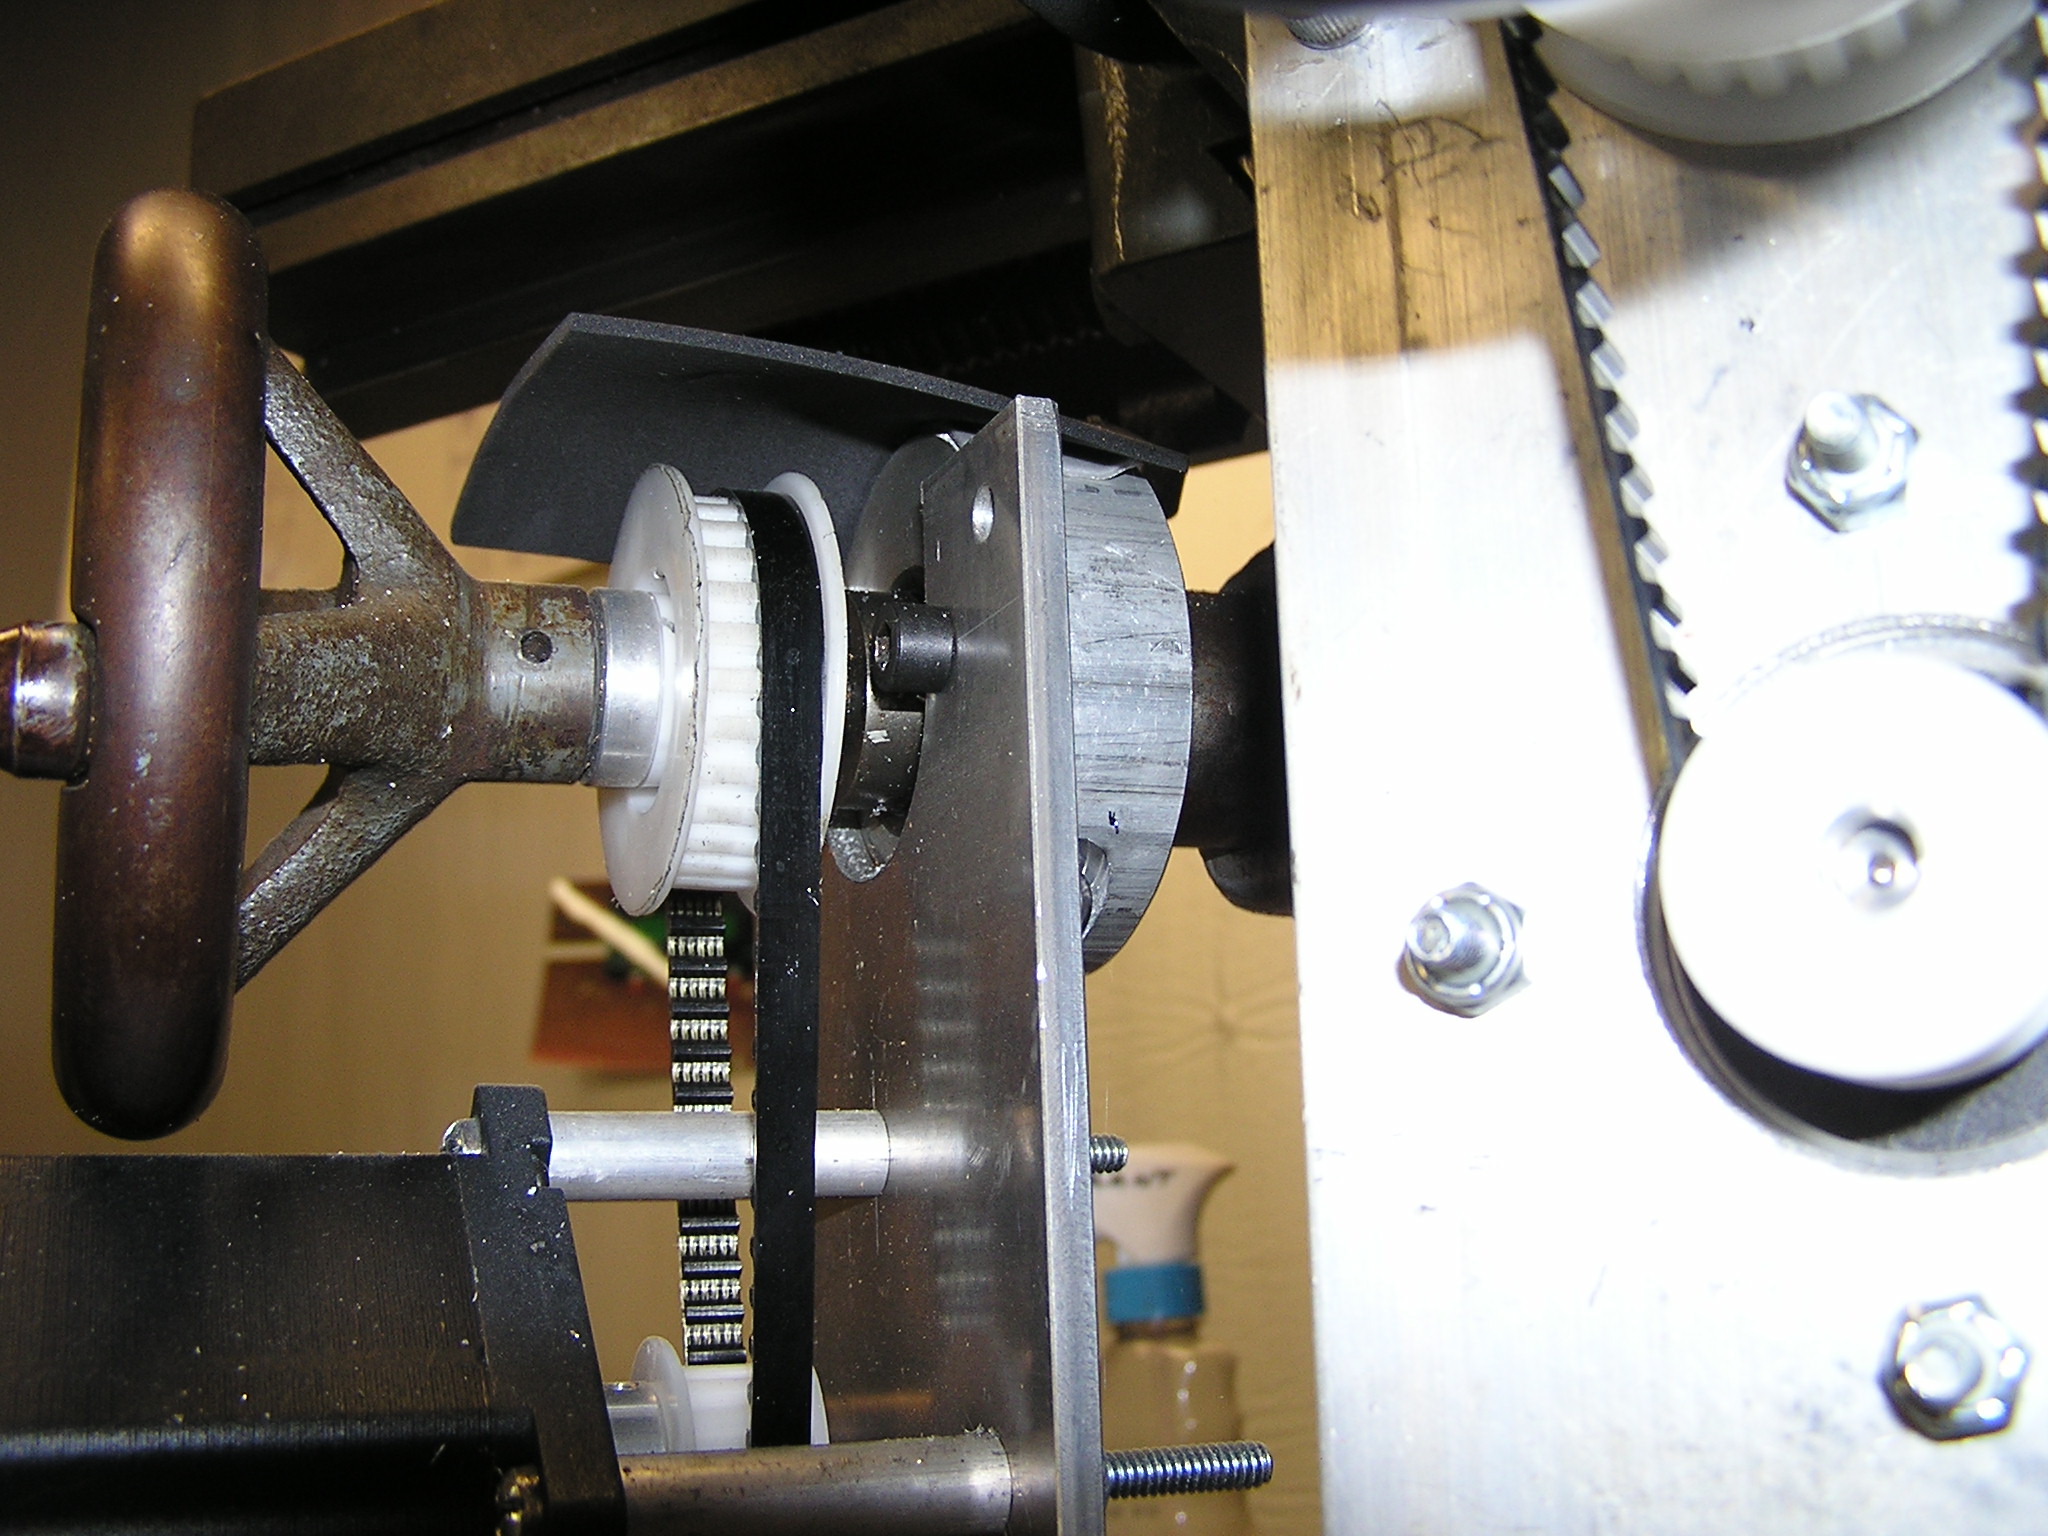
Now that the ball screws are all installed I had to buy some stepper motors. I bought 3 Keling stepper motors from Dan Mauch who owns Camtronics. He helped me pick the correct size steppers for my machine. Dan was a great help and gave me a lot of advise on my setup. The X & Y axis ended up with two 385 oz-in steppers with a 2:1 gear reduction and the Z axis has a 495 oz-in with a 2:1 gear reduction. They are plenty strong enough and I can get 50in/min rapids with ease on the x-y and about 20in/min on the Z. That’s fast enough for me. I also extended the shaft so I could attach my original handles. Now I can still use it as a manual mill just like before.
I had to make all the mounts and I bought the timing belt and pulleys from McMaster Carr. I decided to go with belts and not direct drive because belts are very forgiving on the install. Belts still work very well even if you make crooked mounts and your holes are not perfect. It also allowed me to use smaller (hence cheaper) stepper motors. There are lots of places online that sell motors.
Here are a couple pictures of the Z-Axis mount. There was no real place to drill hols so I made a clamp to clamp onto the Z-Axis shaft support. It works great.

Now that the mill is fully converted. I needed a way to control it. I ended up buying a Gecko G540 controller complete with box & 36v power supply.


The controller was complete with power supply, cooling fan, power switch, & motor disengage switch. It works perfect and was worth every penny.

I currently run a demo version of Mach3 to control the CNC. It is a really nice piece of software. I also tried EMC2 which runs on Linux and can be downloaded free at www.linuxcnc.org. EMC2 also is nice and does not have the 500 line limit that demo version of Mach3 has. I have not played with it too much but you can run it off a CD-ROM without installing Linux permanently. I plan on using it more this year.
Here is a video of it engraving.

Here is the finished engraving.
Here is the complete McMaster Carr parts list:
14 Tooth Acetal Pulley (3) 57105K14
28 Tooth Acetal Pulley (3) 57105K24
Urethane Timing belt (3) 1679K21
5/8 Ball Nut (2) obsolete – 5966K16 (New number – 3405N079)
5/8 Ball Screw (2 feet) obsolete – 5966K261 (New number – 3405N007)
The motor mounts are all homemade out of 1/4″ Aluminum Plate. I also did not use the expensive ball nut mounts. I used the standard bushings that were in the mill table and the standard anti backlash nut.
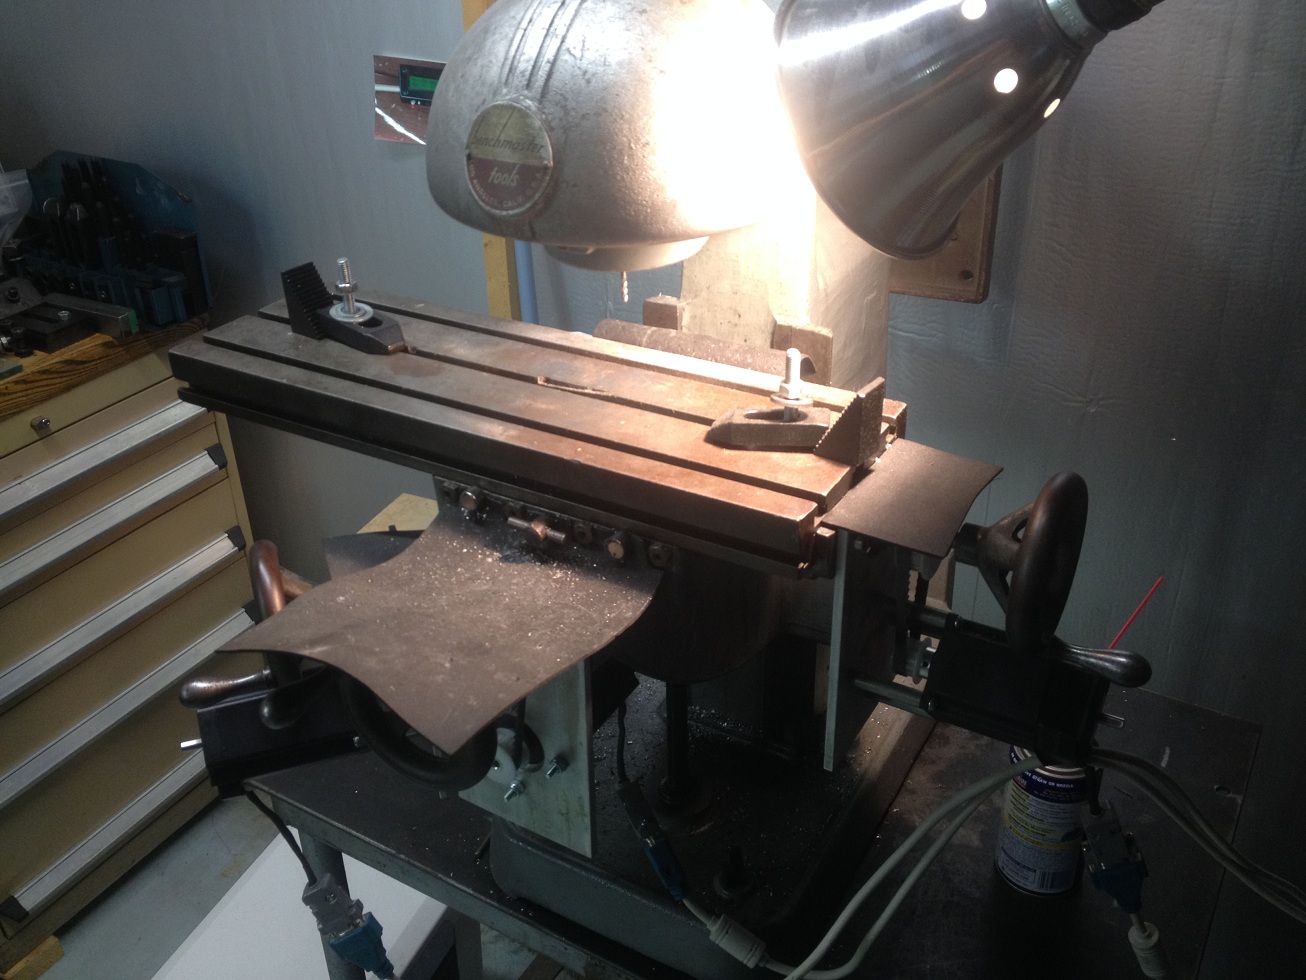
Here is an updated picture of my mill. I added a light and I covered the belts since I was getting chips in between the belt and pulley.
I have been asked what my travel is so I measured it. I have 4.1 inches “Y” travel, 12 inches “X” travel and about 6″ “Z” travel. I could get another 1/2 inch on the “Y” if I removed my rubber cover that keeps chips out of the ways. So far I have not needed it.
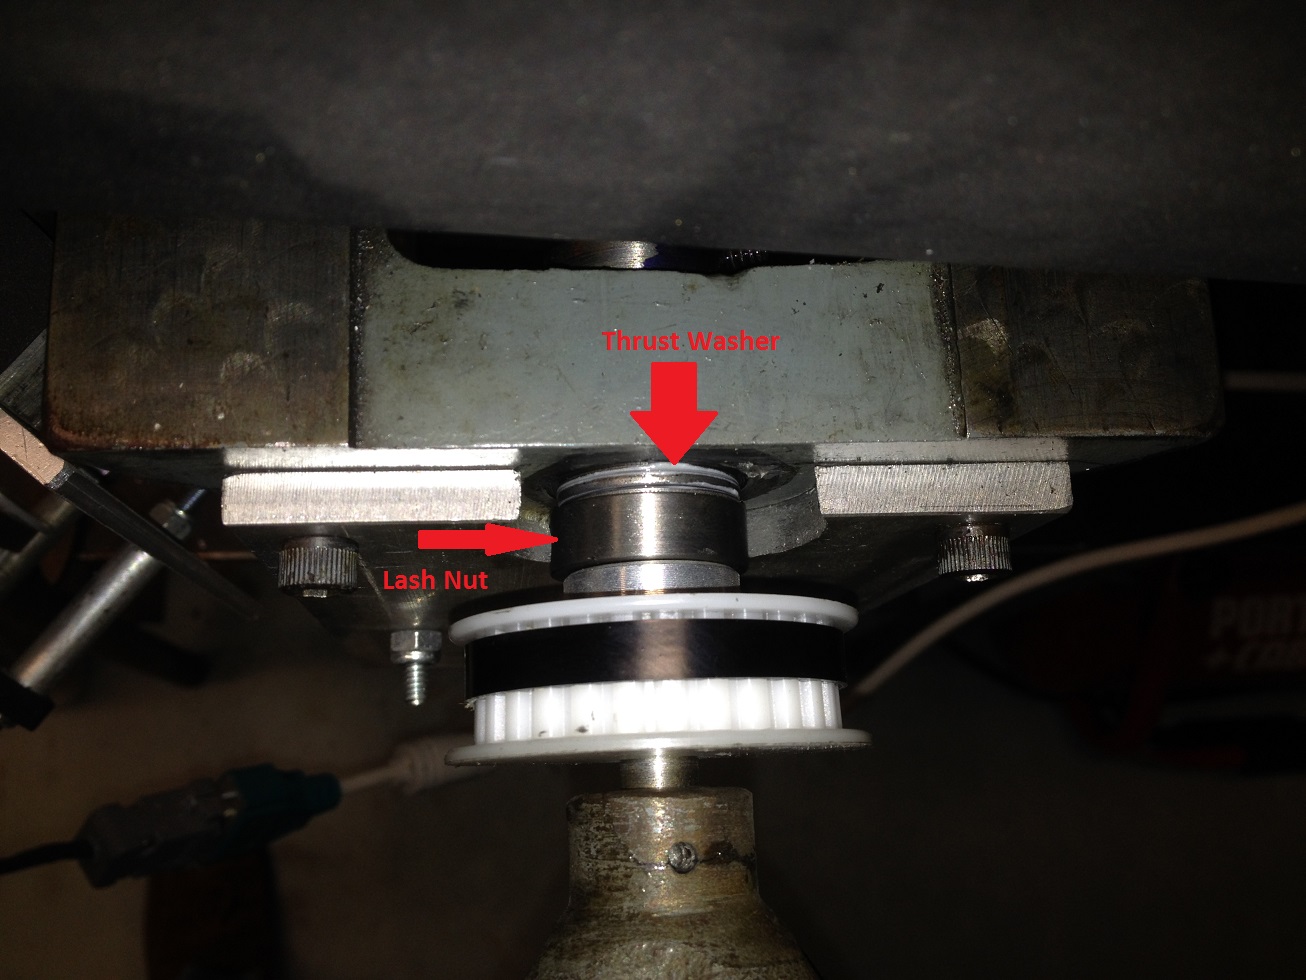
Update 02-14-14:
I added thrust washers between the lash nuts and the table which was an awesome upgrade recommended from someone reading my page. Thanks Blaine! My backlash on the X & Y is now 0.001 inch max. Make sure and pack them with some lithium grease or equivalent bearing grease.
McMaster part numbers:
5909K31
5909K44
5909K46
5909K33
These cover the X, Y, and Z axis. I did not install them on my Z axis since I have a very tight Z and did not need them.

Mike,
Great article. I recently picked up a Benchmaster with the intent to convert to CNC too. What P/N is that ballscrew that you got from McMaster?
-Jason
Here are the part numbers.
Ball lead screw (I bought 2 feet): 5966K26
Thomson Ball nut (bought two): 5966K16
The z axis is still using the original ACME screw. There is so much weight on the screw that there is less than 0.001 inch backlash. It works just fine. The ball screws reduced the backlash to about 0.0015-0.002 inch which is acceptable for what I do.
Ball lead screw 5966K26
and
Thomson Ball nut 5966K16
Have gone obsolete
Suggested new part numbers per McMaster Carr are
3405n079 for the nut
3405n163 for the screw
I updated the article with the new numbers. I suggest the 3405N007 5/8 screw. The one you listed has the machined end which I just did myself on the lathe and can save you $350. The machine end is 3405N063 I think you have a typo in your screw part number.
Could you list McMaster part #’s for 2:1 gears
and belts and wether or not a you used ball scew end mounting blocks at the motor/handle table side of the X & Y axis ?
I listed the complete parts list as requested. I did not use the expensive ball screw mounts. I updated the post with pictures of the adapter I made which just uses the existing table bushings & anti backlash nut.
I like your article. I am new to metal working and I just purchased a BenchMaster mill as my first piece of equipment. I will be taking machining classes to get better at metal working and like the idea of making this a project for the future. If you have any more specific info on this conversion please send me anything that you think will help me with this project. Great work!!!
Jesse
Awesome. I am looking at a BP Round Ram, and would like to do the same. Total cost of the servo’s and controller? I did tooling design for a year, so sourcing/designing/making the parts I need to upgrade/drive the mill are not an issue.
I’d love to chat, if you are willing, please email me at abbynrml94 AT yahoo dot com
I think I have about $650 into the controller & steppers. Each stepper is about $65 and the controller with the power supply & box was around $400. It’s a gecko 4 axis drive unit with a power supply and fan.
Very nice thanks for sharing this, I just got a benchmaster like yours and actually have a gecko540 system with the 385oz steppers, I guess I might have to get a larger one for the Z or slave 2 of the 4 385oz I have on hand. I think for around $150 more investment this is a nice upgrade for the little mill.
Thanks again for posting this.
Nick
What is the end mill holder that is in this machine I love my Benchmaster but having a hard time finding a end mill holder with the correct taper and threads
did you cut the ends off the lead screws and adapt them to the new ball screws to use the factory handels.
Nope. I made brand new ends for the lead screws. I still have the original ACME lead screws just in case I want to go back.
I bought my end mill holders from http://www.littlemachineshop.com. They are morse taper #2. I also bought a set of collets from there too. I can hold anything I need now.
Very nice I am glad I ran accross your site. I have a benchmaster and had been wanting to do the same thing. Seeing yours has me motivated.
Hi,
So it looks like everything is off the shelf except for the “aluminum adapter to attach the ball nut”. Do you have the drawings for this or know anyone that sells them?
Thanks! And nice write up.
I think I have the drawings for them. I just made them myself to fit my mill.
Very nice work here!! A few questions…1)What is the accuracy of your set-up & doesn’t the 2:1 red actually half the error?? 2)I can’t(from the pic) see how the ballnut is attached to your adapter?? 3)What is the travel (X & Y) with your set-up?? Thanks so much for the post!!
Mike,
Nice work and thank you for sharing. I am working on a similar conversion and had a couple of questions about yours. How are the delrin pulleys holding up? Do you get chips in between the belts and the pulleys? Do you have enough space between the handwheels and the steppers for comfortable operation? Are you running any limit or home switches? Any advice on anything you would do differently? Thanks in advance for any help you can provide!
Thanks,
Blaine
The pulleys are holding up very well. Yes I was getting chips in between the pulleys and the belt so I covered them with some thin rubber sheeting I got from work (I added a picture). I also covered the ways as well. I have no limit switches yet so I do pay close attention to my travel. So far I have not had any trouble. I do have plenty of room to use the handles but I have noticed that since I converted to the ball screws, hand control is not very easy anymore. I only use the handles for centering and alignment. CNC the rest.
As a former Machine Tool Builder I can tell you that ballscrew backlash can easily be made .000. All it takes is better quality thrust bearings (We used Nadella ARNB Combination bearings) and preloaded them until the set has 15 lbs/in rolling (not breakaway) torque. The secret to not eating preloaded bearings was all the the lubrication. Mobil Oil custom formulated a synthetic grease for us that came out so well that the Navy and Air Force spec’ed it for use on Jet Fighter Wheel bearings. They named it Mobil 28 and it can be purchased over the counter if you look for it. If you have any questions please feel free to email me for answers.
Jim
Sir! This was way cool! I should have looked into one of these little guys sooner! I’ve wanted a little CNC mill and now think it’s in my price range. Thank you for showing us how you did it!
I think this is great. I read it pretty much thru and thru but I didn’t see anything about the software you’re using to run the mill. Do you do your own programming or maybe you could explain how that works. Every place I’ve ever worked we had our own in house programmer who took the prints and created the programs. We knew enough to tweak ’em to speed it up in places but that was about all the editing we did on the floor (would have gotten fired if they caught us). Where would someone start if they needed to take up programming to write their own programs? Thanks!
I did not discuss the software too much because there are so many options available. I use Mach3 to control the mill and the G-code is either hand written for simple stuff or I have used both PyCAM and MasterCAM. I use old AutoCAD R14 for all my 2D drawings and Solidworks for anything 3D (like my clock drawings). DraftSight is also a very good AutoCAD R14 clone and its free. I still like AutoCAD better but Draftsight is very usable.
Can you make me copy of the part on your BenchMaster mill. that clamps on the 3 in shaft that the motor bracket attaches too. I lost mine in a move. I would sure like to get my mill running again.
my friend required DD 1750 several days ago and was informed about a great service with an online forms library . If people are interested in DD 1750 also , here’s a
http://goo.gl/o2hVPzHi, I think your site might be having browser
compatibility issues. When I look at your website in Safari, it looks fine but when opening in Internet
Explorer, it has some overlapping. I just wanted to give
you a quick heads up! Other then that, great blog!
My father owned Benchmaster from 1942 till 1977. I remember learning to assemble those mills & punch presses. It is amazing to see one converted to CNC. I was thinking about finding an old one and converting it to CNC instead of buying a new CNC mill. Thanks for bringing back many fond memories. I can tell you some interesting privately if you are interested.
Respectfully,
I’d like to hear more